Sicily and Stuffed Sardines
A few years ago I visited a tiny Sicilian island. It was so small that I either walked, rode my bike or swam to get around. But most of the time I did nothing, just laid on the rocks at the beach or in the garden, staring into the sky, amazed by how beautiful the world is. I only used a car when I arrived to get to the little farm where I stayed, a sturdy stone building tucked in between fig trees, hibiscus and oleander; and to go back to the harbor at the end of the trip, speechless and sad to leave this little piece of heaven.
In the past couple months I've been thinking a lot about this tiny island in the Mediterranean, dreaming of a place that feels safe and makes me happy. The house was part of an organic farm and I could pick all the fruit and veg right from the fields. The juiciest tomatoes, sweet bell peppers, soft figs, zucchini, eggplant ... As soon as I fell out of bed I'd walk - still in my pyjamas - through the field to pick zucchini flowers and fry them for breakfast. The farm's olive oil and wine I basically enjoyed from tap and although there wasn't really the need to, I also visited the island's fantastic restaurants and bars almost daily. If I had to eat Sicilian food for the rest of my life I'd live a happy life.
Dinners were spectacular: the freshest grilled fish and sun showered vegetables, raw prawn carpaccio, lobster, pasta, risotto and nana's almond cake - and bay leaf schnaps for dessert. Unforgettable, there's no doubt. The little luncheons at the piazza, at a rustic bar where mamma herself cooked all morning and laid out her delicious work on the counter by noon, was the food that melted my heart. Casseroles, lasagna, tarts, focaccia and stuffed vegetables, fish and saltimbocca, framed by hearty salads made with legumes. I went there almost every day, pretending to go just for an espresso before snorkeling but always ordered more plates than could fit on the round bistro table. The table was strategically placed in the shade of a large tree, close enough to mamma's kitchen to order more food but still in the middle of the airy piazza to follow the village's late morning life. This is the Mediterranean (to me).

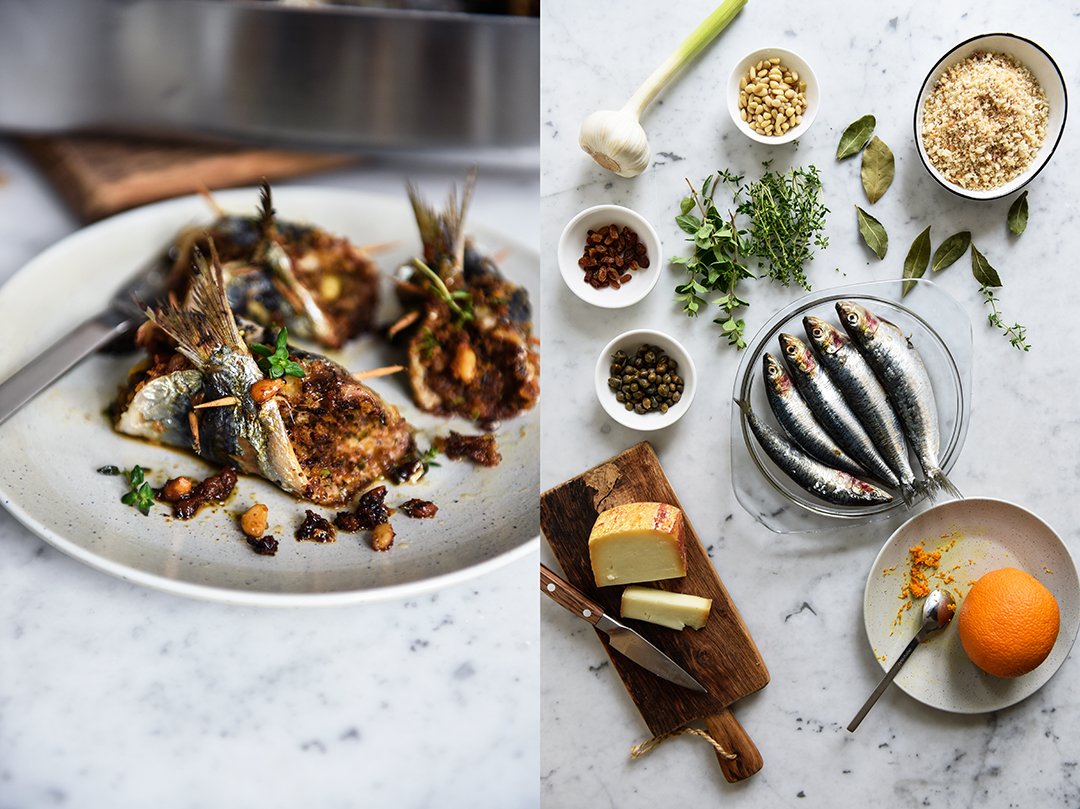
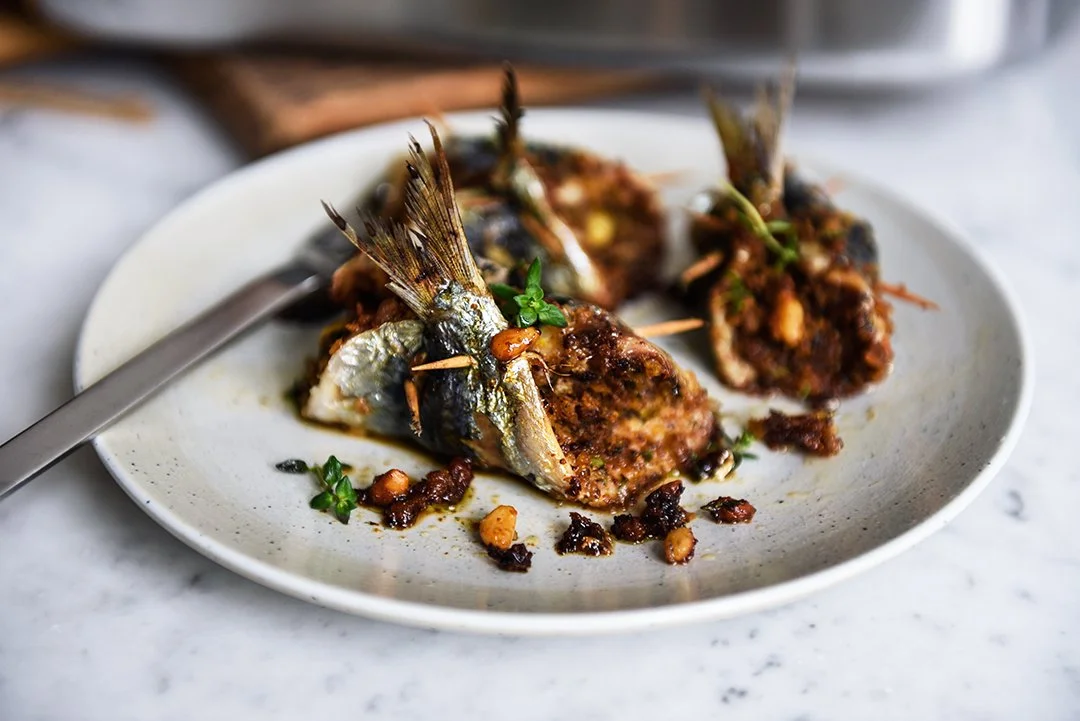
So at this unimposing cozy bar, I enjoyed my first Sicilian stuffed sardines. The fish filets were wrapped around a filling made of breadcrumbs, orange zest, crumbled bay leaves, pine nuts, raisins, capers, fresh oregano and thyme. The whole bold and colorful culinary orchestra that Sicily's cuisine is famous for in one single bite. Don't ask why but it took me two years to recreate this recipe in my own kitchen. Last Saturday I was in the mood for a Sicilian lunch, so I drove to the fishmonger. The recipe worked out perfectly - I only should have bought more fish. It was a little feast for two. Five stuffed sardines were just enough for a lunch nibble, for a main I'd go for ten sardines for two (recipe below).
Anyway, get your loved ones to your kitchen, cool your favorite white wine, start the oven, pull out the dusty Adriano Celentano records and pretend you're in Sicily!

Sicilian Stuffed Sardines
Serves 2 as a main or 3-4 as a starter
You can enjoy stuffed sardines warm from the oven or at room temperature
10 whole sardines, gutted and cleaned (about 800g / 1 3/4 pounds)
2 tablespoons raisins
Olive oil
85g / 3 ounces breadcrumbs
2 tablespoons pine nuts
2 tablespoons finely grated pecorino
2 cloves garlic, crushed
2 tablespoons chopped fresh thyme leaves
2 1/2 teaspoons chopped fresh oregano or marjoram leaves
2 teaspoons freshly grated orange zest
2 tablespoons freshly squeezed orange juice
6 small (or 3 large) bay leaves, finely crumbled (or ground with a mortar and pestle)
2 teaspoons capers, chopped
1/2 teaspoon fine sea salt
Ground pepper
20 wooden tooth picks
Preheat the oven to 200°C / 400°F. Grease a medium baking dish with olive oil.
Cut off and discard the heads of the sardines. To butterfly the sardines, spread and lay them cut-side (belly-side) down on a cutting board and, using your hand, push the back down gently (see 2nd picture from the top, right). Flip the sardines, gently pull out the backbone and cut the bone at the tail but don't remove the tail; discard the backbone. Spread the sardines skin-side down on the cutting board.
In a small bowl, soak the raisins in hot water for about 5 minutes then drain.
In a medium, heavy pan, heat a splash of olive oil over medium-high heat and roast the breadcrumbs, stirring, for about 2 minutes or until golden and crispy. Push the breadcrumbs to the sides, add the pine nuts and roast, stirring, for 1 minute. Transfer the breadcrumbs and pine nuts to a medium bowl and add the raisins, pecorino, garlic, thyme, oregano, orange zest, orange juice, bay leaves, capers, 2 tablespoons of olive oil and the salt and season to taste with pepper. Mix well with your hands, rubbing the mixture between your fingers.
Season the sardines with a little salt and pepper. Divide the filling among the sardines, pushing the filling down gently with the back side of a tablespoon. Gently roll up the sardines towards the tail and fix the roll with 2 tooth picks (see pictures below). Arrange the sardines, side by side and tail up, in the prepared baking dish, drizzle with a little olive oil, sprinkle with the remaining filling in case any is left, then season with a little salt and pepper and bake for 20 minutes. Let the sardines cool for a few minutes and enjoy warm or wait a little longer and serve at room temperature. Enjoy with good bread (drizzled with good olive oil), a simple green salad and a glass of white wine.


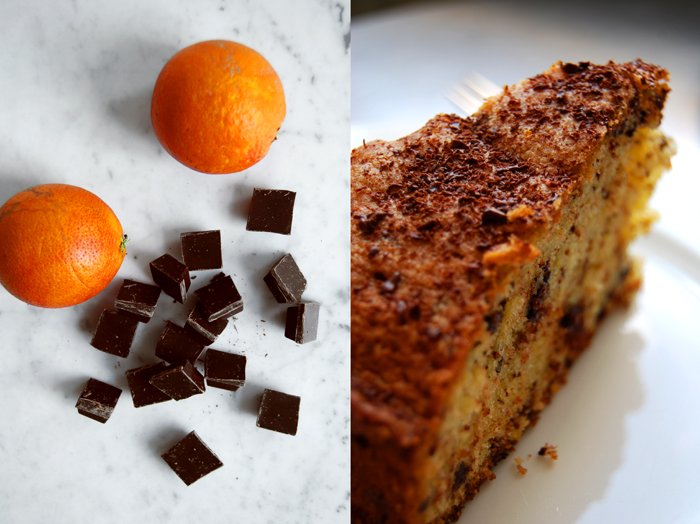
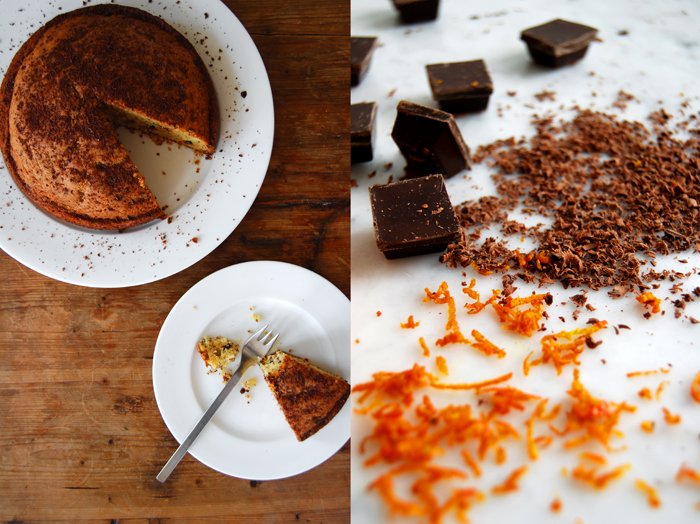
Chocolate, Orange and Cardamom Stollen
My granny Lisa was loved and adored for many of her baked goods. She truly mastered the German Sunday coffee table, filling the house with the sweetest smell of butter, sugar, and eggs every weekend. To please her six children's cravings, and later a growing pack of grandchildren, she sometimes baked seven different cakes in one day. Sponge and fruit cakes, cream tarts and crumbles were often lined up on her kitchen counter and doubtlessly influenced my own baking habits. Her Donauwelle - a marbled cake with cherries and buttercream - will always be my favourite. It's the taste of my childhood - and the beginning of my ever hungry sweet tooth.
Six to eight weeks before Christmas, Lisa used to take orders from friends and family for another one of her celebrated classics: stollen. It's a German staple that you can find at every bakery, in every household as soon as the Christmas lights leave the boxes to twinkle behind wintery windows. The original stollen is quite a dense treat, it's a heavy yeast dough, the texture is crumbly like a fruit bread, but it has richness and depth. Raisins, candied orange and lemon peel infuse the cake for weeks while it sits wrapped in parchment paper in the darkness of the pantry. The top brushed with warm fat and then generously dusted with icing sugar, preventing it from drying out and giving it its snowy white Christmas look.
You can find various interpretations of the basic formula and fill the cake with marzipan, hazelnut or poppy seed paste to add taste and moistness. This is the first stollen recipe I ever created and I wanted it to be an aromatic firework of flavours without distracting from the classic's qualities. I went for bittersweet chocolate chunks, candied orange peel, and a touch of christmassy cardamom and aniseed. I'm more impatient than my granny, so we ate the stollen immediately. There's only one treat that I manage to wait for and that's English Christmas pudding.
Thanks to Kærgården for sponsoring this post, thanks for reminding me of my granny's kitchen and inspiring me to create my first stollen recipe!


Chocolate, Orange and Cardamom Stollen
For the stollen
plain flour 450g / 3 1/2 cups (divided)
granulated sugar 70g / 1/3 cup
ground cardamom 5 teaspoons
aniseed, finely ground in a mortar, 1/4 teaspoon
zest of 1 large orange
fast-acting yeast 2 sachets (7g / 1/4 ounce each)
water, lukewarm, 150ml / 2/3 cup
fine sea salt 1/8 teaspoon
soft butter, unsalted, 250g / 9 ounces
candied orange peel (preferably organic) 100g / 4 ounces
almonds, roughly chopped, 150g / 5 ounces
bittersweet chocolate (50%), roughly chopped, 170g / 6 ounces
For the topping
butter, unsalted, melted 50g / 2 ounces
icing sugar, sifted, about 4-6 tablespoons (to taste)
ground cardamom (optional, to taste)
In the large bowl of a stand mixer, combine 260g /2 cups of the flour, the sugar, cardamom, aniseed, orange zest, and yeast. Add the water and, using the hooks, mix for about 2-3 minutes or until well combined. If the dough is too sticky, add a little more flour. Cover the bowl with a tea towel and let the dough rise in a warm place, or preferably in a 35°C (100°F) warm oven, for 45 minutes or until almost doubled in size.
If the dough has almost doubled in size, add the remaining 190g / 1 1/2 cups of flour, the salt, butter, and orange peel and, using the hooks of the stand mixer, mix for about 3 minutes until smooth. Add the almonds and chocolate and continue mixing until well combined. The dough should be soft and shiny, but not sticky. Take the dough out of the bowl and, using your hands, knead for about 1 minute.
Line a baking sheet with parchment paper.
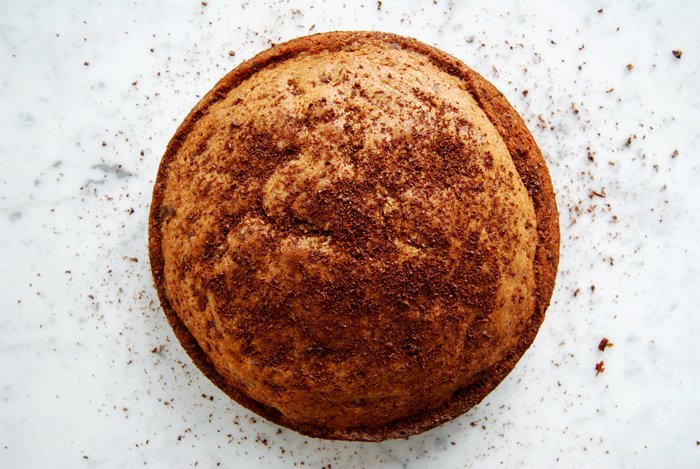
Transfer the dough to the lined baking sheet and form a short-ish loaf-shape. Flatten the dough a little, flip one long side over until it reaches the middle, then flip over the other long side (see 6th picture), pushing the layers softly together, but don't flatten the loaf, it will expand when it's in the oven! Cover with a tea towel and let rise for about 20 minutes.
Preheat the oven to 175°C / 350°F.
Bake the stollen for about 45-50 minutes or until the loaf is just baked through.
For the topping, brush the top of the warm stollen with the melted butter and dust immediately with icing sugar. If you'd prefer the cardamom to be more present (I recommend to try the stollen first), combine some icing sugar with additional cardamom (to taste) and dust the top of the stollen.
You can serve the stollen immediately, yet I prefer to eat it when it's cool and the chocolate isn't soft anymore. Keep it wrapped in parchment paper and aluminium foil.


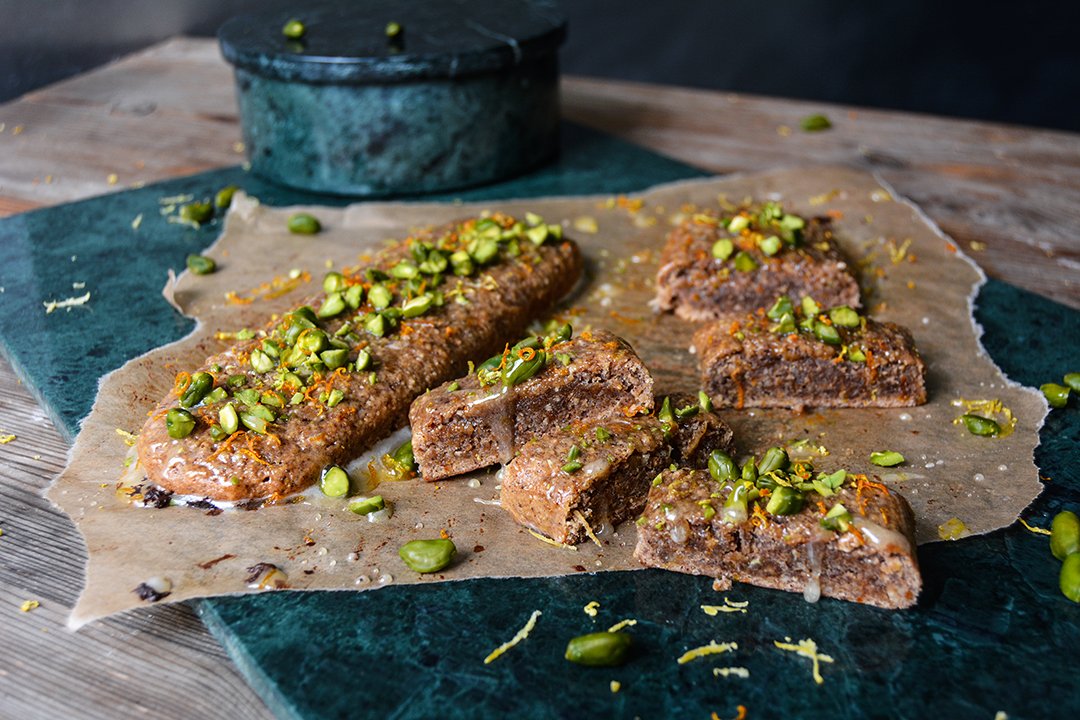
Kwareżimal - Maltese Easter Sweets without Eggs and Butter
No eggs and no butter, but lots of spice and flavour and a soft and chewy texture. Maltese Kwareżimal are an almost guilt-free pleasure that tastes so good, that I ask myself why I didn't bake them earlier.
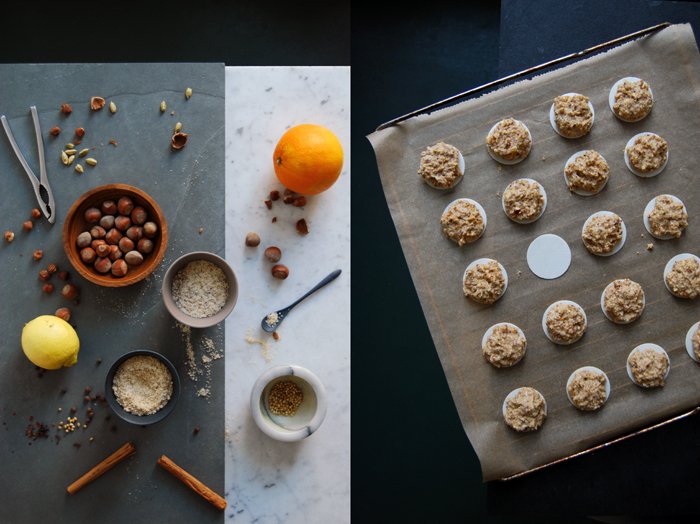
This ancient treat dates back to the medieval times, when the Knights in the Mediterranean traditionally baked Kwareżimal during Lent. The little dark brown loaves are made without dairy products, just ground almonds (or hazelnuts in my recipe), spices, and honey create a beautifully fragrant cakey sweet. Sugar was allowed, as it was seen as a spice in those days. It's not a healthy bar after all.
The name derives from the Latin word quaresima, the 40 days of the Lenten season. Although you can find Kwareżimal in some confectionaries on the Maltese islands throughout the whole year, my favourite bakery for sweet treats, Busy Bee, only pulls them out of the oven as Easter is nearing. The problem was that I have never been to Malta around this time, so I had no idea how good Kwareżimal tastes. I knew that I wanted to try them at Busy Bee first and thanks to Jessica and Luke this day has finally come. Our friends visited us a couple weeks ago and gave me - besides many other goods - this plain looking miniature cake as a present. It only took me 12 years to have my first bite of Kwareżimal and it was pure enjoyment. I didn't share a piece with anyone.
So I finally knew what I was aiming for, I felt ready to give it a go. My Kwareżimal are made with ground hazelnuts, as my Maltese man doesn't like almonds, but feel free to use whatever nut you prefer. I mixed in some white spelt flour (plain flour woks just as well) to lighten up the texture. But don't worry, it's still as soft and chewy as it should be thanks to the juice of half an orange.
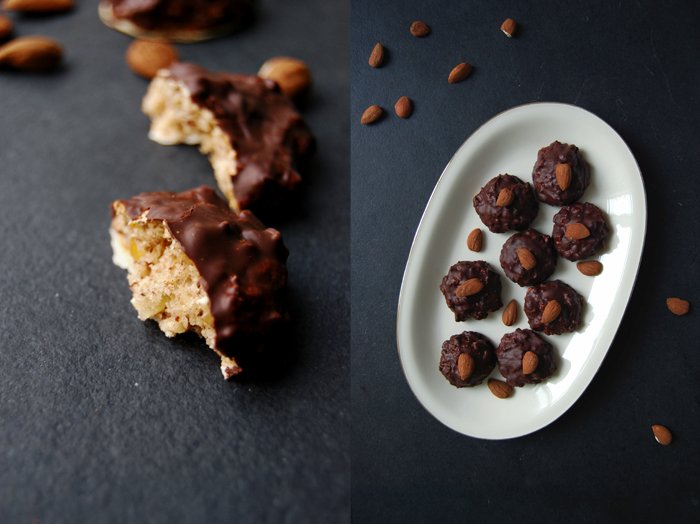
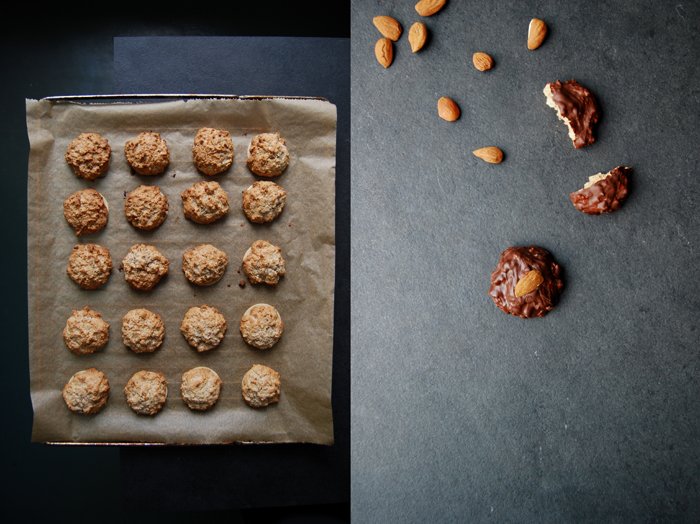
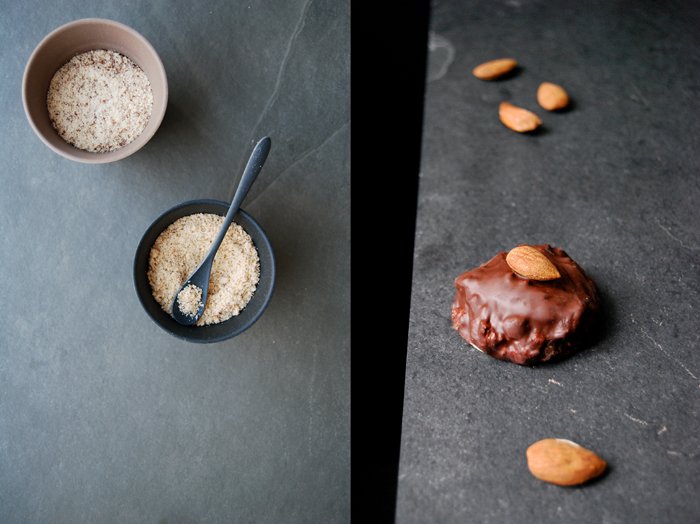
The texture is divine, almost moist, it reminds a bit of rough marzipan. And it tastes so rich, nutty, and citrusy, with strong tones of rather Christmassy spices, such as cinnamon, cloves, citrus zest, and flowery orange blossom water. I went for a crunchy pistachio topping, bedded on sticky honey running down the sites of my little Kwareżimal. You can also chop almonds or hazelnuts. When you buy this sweet from a shop, you get a single bar, not more than 12cm / 5" long, that was my measure. To serve, I cut it in thick slices - it's a bit like a cookie with a chewy feel.

Kwareżimal
Makes 2 small bars (serves 2-4)
finely ground hazelnuts (or almonds) 120g / 1 cup plus 2 tablespoons
plain flour (I used white spelt flour / type 630) 100g / 3/4 cup
granulated sugar 100g / 1/2 cup
cocoa powder 1 teaspoon
baking powder 1/8 teaspoon
fine sea salt 1/8 teaspoon
ground cinnamon 1 teaspoon
freshly grated nutmeg 1/4 teaspoon
cloves, finely ground in a mortar, 1/2 teaspoon
vanilla bean, scraped, 1/4
freshly grated orange zest 2 generous teaspoons
freshly grated lemon zest 2 generous teaspoonsf
reshly squeezed orange juice 60ml / 1/4 cup
honey 1 tablespoon
high quality orange blossom water (preferably organic) 2 tablespoons
candied orange peel, finely chopped, 1 tablespoon
For the topping
honey 2 tablespoons
freshly squeezed orange juice 1 teaspoon
shelled unsalted pistachios, roughly chopped, a small handful
freshly grated orange zest 1/2 - 1 teaspoon
Preheat the oven to 180°C / 350°F (preferably convection setting) and line a baking sheet with parchment paper.
In a large bowl, whisk together the ground hazelnuts, flour, sugar, cocoa powder, baking powder, salt, cinnamon, nutmeg, cloves, vanilla seeds, orange zest, and lemon zest.
In a small saucepan, heat the orange juice and honey over low heat and whisk until the honey has melted. Take off the heat and whisk in the orange blossom water. Let it cool for a couple minutes, then stir into the dry mixture. Add the candied orange peel and stir until well combined. The dough will be soft, but you should be able to form a bar; if it's too soft, add a little more ground hazelnuts.
Wet your hands lightly, divide the dough in half, and form 2 bars, about 5cm / 2" wide and 2cm / 3/4" tall. Mind that they aren't too flat or they will dry out in the oven. Bake for about 15 minutes, the top of the loaves should still be soft and just slightly baked.
While the Kwareżimal are baking, prepare the topping: in a small saucepan, heat the honey and orange juice over medium heat and whisk until combined. Take the pan off the heat.
Brush the warm Kwareżimal with the warm honey and sprinkle with the pistachios and a little orange zest. To serve, cut into thick slices. Wrapped in cling film, it stays fresh for days.


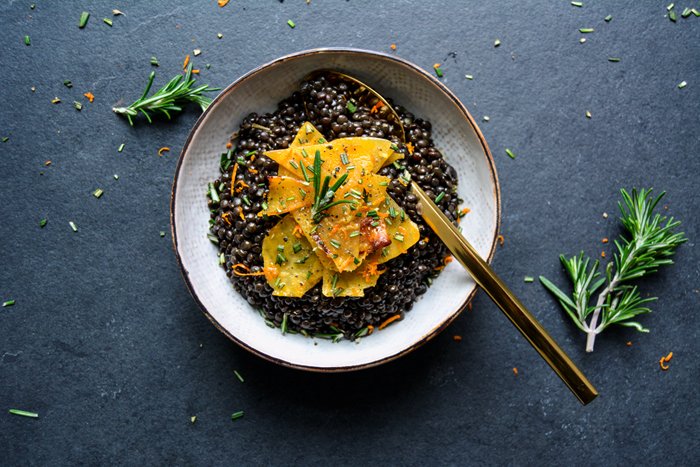
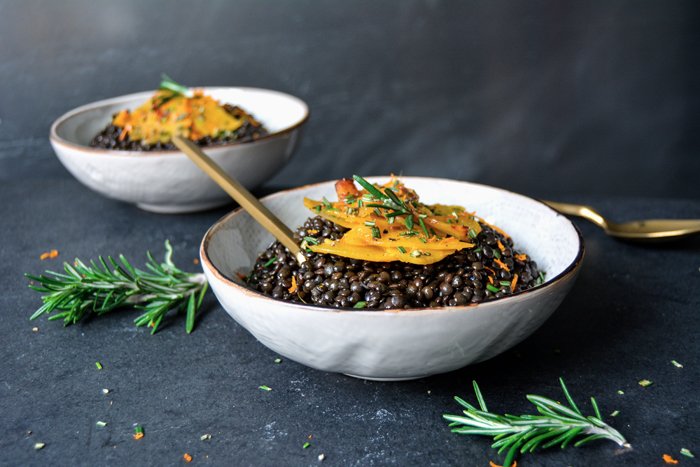
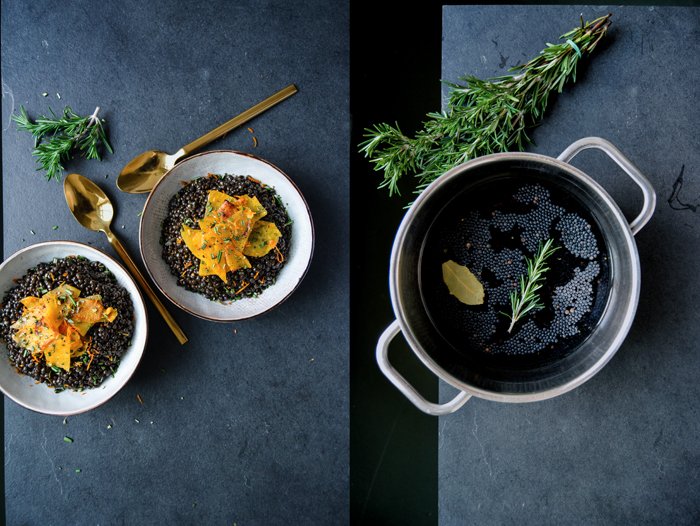
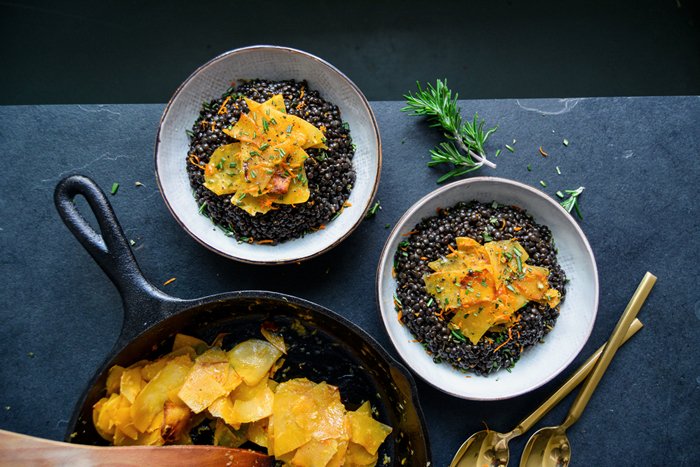
Beluga Lentils with Grilled Cherry Tomatoes, Orange and Rosemary
Spontaneous weekend trips are the best way to calm the weary mind after a busy week. I don't have to travel far, I don't even need to stay overnight, just a few hours in a nearby forest or at one of Berlin's beautiful lakes and I'm back on my feet.
My mother brought many wonderful things into my life. My love for food and cooking was definitely sparked by her own passion. She also fed my need for snuggly Sunday afternoons on the sofa. I sink in a pile of cushions and wrap myself in a cozy quilt, preferably listing to Prokofiev, and a plate of warm waffles on my lap. This used to be one of our favourite weekend rituals. Unfortunately, we haven't made waffles together in a while, but there's another tradition from my childhood days that she introduced me to, which both of us still hold dear. Mother and daughter grab their jackets, hop in the car to find a nice spot in the countryside, and go on a short weekend adventure. We prefer relaxed walks that allow us to chat a little and enjoy the scenery around us. In all these years we must have walked hundreds of kilometres. We walked down narrow paths meandering through the darkest woods, jumped over tinkling waters, and crossed the fields on windy hill tops, where the sky feels endless and the views take your breath away. Mud, rain, heat, or darkness never stopped us from our next adventure.
When Volkswagen asked me for a new recipe, I had to think of one of my favourite places in Berlin for long walks, the gorgeous Müggelsee Lake. Be it spring, summer, autumn, or winter, this lake is a quiet beauty in every season. It's a peaceful place, my beloved weekend get away. Usually, we go to the local bakery and butcher and grab some sweets and a sausage. But this time I had another idea: wrapped in scarves, wool beanie, and a big jacket, sitting on a bench at the lake, we can have a little picnic date, even in winter. I went for a recipe that tastes just as good as a warm lunch and as a cold salad: nutty beluga lentils with sweet and smokey grilled cherry tomatoes and woody rosemary oil. It's a scrumptious trilogy.


Beluga Lentils with Grilled Cherry Tomatoes, Orange and Rosemary Oil
Serves 4
For the lentils
beluga lentils (no soaking required) 280g / 10 ounces
fresh thyme 1 small bunch
fresh rosemary 1 sprig
bay leaf 1
fresh orange peel 4 long strips
balsamic vinegar 1 tablespoon
fine sea salt
ground pepper
For the grilled tomatoes
cherry tomatoes, on the vine, 20
For the rosemary oil
olive oil 6 tablespoons
fresh rosemary, needles only, 4 sprigs
For the topping
freshly grated orange zest, about 1 tablespoon
Preheat the oven to grill / broil (quicker method) or preheat to 220°C (425°F).
Place the lentils in a saucepan with plenty of (unsalted) water, add the thyme, rosemary, bay leaf, and orange peel and bring to the boil. Simmer for about 20 minutes or until al dente (or follow the package instructions). Remove any excess liquid with a ladle, if necessary, and the spices. Stir in the vinegar and season with salt, pepper, and additional vinegar to taste.
Place the tomatoes in a baking dish and grill / broil for about 12 minutes or roast at 220°C / 425°F for about 35 to 45 minutes—their skins should start to burst and turn partly black. Leaving the tomatoes on the vine, divide them into 4 portions.
For the rosemary oil, in a small saucepan, heat the olive oil over medium-high heat. Add the rosemary and, as soon as it starts to sizzle, remove the pan from the heat. Cover and let the herb infuse the oil for at least 1 to 2 minutes. Remove the rosemary from the oil and set aside.
Stir the rosemary oil into the lentils and divide between plates. Arrange the grilled tomatoes and rosemary on top and season with fresh orange zest to taste. Enjoy warm or cold.


16 Recipes for Winter Salads
Berlin, January 2017:
Despite the grey skies and frosty temperatures that come along with Berlin's long lasting winter, I've been in the mood for salads surprisingly often this January. Cozy soups, stewy and rich, would have been more obvious, but no, my appetite longs for winter salads. Celeriac, cabbage, beans, roots, and potatoes inspire my cooking and satisfy my longings for fresh vegetables. And thanks to the addition of citrus fruits, fresh coconut, or turmeric root I never get bored. If you feel the same, take a look at these scrumptious compositions collected on Eat In My Kitchen over the past 3 years (click the titles for the recipes)!
Update, January 2024: Click here for all SALAD recipes on the blog, and here for many more in my cookbooks.
16 Recipes for Winter Salads
Celeriac Salad with Cardamom-Yoghurt, Caramelized Honey Kumquats, and Walnuts


and from my book:
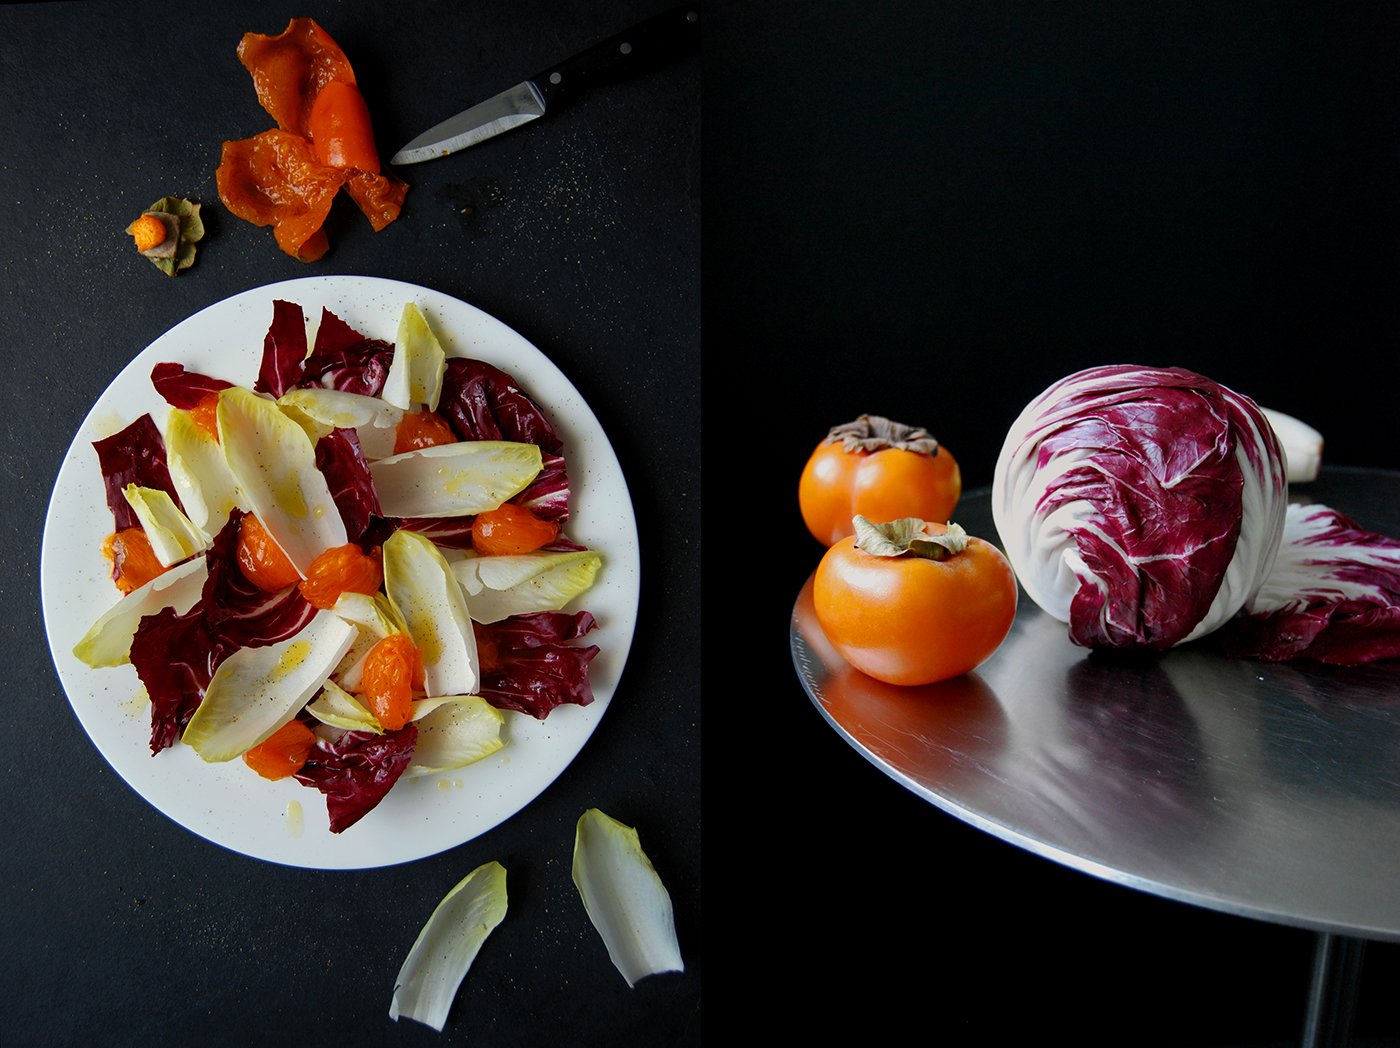
Radicchio, Peach, and Roasted Shallot Salad with Blue Cheese (you can replace the peach with ripe persimmon or pear)

Bavarian Cabbage Salad with Crispy Bacon
(I’m sorry, there’s no picture to share, the quality is too bad. It was one of my very early blog recipes …)
Enjoy!


My Maltese Winter Sandwich: Pomegranate Chicken, Red Coleslaw & Bacon

We drove down the winding road to the Grand Harbour in Valletta and stopped our cars in front of an old garage. The wooden door must have seen many storms, the green paint faded and the hinges rusted, it's the salt in the air that takes over whatever it gets hold of. Our friends Michelle and Michelangelo came down to the harbour in the cutest Volkswagen beetle the world has ever seen - in baby blue (Michelangelo would correct me and say it's Diamond Blue). Built in 1968, the car only changed owner once, when our friends bought it in 2010 from an elderly lady from the village of Qormi. It was in mint condition despite its 110,000 original kilometres. The previous owner's name was Teresa and she became the eponym of our friend's little love bug, since then, the beetle is affectionately called Terez.
Terez - and her original 1300cc single port engine, a fact that Michelangelo points out with pride in his voice - has seen a lot since she found her new owner: four overland trips, the latest being our friend's honeymoon trip last summer. The three of them (including Terez) attended the Le Bug Show 2016 in Spa and crossed half of Europe to get there. Malta, Sicily, France, Switzerland, Belgium, and Germany added 5,400 kilometres to the tachometer and seemed to have made the bond between the car and its owners even stronger.
Every car needs a check up once in a while, especially when it's nearly 50 years old, and to make it a little more fun, I joined my friends and brought some food and my camera. While Michelangelo laid hands on the tires, I kept mine busy preparing sandwiches for all of us. It's the peak of winter, a time of year when I usually have to confront Berlin's seemingly endless, yawning grey sky for weeks and months, but here in Malta I'm spoilt with sunshine and vibrant colours. This inspired me to come up with a snack as fresh and bright as the Mediterranean world around me. It's a chicken sandwich, the meat tender and thinly sliced, with purple coleslaw and orange wedges, sparkling pomegranate seeds (some of which I turned into a sticky syrup), crunchy bacon bites, and pungent green onions. The composition is rather difficult to eat, but trust me, the pleasure that you'll feel when you taste it, is absolutely worth it. And the solution is simple, just squeeze it until the sticky juices run out of the sandwich and soak the soft bread - it's a heavenly mess.
Thank you Michelle, Michelangelo, and Terez for a wonderful morning in Valletta!
For more delicious recipes and kitchen inspiration, visit Volkswagen's Pinterest community board Food Bloggers for Volkswagen.


My Maltese Winter Sandwich: Pomegranate Chicken, Red Coleslaw, Orange and Bacon
Makes 6 sandwiches
For the coleslaw
cored red cabbage, cut into thin strips, about 230g / 1/2 pound
fine sea salt
yoghurt 5-6 tablespoons
freshly squeezed orange juice
ground pepper
For the pomegranate syrup
pomegranate juice 180ml / 3/4 cup
granulated sugar 4 1/2 tablespoons
For the sandwich
olive oil
chicken breast 400g / 14 ounces
fine sea salt
ground pepper
bacon 6 slices
lettuce leaves 6
white buns (or ciabatta cut into buns), cut in half, 6
oranges, peeled and cut into filets, 1-2
the seeds of 1 pomegranate
green onions, the green part cut into thin slices, 1
freshly grated orange zest, about 1 tablespoon
For the coleslaw, in a large bowl, mix the cabbage and 1/2 teaspoon of salt and, using your fingers, rub the salt into the cabbage. Let it sit for about 15-20 minutes. Add the yoghurt and orange juice, mix well, and season with salt and pepper to taste.
Preheat the oven to 200°C / 400°F.
For the pomegranate syrup, in a saucepan, bring the pomegranate juice and the sugar to the boil and cook over medium-high heat (it should bubble) for about 7 minutes or until it starts to thicken. Set the syrup aside.
In a heavy pan, heat a splash of olive oil over high heat and cook the chicken breast for a couple minutes on each side until golden, you might have to reduce the heat to medium-high. Season with salt and pepper to taste and transfer the chicken to a baking dish. Roast in the oven for about 8 minutes or until the chicken is cooked through. Check with a skewer, only clear juices should come out. Let the chicken rest in aluminium foil for about 5 minutes. Cut the chicken into slices (about 18 slices for 6 sandwiches).
In a large heavy pan, heat a splash of olive oil and cook the bacon for a few minutes on both sides until golden brown and crisp. Transfer to paper towels, let it cool for a few minutes, then break the bacon into pieces.
Divide the lettuce leaves between the bottoms of the buns and arrange the chicken on top, drizzle with a little of the pomegranate syrup. Spread a heaping tablespoon of coleslaw, 2-3 orange filets, and some pomegranate seeds on top of the chicken. Sprinkle with the sliced green onion, bacon bites, and orange zest, and drizzle with additional pomegranate syrup. Close the bun, squeeze, and enjoy!


Artichoke, Ricotta and Orange Ravioli
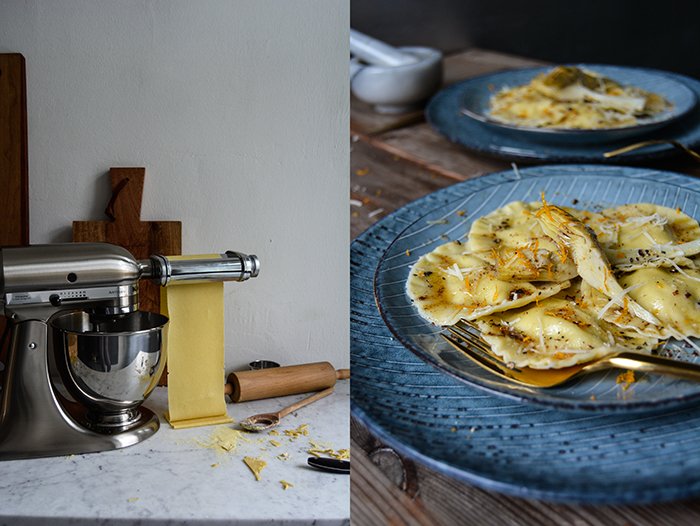
If you decide to make your own homemade pasta, be prepared that you'll never be able to eat store bought pasta again (you'll feel less satisfied with it at the very least) - and that you won't feel your arms and abs for a couple days. To knead the dough by hand is necessary and labor-intensive. I had moments when I felt slight doubts about whether the crumbly mixture in front of me would ever turn into a smooth ball, but it worked. I needed all my patience and muscle power to get there, but the result tasted so good that I'd do it all over again (after my muscles got some rest).
My pasta project started last Friday and ended on Saturday afternoon. I first tried a recipe by Sicilian chef Dario Cammarata who only uses plain flour, durum wheat semolina, salt, egg yolks, and olive oil. The result tasted amazing, but getting there was so much harder than what I remembered from when I visited the chef in his kitchen in Frankfurt earlier this year. What seemed so easy in Darios's hands, didn't want to work as smoothly in my own.
Dario taught me that ravioli are best when they are made with egg yolks and not whole eggs. I have no doubt that this is true, the texture is light and perfectly al dente. But to knead my own dough made of 10 egg yolks, flour, and semolina almost made me cry. The mixture was so hard and fragile, I needed an alternative that was less stressful. I still used my egg yolk dough to make a few ravioli, which were perfect, and I made tagliatelle. And these were the best tagliatelle of my life - taste, texture, and thickness were spot on!
Early the next morning I went back to my kitchen. More eggs in the bowl (this time including the egg whites), with a fresh and open mind and a quenchless appetite for fresh pasta, I felt optimistic. Kneading the dough still required some serious muscle power (maybe it's just me, my arms are not the strongest), but it was manageable. And this time I totally enjoyed pulling the thin layers of fresh pasta through my KitchenAid pasta attachment. I needed about two test sheets, but then I was in business. They were so thin that I could see my hand through them.
For my first homemade ravioli, I chose a filling that still allowed me to enjoy the fine taste of the egg pasta. After all this work it didn't feel right to knock it out. The combination of preserved artichokes and fresh ricotta refined with a little orange zest was just right, present, but not overpowering. I served it with melted butter and golden artichoke hearts, briefly seared in the sizzling fat. A little crushed pepper and some more orange zest, and my work was done.
My KitchenAid has three pasta attachments and I'm particularly fond of the tagliatelle cutter. Once I was done with the ravioli, all the shorter pieces and leftover dough went through this attachment and they were perfectly cut into the thinest, tastiest pasta. Cook it al dente and add a knob of butter, freshly grated aromatic hard cheese, and black pepper, and you'll have the best meal ever. Buon appetito!

Artichoke, Ricotta and Orange Ravioli
Homemade ravioli are time and labour-intensive. They are a great starter or main dish for a dinner party, but I recommend preparing them a day in advance to keep it stress free. Freeze them (uncooked) and cook them in boiling salted water just before serving for 4 minutes. I recommend using a pasta machine for this recipe.
Makes 20-24 ravioli / serves 2-4
For the pasta dough
plain flour 150g / 1 cup plus 2 tablespoons
durum wheat semolina 150g / 5 1/4 ounces
fine sea salt 1/4 teaspoon
large organic eggs 3 plus 1 egg yolk
olive oil 1 tablespoon plus 1 teaspoon
water, cold, 1 tablespoon
For the filling
preserved artichoke hearts, drained and squeezed, 160g / 6 ounces
fresh ricotta 125 g/ 4 1/2 ounces
olive oil 1 tablespoon
freshly grated Parmesan 25g / 1 ounce
a pinch of freshly grated orange zest
fine sea salt
ground pepper
For serving
butter 4 tablespoons
preserved artichoke hearts, drained and cut into 6 pieces each, 2
Parmesan
black peppercorns, crushed
a little orange zest
For the pasta dough, in the bowl of a stand mixer fitted with the dough attachment, combine the flour, semolina, and salt. Add the eggs, egg yolk, and olive oil and knead for about 5 minutes (I set it on '4' on my KitchenAid). If it's too dry, add 1 tablespoon of water, but not more. If it's too sticky, add a little semolina and flour. On the counter top or on a stable table, using your hands, continue kneading the dough for about 15 minutes until smooth. It will still be firm. I find it easiest to leave it in the shape of a thick disc for the first 5-7 minutes, punching and kneading it, and scraping the crumbs together. Then I knead it and roll it into a ball (see pictures below). Form a ball, wrap it in cling film, and let it rest in the fridge for 1 hour.
For the filling, purée the artichoke hearts, add to a bowl along with the ricotta, olive oil, Parmesan, orange zest, salt, and pepper. Whisk until smooth and adjust seasoning.
Divide the dough into 4-8 portions (depending on the width and power of your pasta machine). Roll out 1 portion with a rolling pin until it's thin enough to fit into your pasta machine. I started using position '1' on my pasta attachment, using the speed setting '2'. Pull the dough through the pasta machine twice, fold it in the middle, flatten it a little with the rolling pin if necessary, turn it 90°, and pull it through the pasta machine. Continue 2-3 times. Change to a thinner setting (I used '3') and pull the dough through the machine about 3 times, without folding it. Using a knife, straighten the sides of your pasta sheet and cut off excess dough. Continue using the thinner settings of your pasta machine until you can see your hand through the dough (I used '5' and then '6' at the end). If the dough is too sticky, use semolina, but no flour.
Sprinkle the rolled out pasta layer with semolina, fold it gently, and cover with cling film. Continue rolling the remaining dough.
Sprinkle a large baking sheet with semolina. Bring a large pot of generously salted water to the boil.
Lay out a layer of pasta and mark it with circles, using a 7cm / 3" round cutter (or whatever size and shape you prefer). Add a teaspoon of the filling in the middle of each marked circle. Dip your finger in water and wet the rim of the circles. From a second sheet of pasta, cut out circles of the same size, lay on top of the filling, and using your finger, push around the rim (see picture above). Using the cookie cutter, cut out the ravioli and press a little fork all around to seal the rim (see picture below). Transfer the ravioli to the prepared baking sheet.
In batches, cook the ravioli in the simmering water for about 2-3 minutes or until al dente.
To serve the ravioli, in a saucepan, heat the butter over high heat until golden brown, add the artichoke hearts, turn gently, and sauté for 1 minute.
Serve the ravioli sprinkled with the butter, Parmesan, orange zest (optional), and crushed pepper and lay the sautéed artichokes on top.


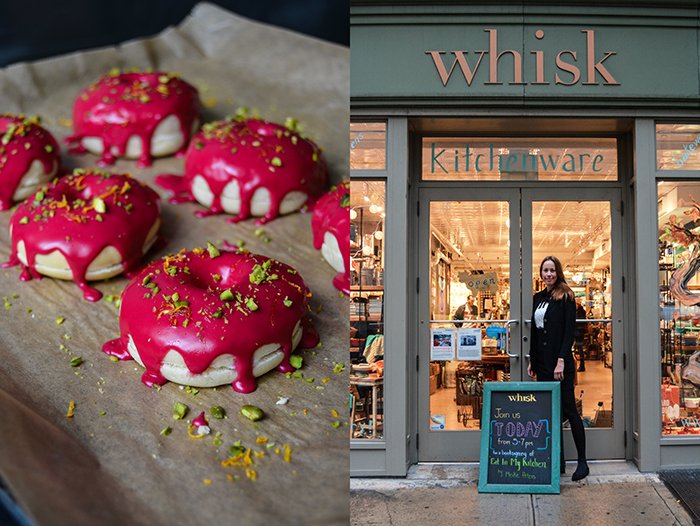
Ricotta Beetroot Doughnuts, New York and my 4th book launch

New York, November 2016:
The monotony of clouds and waves kept me in a daze while I crossed the Atlantic, but then, when I finally spotted Nova Scotia from high up in the skies, I was as excited as a little girl. Soon we'd land in New York JFK, to open the last two chapters of my overwhelming Eat In My Kitchen book tour. New York and Washington DC had been on my itinerary for months, but to know that I'd be there in just a few hours gave me shivers.
This trip was emotional, which I got used to after weeks of being on the road in London, Berlin, and Malta, my emotions seem to be tied to a rollercoaster. And now New York, this city filled with so many dreams and visions, vibrant, loud, and bright, it never rests. As I stumbled out of the subway, packed with all my bags and suitcases (I took a few pounds of Maltese sea salt with me), my view was drawn to the sky, along the shiny facades of the city's famous skyscrapers. Jet-lagged, happy, and with an espresso in my hands, I felt breathless as I stood on the vibrant streets of Greenwich Village.

Ten days on the East Coast allowed me to dive deep into this magical city, to meet and get to know so many people and to enjoy some of the most delicious treats. I hadn't seen my dear friend and editor Holly La Due in more than a year, and to step into her office on Broadway for the first time, to finally meet the entire team of Prestel Publishing that worked on my book, almost made me cry. And I ate - constantly! There was so much to discover, so much to try, it felt like traveling the world through food, but in one city. My palate enjoyed the most amazing Jamaican curry, Cuban stew and pies, Korean BBQ, Indian treats, and American classics. Breakfast was lush, every day: The richest Challah French toast, fluffy blueberry pancakes, huge muffins, crunchy cookies, fudgy brownies, perfect bagels, lobster roll, juicy burger, creamy clam chowder, and generously filled sandwiches.
New York is heaven on earth if you love food. The quality is outstanding, proven by the fact that I didn't experience a single bad meal, I can recommend almost every restaurant I went to as you can see in my list below. One of the treats that struck me on our last day was a gorgeous pink doughnut at Bryant Park Holiday Market filled with ricotta and covered in sticky beetroot glaze. This combination is so good that I decided to come up with my own recipe and share it with you. My version is a soft and spongy oven-baked yeast doughnut refined with orange zest and sprinkled with pistachios. Next time I'll fry them in oil, which adds that extra rich flavor plus calories.

There's no better way to explore a city than on foot, so as I ate my way through Manhattan and Brooklyn, I also got to walk on the elevated High Line, a 1.5 mile long city garden. It's an impressive green oasis along the closed tracks of the West Side Line.
I managed to see a live performance and also Nan Goldin's Ballad of Sexual Dependency at MoMA, and a fantastic show at The Met Breuer, by James Kerry Marshall called Mastry. And visiting Kenzi Wilbur at Food52's holy test kitchen in Chelsea (picture above) was another highlight.

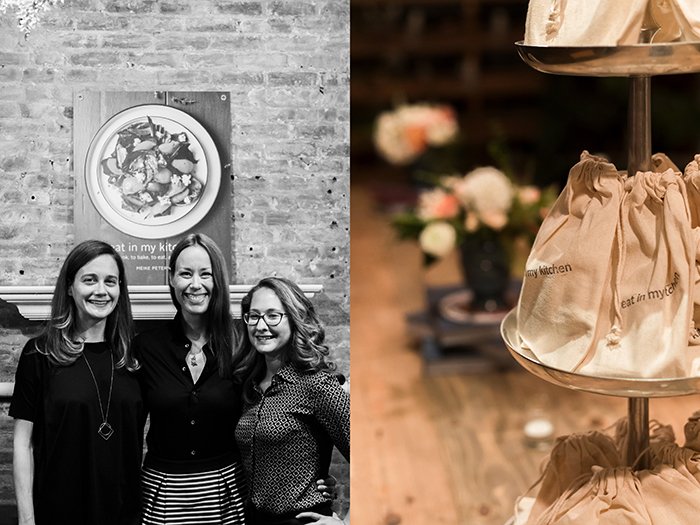
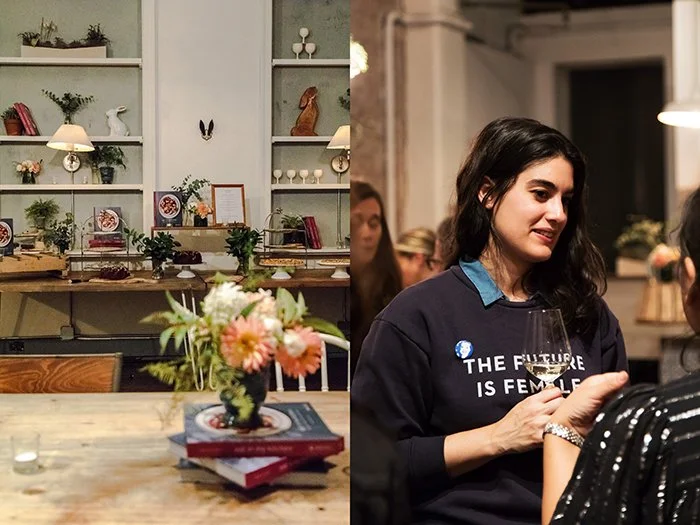
I came to New York to present the Eat In My Kitchen book, at a wonderful book launch feast at Maman NYC and at a cozy book signing event at the beautiful - and so tempting - Whisk kitchenware shop on Broadway. It's my first book, and to have had these two unforgettable celebrations in New York makes me feel very humble. I can't thank everybody enough who's been involved in both of the events. Maman is a stunning space with high ceilings in TriBeCa, founded by Michelin starred French chef Armand Arnal, Elisa Marshall, and Benjamin Sormonte. They are the sweetest team and they did everything possible to turn our event into a very special night. Chef Hetty McKinnon from Arthur Street Kitchen, and author of the cookbook Neighbourhood, prepared the recipes from my book for this special event. She's a precious gem, as a chef and as a friend.
My trusted partner Meridiana Wine Estate shipped their glorious Maltese wine over the Atlantic just for our event - our American guests are already thinking about how they can get hold of this wine from Malta in the future. Marisa Dobson is the power woman who helped me so much, organizing all my events in the US, and she introduced me to Baked (see the list below). Photographer Maria Midões is the lovely woman who captured the magic of our night at Maman in her gorgeous pictures. I had a dream team in New York, accomplished by the support of my wonderful publisher Prestel. You can't create a book on your own, but you also can't send it out into the world on your own. Thank you, my friends!


Here are some of my favourite food spots:
Manhattan
Baked TriBeCa, American bakery (they bake Oprah Winfrey's favourite brownies)
Maman TriBeCa, coffee, bakery, and events
Tina's Cuban Cuisine
Luke's Lobster East Village (the best lobster and crab roll and clam chowder)
Clinton Street Baking (New York Magazine voted: the best blueberry pancakes)
ABC Kitchen (their spinach, chèvre, and dill pizza is a revelation)
Stick With Me (Susanna Yoon's finest confectionaries)
Black Seed Bagels (delicious tuna melt and salmon bagel!)
Pondicheri New York (acclaimed Indian restaurant)
Food market at Bryant Park, especially
The Doughnut Project
Salumeria Biellese Deli (the best sandwiches lusciously filled with Italian prosciutto and cheese)
Blue Bottle Coffee
Eileen's Special Cheesecake
Jongro BBQ (Korean BBQ, be prepared for loud! music)
Russ and Daughters
Compagnie des Vins Surnaturels
Hot Pot Under de Tree in Harlem (Jamaican Diner on Frederick Douglass Boulevard)
Williamsburg - Brooklyn:
Khao Sarn (delicious Thai soups and papaya salad)
The Rabbit Hole (cozy breakfast spot, try the challah french toast with strawberry mscarpone!)
Extra Fancy (American restaurant, seafood and burger)
Peter Luger Steakhouse (reservation needed!)
Vanessa's Dumpling House
Ricotta Beetroot Doughnuts
Makes about 16 doughnuts plus doughnut holes
For the dough
plain flour 325g / 2 1/2 cups, plus about 2 tablespoons if the dough is too sticky
fast-acting yeast 1 1/4 teaspoons
granulated sugar 50g / 1/4 cup
fine sea salt 1/2 teaspoon
orange zest 1/2 teaspoon
milk, lukewarm, 155ml / 2/3 cup
butter, melted and cooled, 20g / 1 1/2 tablespoons
vanilla bean, scraped, 1/2
organic egg 1
For the filling
fresh ricotta, whipped, 250g / 9 ounces
For the glaze
icing sugar 200g / 2 cups
beet juice 4-5 tablespoons
unsalted pistachios, chopped, a small handful
orange zest 1 tablespoon
For the dough, combine the flour, yeast, sugar, salt, and orange zest in the bowl of a stand mixer fitted with the dough hook. Whisk together the milk, butter, vanilla seeds, and egg - the mixture should be lukewarm - and add to the flour mixture. Knead on medium speed for a few minutes until well combined. The dough should be soft and moist, but not sticky. If it's too sticky, add a little more flour. Transfer the dough to a table or countertop and continue kneading and punching it down with your hands for about 4 minutes or until you have a smooth and elastic ball of dough. Place the dough back in a clean bowl, cover with a tea towel, and let rise in a warm place, or preferably in a 35°C / 100°F warm oven (conventional setting), for about 60 minutes or until almost doubled in size.
Line 2 baking sheets with parchment paper.
When the dough has almost doubled in size, punch it down, take it out of the bowl, and knead for 1 minute. On a lightly floured countertop, using a rolling pin, roll out the dough until it's about 1cm / 1/2" thick. Using a 7 1/2cm / 3" round cookie cutter or glass, gently cut out circles and transfer them to the lined baking sheets. Using a 3 1/2cm / 1 1/2" cookie cutter or shot glass, stamp out the smaller inner circles and arrange them around the doughnuts on the baking sheet. If you use a smaller cookie cutter for the inner circles, the hole in the middle will close while baking. Cover with cling film and let rise in a warm place for about 25-30 minutes or until puffy.
Preheat the oven to 190°C / 365°F (conventional setting).
Bake the doughnuts and the doughnut holes for about 6-8 minutes or until light golden and still soft. If you're not sure, take out one doughnut and cut it in half to see if it's baked through. Transfer to a cooling rack and let cool completely. Cut the doughnuts in half and spread each bottom with about 1 heaping teaspoon of ricotta.
For the glaze, whisk the icing sugar and beetroot juice until smooth, the mixture should be quite thick. Using a teaspoon, sprinkle the glaze generously over each doughnut and doughnut hole. Immediately sprinkle with pistachios and a little orange zest.


Orange, Chocolate & Buckwheat Muffins
What a week!
The German Eat In My Kitchen book is out and my English book will follow next week, on the 4th October. Just 2 more nights!
The New York Times included the Eat In My Kitchen book in their list of 'The Best Cookbooks of Fall 2016'. NY Times' editor Florence Fabricant wrote a very nice review and also shared one of my recipes from the book. To call me excited would be a complete understatement - I feel insanely happy!
I had my first book launch event in my hometown Berlin, on the gorgeous roof terrace of the stunning Hotel de Rome. It was a golden afternoon, literally, we had blue skies and a slow sunset that wrapped the whole scene in magical light! There were so many wonderful people, fantastic wine from Meridiana Wine Estate in Malta, I offered my first food tastings - and saw many happy faces - and I held my first talk about my book, with dear Cynthia Barcomi. It was an unforgettable event and the best start possible for my book tour (you can see the pictures of the event here). Here's a picture of me at my launch, taken after I gave one of my cookbooks to tennis legend Boris Becker and his wife - the lunching family had to move table due to our event. I still feel a little bad because of that. Lots of nice pictures from the event are waiting on my computer to be shared on the blog, but I guess they'll have to wait a few more weeks, Malta is the next stop on my book tour. More adventures, book talks, and travels to come! To be continued ...
Here's a muffin recipe that I came up with - by request - a few months ago. Although oranges are a typical winter fruit, you can find them on the large fruit plate in my kitchen all year round. I can't live without their fragrant zest, especially in my baking. Pair it with bittersweet chocolate and you end up with one of the best combinations that the sweet world can offer (see last week's recipe from my cookbook). My quick and easy Sunday muffin is gluten free, made with buckwheat flour and ground almonds. It adds a nutty flavour, the texture is a little less dainty compared to plain flour, but the result is wonderful. Give me a cup of cappuccino and a few of these breakfast treats and I'm in heaven, especially when I can move straight to my sofa after a week of so much excitement.


Orange, Chocolate, and Buckwheat Muffins
Makes 12 muffins
buckwheat flour 200 g / 1 1/3 cups
ground hazelnuts or almonds 170 g / 1 1/2 cups
granulated sugar 100 g / 1/2 cup
freshly grated orange zest 3 tablespoons, plus more for topping
baking powder 3 teaspoons
baking soda 1/2 teaspoon
fine sea salt 1/4 teaspoon
freshly squeezed orange juice 120 ml / 1/2 cup
whole milk 120 ml / 1/2 cup
organic eggs 3
unsalted butter, melted and cooled, 125 g / 1/2 cup plus 1 tablespoon
bittersweet chocolate, roughly chopped, 100 g / 3 1/2 ounces
paper muffin pan liners 12
Preheat the oven to 190°C / 375°F (preferably convection setting). Line a 12-cup muffin pan with paper liners.
In a large bowl, whisk together the buckwheat flour, hazelnuts, sugar, orange zest, baking powder, baking soda, and salt.In a medium bowl, whisk together the orange juice, milk, eggs, and butter. Add to the flour-mixture and stir with a wooden spoon just until a lumpy batter forms. Gently fold in the chocolate. Mind that if you mix the batter too much, the muffins will lose their light texture.
Spoon the batter into the muffin cups and bake for about 16 minutes (slightly longer if using a conventional oven) or until golden. Take the muffins out of the pan and let them cool on a wire rack for 2 minutes before serving. Sprinkle the tops with a little orange zest.


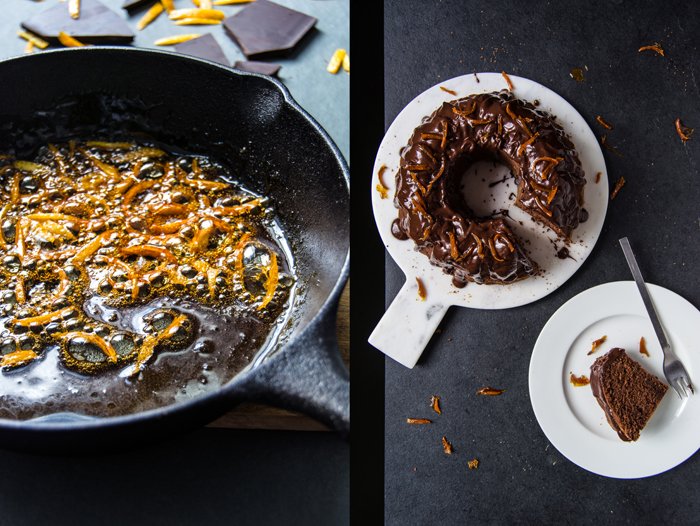
From my cookbook: Chocolate Olive Oil Bundt Cake with Candied Orange Peel
Berlin, 2016:
The first picture of today's post caught the moment I held my Eat In My Kitchen cookbook in my trembling hands for the first time. I had to sit down, or rather, I fell into my beloved old chair in my living room. This chair has seen many emotions, sad and happy, it's been with me all my life and it's the place I want to be when the world around me becomes a little overwhelming.
So this chair had to catch me once again. My knees were wobbly and I didn't know if I should laugh or cry, so I did both. I received a package from my publisher and I knew what it was before I even opened it: two books, my books.
Tomorrow is a very special day, my German book, Eat In My Kitchen -sssen, backen, kochen und genießen, will be published and in a week the English book will follow: Eat In My Kitchen- to cook, to bake, to eat, and to treat, on October 4th. The book is already on Epicurious' list of 'The 25 Most Exciting New Cookbooks for Fall 2016' and my heart is jumping with joy!!
So many people keep asking me how I feel about my big publishing day(s), whether I'm excited, proud, or nervous. To be honest, I can't really say how I feel. Maybe confused and overwhelmed? As much as it felt normal to write this book at one point, to cook and bake the recipes, and to take the pictures, strangely enough it's starting to feel normal to know that it'll be out soon. It may sound weird and maybe I'm wrong, maybe I'll have a nervous breakdown at one point, maybe when I present the book in front of an audience (in the next few weeks, all over Europe and in the US), or when I see it at in bookstores, or when I watch people pulling it off a shelf and buying it. I don't know.
Luckily, I don't have much time to think about it, which is sometimes the best thing that can happen. Eat In my Kitchen feels as intuitive, natural, and close to myself as it can get. The physical book just as much as this blog. I'm in my comfort zone, constantly, which I consider to be the greatest gift. I don't take anything for granted in life, I'm here and I want to learn, grow, and experience everything. I don't know if I'll fail or succeed with this book, but it's also nothing I want to worry about. Every recipe, every story and picture that fill the 256 pages of this book, is totally me, to question or doubt its relevance, would be fatal. That would mean questioning my passion and my beliefs, before this book even sees a shelf in a bookstore.
I can say that I'm unbelievably happy that this book exists. With a big smile on my face, I stand behind all I've created and written in the past year and a half to fill its pages, in both the German and the English book. I went through many lows and I took the highs with great pleasure, I suffered and I cried, I changed some decisions and stood strongly behind others. I've been through my battles, while working on these pages. But now I let go. A month ago I wrote about this transition, this process of letting go of a project. Tomorrow, this process will be complete.
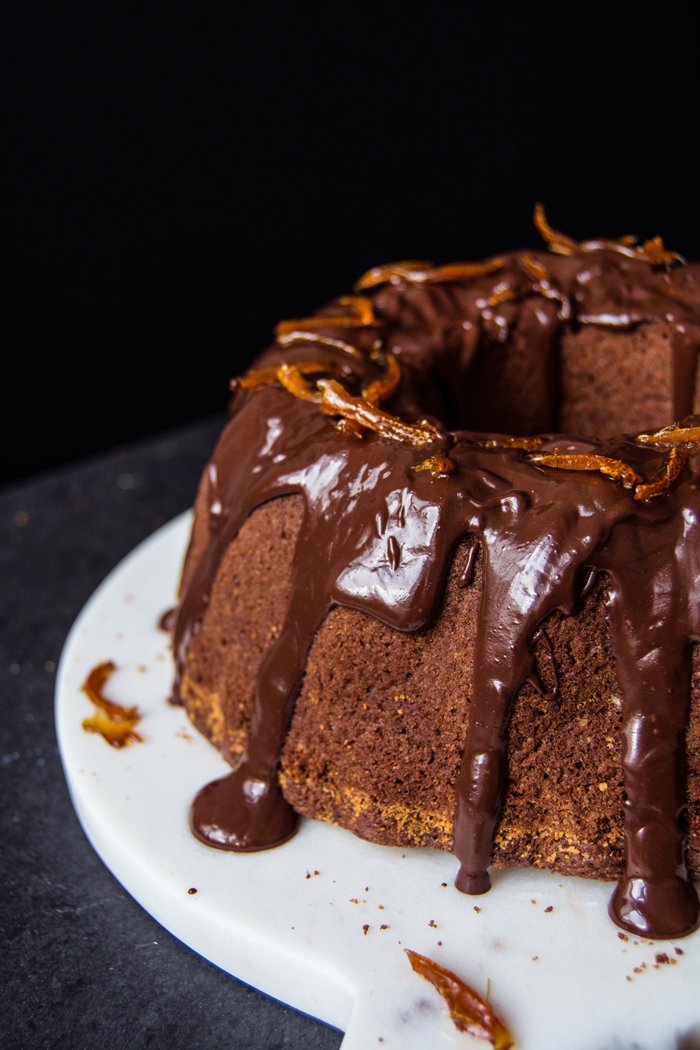
Today sees a premier on the blog, I'm sharing the first recipe from my book with you and, also for the first time, I'll share a recipe in English and in German. I get many requests to write my blog in two languages, and as much as I'd love to do that, I simple don't have enough time. I appreciate the effort of so many of you who aren't that familiar with the English language but still give it a try and follow my recipe instructions in a foreign language. Today, my German readers, you can relax and bake the most delicious, spongy chocolate olive oil Bundt cake, topped with a thick chocolate glaze and sweet and crunchy caramelized orange peel. I love this cake!
Next week, I'll share another recipe from my book with you, on the 4th October, on the day when my English readers can hold the book in their hands for the first time. I'll be in Malta at that point, celebrating the book at my launch at the gorgeous Villa Bologna before my journey takes me to London, New York, and Washington. I'll try my best to keep up with writing about all this here on the blog - and I also intend to start sharing videos on Instagram, so please come over and join my journey in the next few weeks and months.
Today I want to thank my amazing team here in Germany, all the wonderful women and men who made this book possible. Thank you everyone at Prestel in Munich, especially Pia, Julie, and Adeline. Thank you so much Ellen Mey for being my editorial guidance.
So very soon the book will be available in bookstores, and in case you can't find it on the shelves, you can order it at any bookstore in the world, or here:


Chocolate Olive Oil Bundt Cake with Candied Orange Peel
from Eat In My Kitchen - to cook, to bake, to eat, and to treat, published by Prestel
SERVES 8 TO 12
Dry breadcrumbs, for sprinkling the Bundt pan
2 cups (260 g) all-purpose flour
1 cup (200 g) granulated sugar
1 tablespoon baking powder
1 teaspoon baking soda
⅛ teaspoon fine sea salt
5 ounces (140 g) bittersweet chocolate
⅔ cup (155 ml) olive oil5 large eggs
3½ tablespoons (50 ml) whole milk
1 tablespoon freshly grated orange zest
3½ tablespoons (50 ml) freshly squeezed orange juice
FOR THE CHOCOLATE GLAZE
5 ounces (140 g) bittersweet chocolate
1 tablespoon (15 g) unsalted butter
1 to 2 teaspoons sunflower oil
FOR THE CANDIED ORANGE PEEL
¼ cup (50 g) granulated sugar
2 tablespoons water
1 small handful very thin strips of fresh orange peel
Preheat the oven to 350°F / 180°C (preferably convection setting). Butter a 7½-cup (1.75 l) Bundt pan and sprinkle generously with breadcrumbs.
In a large bowl, whisk together the flour, sugar, baking powder, baking soda, and salt.
In a large heat-proof bowl set over a saucepan of barely simmering water, melt the chocolate. Let cool for a few minutes then add the olive oil, eggs, milk, orange zest, and orange juice, and beat with an electric mixer for 2 minutes or until smooth. Add to the flour mixture and quickly mix with an electric mixer for 1 minute or until well combined. Pour the batter into the prepared Bundt pan and bake for about 35 to 40 minutes (slightly longer if using a conventional oven) or until golden brown and firm on top. If you insert a skewer into the cake, it should come out clean. Let cool for a few minutes then shake the Bundt pan a little and turn the cake out onto a plate. Let cool completely. Trim the bottom of the cake to even it out.
For the chocolate glaze, melt the chocolate and butter in a saucepan over low heat. Add 1 to 2 teaspoons of vegetable oil and whisk until smooth. Pour the glaze over the cooled cake, evening it out with a knife or leaving it in voluptuous drops.
For the candied orange peel, in a small saucepan, bring the sugar and water to a boil. When it starts to caramelize add the orange peel. Reduce the heat to medium and cook for 3 to 4 minutes or until the peel is golden and soft—mind that it doesn’t burn. While the caramel is still liquid, quickly transfer the candied peel to a piece of parchment paper. Let cool for 1 minute then peel it off the paper and decorate the cake while the glaze is soft.

German recipe:
Schokoladen-Gugelhupf mit Olivenöl und Kandierter Orangenschale
aus Eat In My Kitchen - essen, backen, kochen und genießen, veröffentlicht bei Prestel
FÜR 8–12 PERSONEN
Semmelbrösel, für die Gugelhupfform
260 g Mehl200 g Zucker
3 TL Backpulver
1 TL Speisenatron1 Prise feines Meersalz
140 g Zartbitterschokolade
150 ml Olivenöl
5 Eier
50 ml Milch
1 EL Orangenabrieb
50 ml frisch gepresster Orangensaft
FÜR DIE SCHOKOLADENGLASUR
140 g Zartbitterschokolade
1 EL Butter
1–2 TL Sonnenblumenöl
FÜR DIE KANDIERTE ORANGENSCHALE
50 g Zucker
2 EL Wasser
1 kleine Handvoll sehr dünne Streifen Orangenschale
Den Ofen auf 180 °C (Umluft) vorheizen. Eine Gugelhupfform (1,8 l) einfetten und großzügig mit Semmelbröseln bestreuen.
In einer großen Schüssel Mehl, Zucker, Backpulver, Speisenatron und Salz vermischen.
Die Schokolade in einer großen Schüssel über einem Wasserbad schmelzen. Ein paar Minuten abkühlen lassen, dann Olivenöl, Eier, Milch, Orangenabrieb und Orangensaft dazugeben und mit einem Handrührer etwa 2 Minuten glatt rühren. Zu der Mehlmischung geben und mit dem Handrührer etwa 1 Minute gut verrühren. Den Teig in die vorbereitete Gugelhupfform gießen und etwa 35–40 Minuten goldbraun backen, die Oberfläche sollte fest sein. Ein Metallstäbchen sollte nach dem Einpieksen in den Kuchen sauber sein. Ein paar Minuten abkühlen lassen, dann die Gugelhupfform ein wenig rütteln und den Kuchen auf eine Platte stürzen. Komplett auskühlen lassen und, falls nötig, den Boden gerade schneiden.
Für die Schokoladenglasur Schokolade und Butter in einem Topf bei niedriger Hitze schmelzen. 1–2 TL Sonnenblumenöl dazugeben und glatt schlagen. Die Glasur über den ausgekühlten Kuchen gießen, mit einem Messer verteilen oder in üppigen Tropfen herunterlaufen lassen.
Für die kandierte Orangenschale Zucker und Wasser in einem kleinen Topf zum Kochen bringen. Wenn es anfängt zu karamellisieren, die Orangenschale dazugeben. Bei mittlerer Hitze etwa 3–4 Minuten köcheln lassen, bis die Schale golden und weich ist – aufpassen, dass sie nicht anbrennt. Während der Karamell noch flüssig ist, die Orangenschale schnell auf einem Stück Backpapier ausbreiten. Ein paar Minuten auskühlen lassen, von dem Papier abziehen und den Kuchen damit dekorieren, solange die Glasur noch weich ist.


Beluga Lentils with Ginger Orange Rutabaga and Rosemary

I once read that the 3rd Monday of January is supposed to be the most depressing day of the year - Blue Monday. I don't know if it's true, luckily it has already passed, and I didn't notice my mood drooping drastically that day. However, I've felt a rising impatience for more light and warmer weather to come back into my life. So much so that I had to book flights to Malta last night. This always makes me feel so much better, no matter how far in the future the departure date lies, just the thought of it puts me in a good mood.
Another way to lift my spirits is food. Cosy food, colourful food, or simply delicious food. This dish combines all of it: nutty Beluga lentils, topped with thin slices of rutabaga, quickly cooked in the pan with lots of ginger, orange zest and juice, and fresh rosemary. The rustic root is as bright as the sunrise over Malta's east coast and its earthy flavour can easily deal with some strong aromas. I was surprised how well it merged with the dark legumes.

Beluga Lentils with Ginger Orange Rutabaga and Rosemary
Serves 3-4
For the lentils
Beluga lentils, or any lentils (no soaking required), 280 g / 10 ounces
small sprig fresh rosemary 1
bay leaf 1
olive oil
balsamic vinegar 1 tablespoon
fine sea salt
ground pepper
For the rutabaga
peeled rutabaga, cut into wedges and very thinly sliced (use a mandoline or cheese slicer), 300g / 10 1/2 ounces
freshly grated ginger 1 tablespoon
freshly grated zest of 1 orange
freshly squeezed orange juice 100ml / 1/3 cup plus 2 tablespoons
fine sea saltground pepper
finely chopped fresh rosemary needles 1-2 tablespoons
black peppercorns, crushed in a mortar
Place the lentils in a saucepan with plenty of (unsalted) water, add the rosemary and bay leaf, and bring to the boil. Simmer for about 20 minutes or until al dente (or follow the package instructions). Remove excess liquid with a ladle if necessary and stir in a generous splash of olive oil and the vinegar. Season to taste with salt, pepper and vinegar.
While the lentils are cooking, prepare the rutabaga: In a large, heavy pan, heat a generous splash of olive oil over medium-high heat. Add the rutabaga and cook for about 5 minutes, stirring occasionally, until golden and al dente. Scrape the rutabaga to the side, add a little more olive oil to the pan along with the ginger, cook for 1 minute, stirring constantly. Add the orange zest (leave a little of the zest for the topping) and juice and season with salt and pepper. Stir in the rosemary or use as a topping once the plates are ready. Cook for another 1-2 minutes until the desired texture is reached.
Divide the lentils between plates and lay the rutabaga on top. Sprinkle with rosemary, orange zest, and crushed peppercorns and drizzle with a little olive oil (optional). Serve immediately.

Lamb Chops with Orange-Herb Crust & Mediterranean Mashed Potatoes

When the popular German food magazine Lust auf Genuss asked to feature eat in my kitchen in their February print issue I was more than excited. This magazine is a culinary gem! Their fantastic team creates so many amazing recipes and shares detailed information about our every day ingredients. I really love their special columns about wine makers and other fascinating food producers and their delicious products, just reading through the pages and seeing the pictures makes me want to cook!
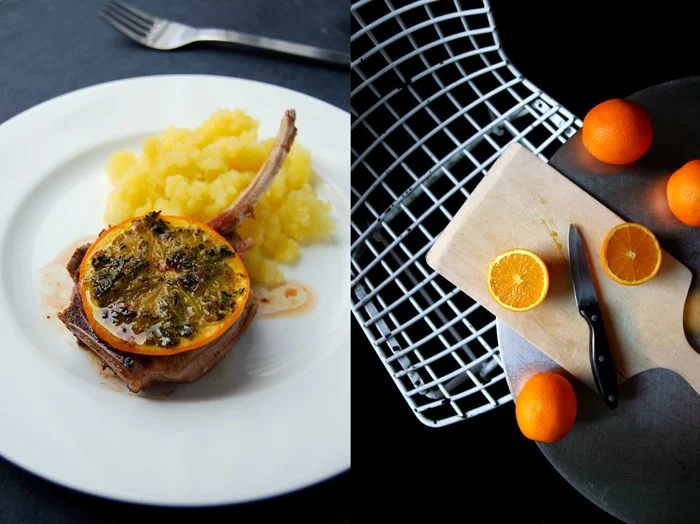
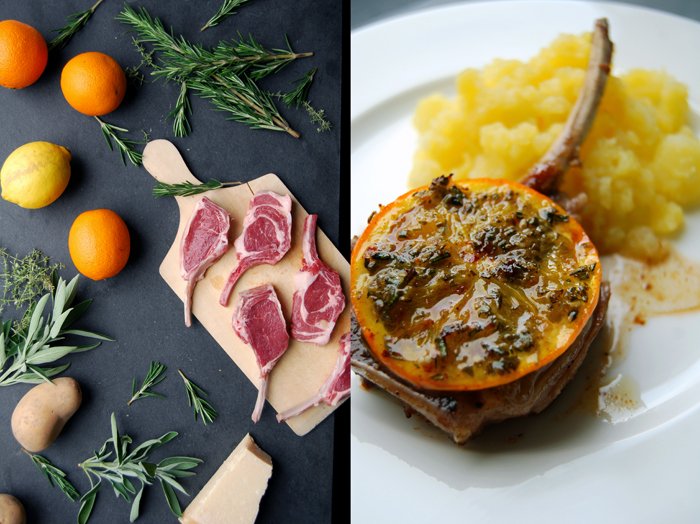
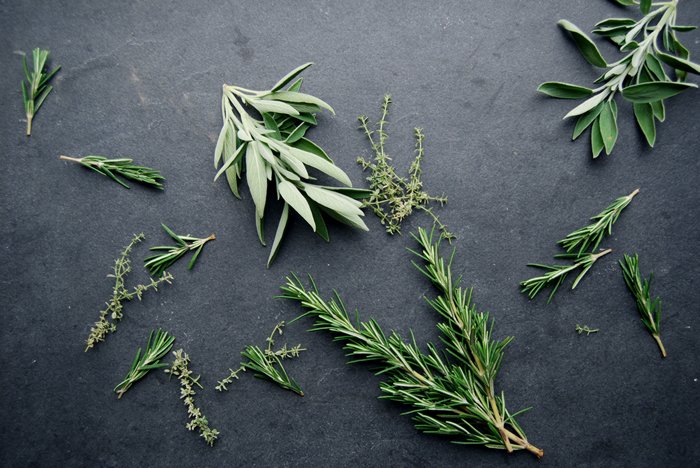
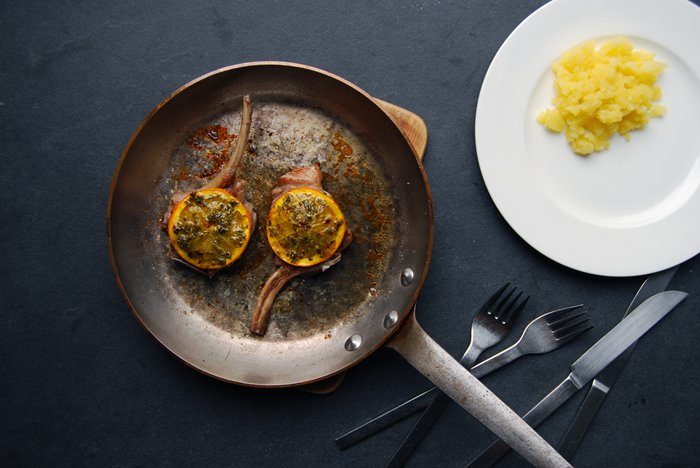
I was very lucky, this month's issue was about citrus fruits which made my pleasure even greater, there is barely a recipe without oranges, lemons or tangerines coming out of my kitchen at the moment. So a whole magazine dedicated to my beloved powerful fruits felt like the perfect surrounding for a feature about me and the blog, especially because I was asked to contribute a new recipe which wasn't on the blog yet. My first choice was guinea fowl with lemon ricotta stuffed under the skin but the magazine's own cooking team had a similar recipe in mind. Lamb chops were next on my list. Easter is close and there'll definitely be lamb on the table at one point, it also combines wonderfully with citrus flavours. It seemed just perfect. The decision for the final recipe was actually made in the forest, during an afternoon walk with my mother. We chatted about the feature and within seconds the idea was set: the chops quickly seared and topped with a thin slice of orange then finished under the grill. The orange coated in a layer of chopped, fresh herbs (rosemary, thyme and sage) mixed with parmesan and olive oil. The ripe cheese creates a fine crust in the oven and adds its wonderful aroma to the composition.
I served the lamb with lemony Mediterranean mashed potatoes to keep it pure and simple, just olive oil, sea salt and a bit of lemon zest chopped with a knife into the roots. This is the right meal to get into the mood for spring and all its culinary pleasures!

Lamb Chops with Orange Herb Crust & Mediterranean Mashed Potatoes
For 2 people you need
For the lamb chops
lamb chops (1 1/2-2cm / 3/4" thick) 6, about 450g / 16 ounces
organic orange, ends cut off, very thinly sliced, 1 (you'll need 6 slices)
olive oil 3 tablespoons plus more for frying
mixed fresh herbs (rosemary, sage, thyme), finely chopped, 1 tablespoon
freshly grated aged Parmesan 2 tablespoons
salt and pepper
Set the oven to grill (broiler), the oven has to be hot when you put the meat in.
Whisk the olive oil, herbs and Parmesan and coat 6 slices of orange generously with the herb oil on both sides. Heat a splash of olive oil in a pan and sear the lamb chops over a high heat for 1 minute on each side. I like them rare, keep them in the pan for another 30 seconds if you prefer them medium. Take the pan off the heat and season with salt and pepper. Lay 1 slice of herb coated orange on each piece of meat and put the lamb chops under the hot grill for about 1 minute (just let cheese melt and the rind turn golden brown). Serve with the mashed potatoes.
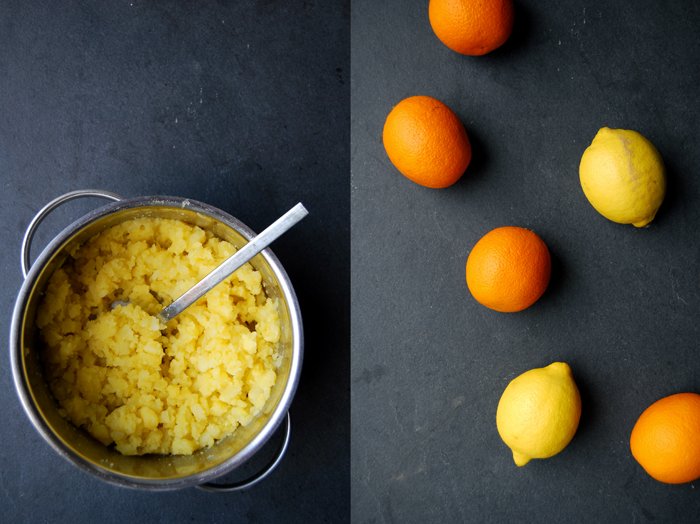
For the mashed potatoes
potatoes, peeled and cooked in salted water, about 400g / 14 ounces
olive oil 50ml / 2 ounces
lemon zest 1 1/2 teaspoons
sea salt
Chop the warm potatoes with a knife until they have a lumpy texture adding the oil constantly. Stir in the zest and season with salt.

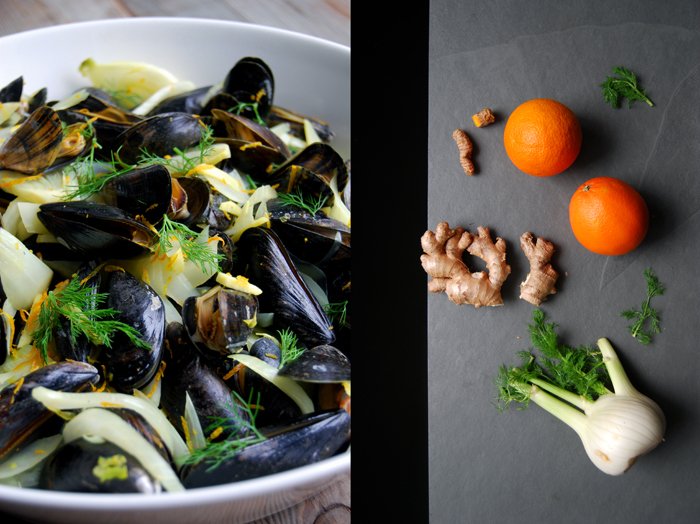
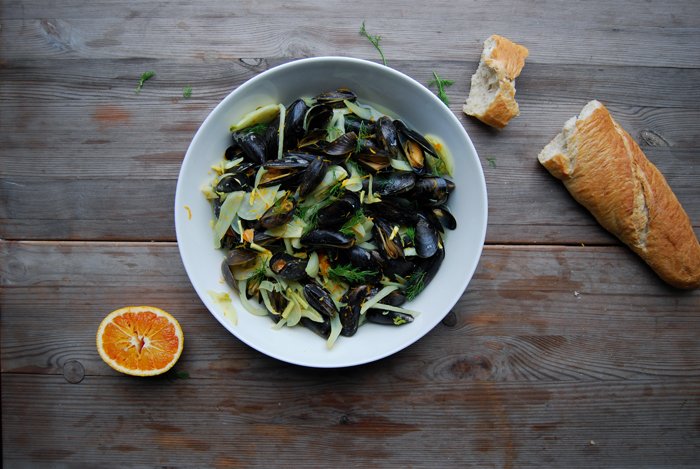
Blood Orange Mussels with Fennel, Ginger and Turmeric Roots
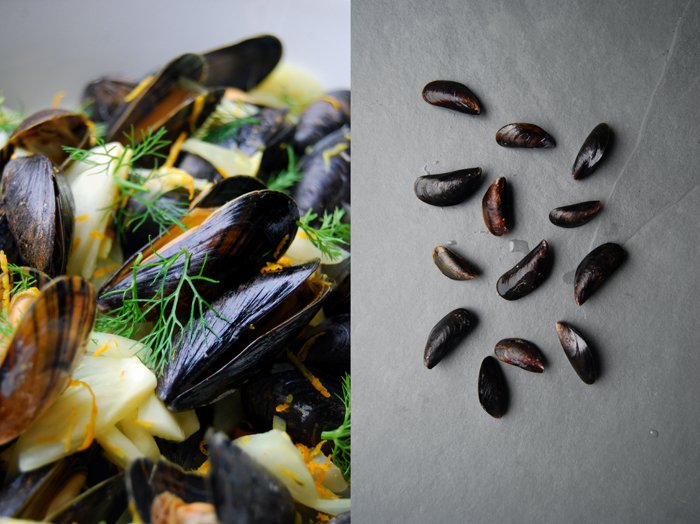
I'm still in my post Christmas meat-reduced phase, I just don't feel inspired to throw a heavy roast in the oven, or put a steak in the pan. Although the annual feasting is already a month ago, my appetite calls for vegetables and seafood, light on the body and preferably refined with lots of citrus fruits, herbs, spices or whatever comes into my mind.
Out of all the wonderful culinary gifts we get from the sea, mussels are one of the easiest to prepare and luckily, they're still in season. I like to be brave when it comes to seasoning their cooking juices, I want each single flavour to be present to infuse their meat, this is not the time to be shy! Today's recipe follows this rule and makes the most aromatic broth, it's perfect to dip little pieces of crunchy baguette in. This is almost the best part of this meal and every time we have mussels on the table, it fills me with excitement. So, I chose a combination of sweet blood orange, fennel, fresh ginger and turmeric which literally melts in your mouth, it's a colourful explosion of fresh flavours. Look at the bright yellow, the vibrant orange and refreshing green, translate that into taste and you'll have an idea of what happened at our lunch table!
For the cooking broth, I mixed the citrus fruit's juice with some white wine and grated a little zest which created a wonderful aroma. Roots were my next addition, strips and slices of warming ginger and luckily, I can get fresh turmeric at the moment. The deep orange root is a fragrant concentrate, it's so unique you can't compare it to anything else, not even the powder. When I peel the thin skin off it turns my fingers into a golden yellow, it had the same effect on the broth and looked stunning. I couldn't help it, this buoyant dish just put a smile on my face!
Some more mussel inspiration:


Blood Orange Mussels with Fennel, Ginger and Turmeric
For 2-3 people you need
fresh mussels 1 kg / 2 pounds
white wine 200ml / 1/2 pint
freshly squeezed blood orange juice 50ml / 1 3/4 ounces
blood orange zest 1 tablespoon
small fennel bulb, quartered and thinly sliced, 1 plus the fresh green, chopped, for the topping
fresh ginger, cut into small strips, a thumb sized piece
fresh turmeric, sliced, 1 thumbnail sized piece
bay leaf 1
salt 1/2 teaspoon
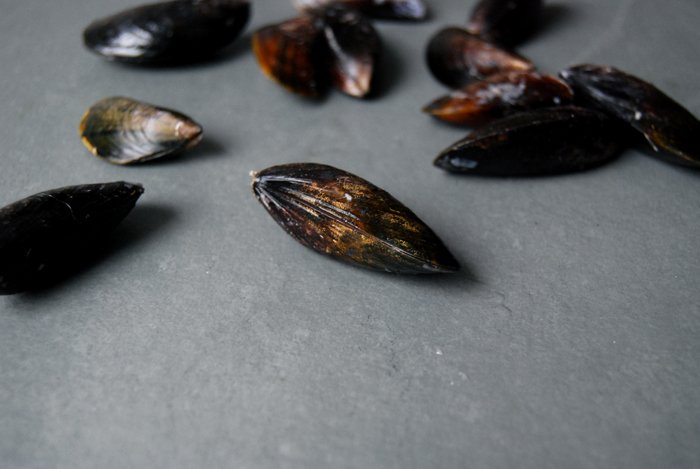
Rinse and scrub the mussels under cold water and cut off the beard, discard any broken mussels.
In a large pot, bring the wine and juice with the zest, fennel, ginger, turmeric, bay leaf and salt to the boil. Add the mussels to the hot broth, close with a lid and cook on lowest heat for 5 minutes or until the shells open (shake the pot once or twice while cooking or gently mix with a slotted ladle). Discard any mussels that don’t open! Sprinkle the mussels with the fresh fennel green and serve immediately, preferably with baguette and a glass of chilled white wine.

Elisenlebkuchen - Juicy Spice Cookies with Bittersweet Chocolate
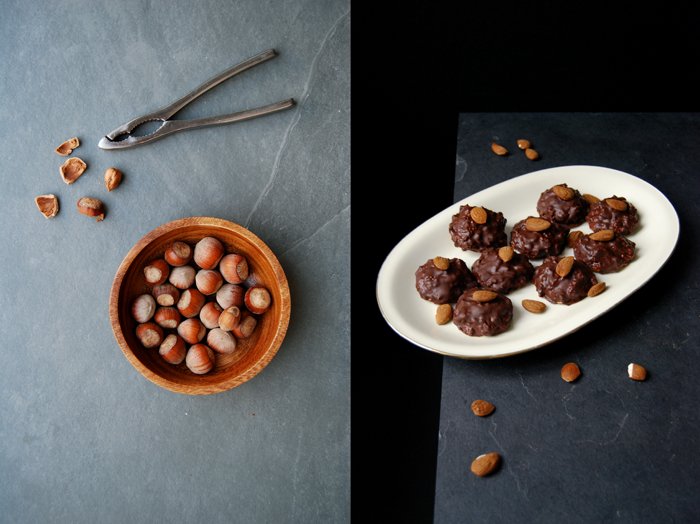
Elisenlebkuchen are essential German Christmas treats! A bite of these juicy spice and chocolate cookies, a sip of my mulled wine and some John Fahey tunes in the background and I'm right in the mood for the 1st Advent!
These dark sweets are a special kind of Lebkuchen, made without any flour or butter but lots of ground hazelnuts, almonds, spices and citrus fruits. They are often compared to gingerbread (which I find difficult as there's no ginger involved in the recipe), with a similar aromatic juiciness which is no surprise as they combine all the wonderful flavours associated with festive baking, like cinnamon, cardamom, cloves, all spice and citrus. A simple Lebkuchen officially becomes the queen of all Lebkuchen, the fine Elisenlebkuchen, when the dough contains more than 25% of nuts and less than 10% flour. It's kind of a royal upgrade to keep the quality and protect its tradition. Originally from Nuremberg (Nürnberg in German), the city gained fame all over the world for this sweet delicacy. I remember emptying one package of them after the other as a child at Christmas, preferably the ones covered in bittersweet chocolate. The Nuremberg Lebkuchen are either 'naked' or glazed with sugar or chocolate, which were the most popular ones in my family so I had to eat them quick.
After years of stuffing my belly with them under the Christmas tree, the time has come to start the Lebkuchen production at my home. Elisenlebkuchen are often quite big but I wanted a smaller size, just a small bite to enjoy them more often. The preparation is surprisingly easy. The dough can be used as soon as it's mixed although some bakers recommend keeping it in the fridge overnight. It's a bit sticky but manageable. You just have to drop a dollop of it on a thin edible wafer paper for cookies (also known asoblate) and put them in the oven until they are golden but still soft inside. The result is almost spongy and so fragrant that it wasn't easy for me to watch them cool before I could brush them with bittersweet chocolate. When you have a treat like this in front of you, the last thing you want to do is wait!
In the past, certain bakeries were specialised in the production of Lebkuchen all over the country to create their own christmassy signature sweet for their region. The textures and shapes vary, some are cut into squares like in Aachen in the west of Germany, or baked in the shape of hearts like in Bavaria. Elisenlebkuchen are still my favourite, with chocolate of course and preferably in large amounts!
Have a jolly 1st Advent!
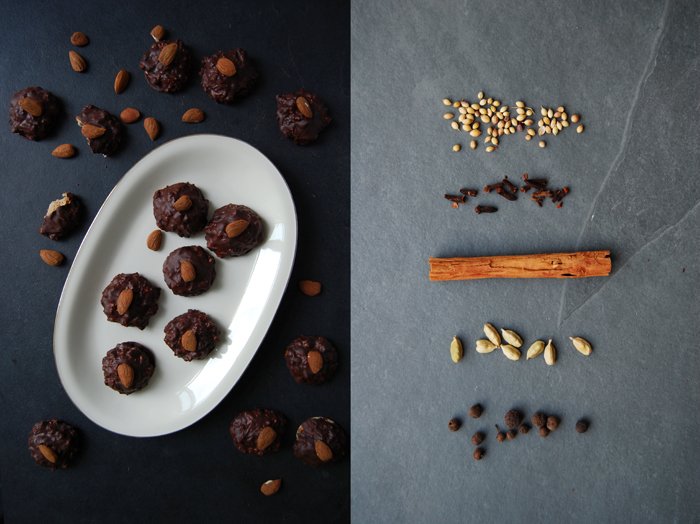
Elisenlebkuchen
For 40 cookies you need
organic eggs (at room temperature) 3
granulated sugar 210g / 7.5 ounces
hazelnuts, roughly chopped, 40g / 1.5 ounces
ground hazelnuts 200g / 7 ounces
ground almonds 80g / 3 ounces
candied lemon peel 50g / 2 ounces
candied orange peel 50g / 2 ounces
lemon zest 2 teaspoons
orange zest 2 teaspoons
ground cinnamon 1 1/2 teaspoons
ground cardamom 1/4 teaspoon
ground cloves 1/2 teaspoon
ground coriander 1/2 teaspoon
ground allspice 1/4 teaspoon
ground mace 1/4 teaspoon
a pinch of salt
edible round wafer papers for cookies (50mm / 1/4" diameter), 40 (if you use a bigger size, add a little more dough on each of them and bake the cookies a bit longer)
bittersweet chocolate 300g / 10.5 ounces, for the topping
butter 1 1/2 tablespoons, for the topping
almonds 40, for the topping
Set the oven to 180°C / 355°F and prepare a baking sheet with parchment paper.
In a saucepan, melt the chocolate and butter for the topping.
Mix the eggs and sugar with an electric mixer for about 7 minutes until light and creamy, there shouldn't be any sugar crystals left.
Combine the ground nuts, almonds, candied peel, zest, spices and salt and gently stir into the egg sugar mixture with a wooden spoon until combined. Stir in the chopped nuts and put a heaped teaspoon of the dough on each round wafer paper. Put the cookies on the baking sheet and bake in the oven for about 13 minutes or until golden, they should stay soft inside.
Let them cool on a rack before you brush them with the melted chocolate and garnish each of them with an almond.

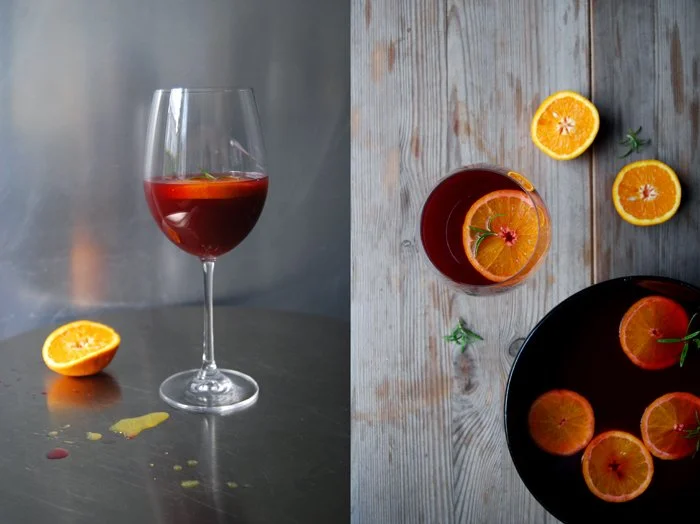
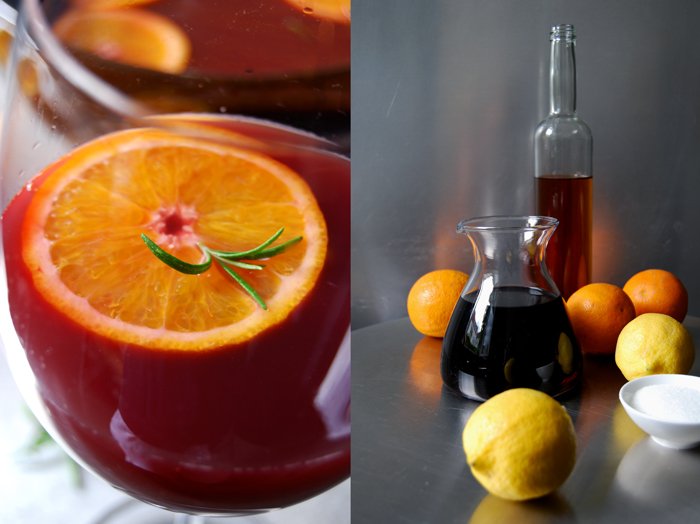
Chilled Summer Sangria with Rosemary

This is one of the best summer drinks, chilled summer sangria with lots of orange juice and woody rosemary. I use more juice than wine, so it's stuffed with vitamins - you could almost call it a healthy drink! The juice of a lemon adds a bit of sourness which I don't want to weaken with too much sugar. Only 1 tablespoon, that's all I put in and its enough to push the fruit's natural sweetness. A glass of brandy and a few orange slices make this Spanish classic complete. You could also chop in some peaches or strawberries, but I like to concentrate on citrus fruits. That's how I remember it from my holidays in Ibiza and that's how I love it. The rosemary is my personal customization, we tried it once and got hooked on it.
For 1 big bowl of sangria, I mixed 750ml / 1.5 pints of dry red wine with 900ml / 2 pints of good quality orange juice and 150ml / 5 ounces of brandy. I added the juice of a lemon, 1 tablespoon of sugar, 4 small sprigs of rosemary and the slices of 1 organic orange. The sangria is best slightly chilled and when it can sit for at least 1 hour.


Bittersweet Chocolate and Orange Sponge Cake

Last week I wrote about one of my numerous phone calls with my Maltese granny who is actually my boyfriend's granny but over the years, after so many stays on her home island and through our shared passion for food she "adopted" me. That's how it feels, she became my granny. In our last conversation she gave me a wonderful recipe for the Maltese tea time cookies with vermouth and she also mentioned a cake made with bittersweet chocolate and orange (juice and zest). I love this combination but my boyfriend isn't so fond of it and I didn't want to end up eating a whole cake on my own. But she insisted on giving it a try, she knows her grandson after all, and she was right!
We both agreed that this cake is amazing, simple but so aromatic. The texture is very spongy and on top it has a fine sugary crust, a bit flaky. I sprinkled it with some more chocolate when the top was still a bit warm and it melted into the crust. Granny Edith was right, I didn't have to eat the cake on my own and it didn't even last for 2 days!
Bittersweet Chocolate and Orange Sponge Cake
For a 20cm / 8″ cake pan you need
butter 180g / 6.5 ounces
granulated sugar 210g / 7.5 ounces
plain flour 180g / 6.5 ounces
baking powder 2 teaspoons
a pinch of salt
organic eggs 3
orange juice 2 tablespoons
orange zest 1 1/2 tablespoons
bittersweet chocolate, chopped coarsely, 100g / 3.5 ounces plus 1 tablespoon finely grated for the topping
Set the oven to 175°C / 350°F (fan-assisted oven) and butter the cake pan.
Mix the butter with the sugar and orange zest till fluffy. Add the eggs, one at a time and mix well for a couple minutes. Add the flour, baking powder, salt and orange juice and mix quickly until everything is combined. Stir in the chopped chocolate and scrape the dough into the prepared pan. Bake for 40 minutes or until golden brown. Check with a skewer, it should come out clean. Let the cake cool for 5 minutes and sprinkle with finely grated chocolate.


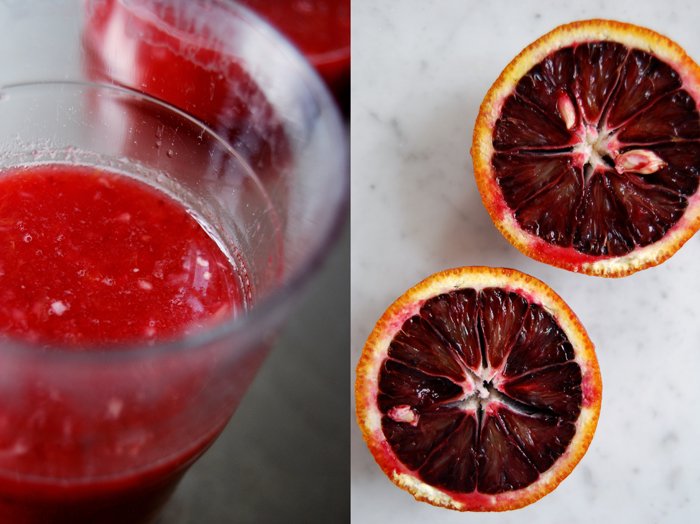
Blood Orange Rosemary Sorbet
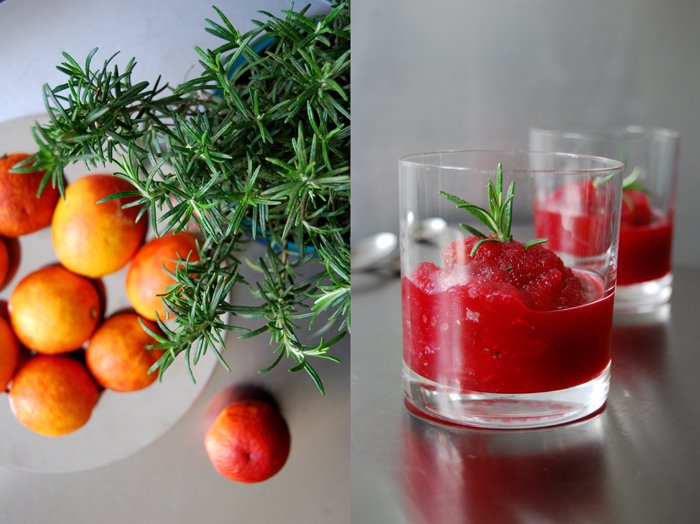
When I bought our ice cream maker a couple years ago, I didn't use it at first. I'm not crazy about ice cream although I have a sweet tooth and I can eat sweets all the time - if it's frozen I have to be in the mood. Things changed after I made my own first ice cream, I think it was strawberry, very creamy and far better, fruitier and less sweet than most I had tried before.
I always start my ice cream production in spring as I prefer to make it with fresh fruit, strawberry, blueberry, later in the year I use plums as well, everything sweet and aromatic finds its way into my ice cream maker. It's still quite early in the year and the temperature is far from summery but spring officially starts today, the perfect day to begin the production! Local berries aren't ripe yet so I have to think of something else. I find my inspiration in a frozen delicacy I love to eat in summer when we're in Malta, a fruity granita or sorbet! I love to walk along the promenade at the sea in the late afternoon when the sun is more forgiving, a cup of sour lemon granita in my hand, melting as soon as I dip the spoon into the crunchy bits of ice!
Today, it's not lemon but blood orange. I want to use them as long as they are still juicy and sweet. I'm in the mood for a sorbet with more complex flavours so I add a few chopped needles of rosemary. The result is delicious and the recipe a keeper, I will definitely make another batch soon!

Blood Orange Rosemary Sorbet
For 4 big portions of sorbet you need
freshly squeezed blood orange juice 500ml
juice of 1 lemon
icing sugar 50g / 2 ounces
fresh rosemary, finely chopped, 2 teaspoons
Mix the ingredients well and put into an ice cream maker for around 25 minutes until almost frozen. Serve immediately or keep in the freezer.


A Monday Morning Juice with Grapefruit, Banana, Orange and Ginger

I have the tendency to become overly excited as soon as the temperature rises above 10°C and the sun comes through for more than a couple hours. I know it's only the beginning of March but I already feel like spring. I want to get out my summer clothes and jump around in the springy, fresh air. I want to sit outside a café with a glass of chilled white wine, enjoying the warm sun. Unfortunately, there's still a gap in temperature between my dreams and reality which I don't want to accept (sometimes) and that's exactly the problem! I'm prepared for the coldest winter and arctic temperatures, I never get a cold, but at this time of the year, a stone's throw away from the end of the cold season, I tend to be too carefree and strain my immune system.
To avoid any deficit in vitamins, I start the week off with a powerful juice made of grapefruit, banana, blood orange and ginger. For two glasses of juice (400ml in all), I squeeze 1 pink grapefruit and 3 oranges. I add 1/8 teaspoon of grated ginger and half a banana, mashed smoothly with a fork. You can use a whole one but I didn't want its taste and sweetness to be too overpowering.
It's a true energy boost, like my January's Turmeric and Ginger Blood Orange Juice!


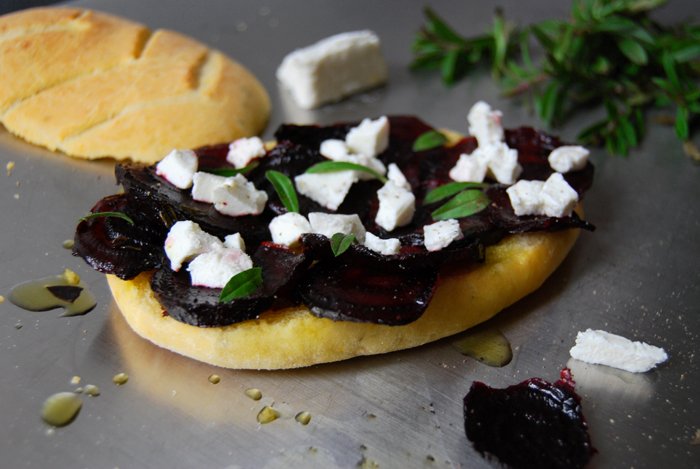
Fougasse Sandwich with Baked Beetroot, Goat Cheese and Thyme

I got really hooked on the roots and syrup combination in the past week. It all started with my ginger honey glazed Navet, yellow turnip fried as vegetarian steaks followed by caramelised maple parsnip with goat cheese combined in a warm salad and I'm still in the mood for sweet and earthy duos, at least one more.
It's Sandwich Wednesday and the first thing that came into my mind when I looked at the beautiful Fougasse bread I baked yesterday, was a baked beetroot sandwich. My flatbread has strong aromas of orange and sage, perfect to add some more earthy and sweet flavours. There are some beetroots lying on my kitchen window sill, just waiting to be baked in maple syrup and olive oil sprinkled with thyme. I found a kind of thyme at the organic store that I have never seen before, with thick, long leaves. They are stronger in taste compared to the small leaved one, a bit woody. The thin slices of the roots are done after 10 minutes in the oven, soft, syrupy and partly crisp. I let them soak into the oily bread and finish my sandwich with some mild goat cheese crumbled on top to add some fresh milkiness.
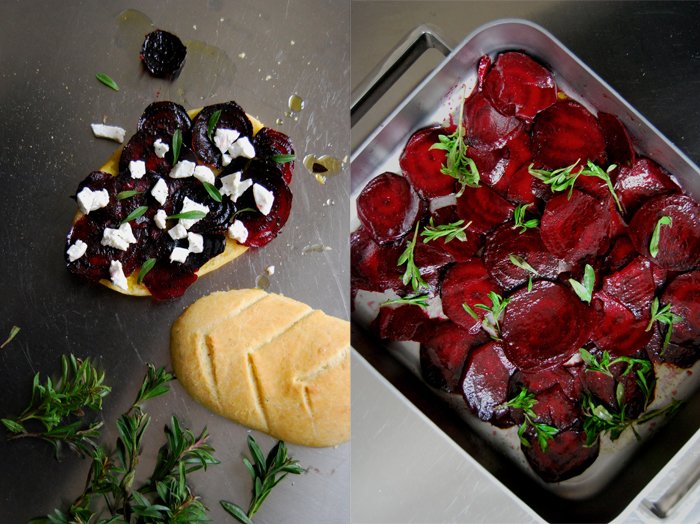
I made 3 flatbread sandwiches with 3 small beetroots peeled and cut into very thin slices and mixed with 3 tablespoons of olive oil and 2 tablespoons of maple syrup. I seasoned the roots with salt and pepper, mixed them with a few sprigs of thyme and roasted them spread in a roasting tin for 12 minutes in the hot oven set to 220°C / 430°F (Rotitherm roasting setting) until they were soft.
If you don't want to make your own Orange Sage Fougasse bread (I can just recommend it as it's fantastic), you can also use focaccia or soft buns (I made some very soft and juicy Mountain Buns with spices a couple months ago). I cut the flatbread in half, drizzled some olive oil (generously) on one side and spread the roast beetroot slices on top. After I sprinkled them with goat cheese (for 3 sandwiches I used 100g / 3.5 ounces of cheese), some fresh thyme leaves, salt and pepper, I closed my Fougasse sandwich, pleased about another great sweet root variation!


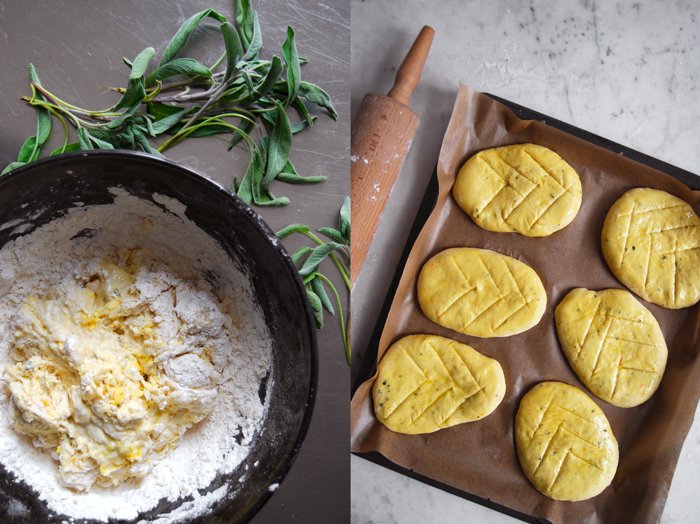
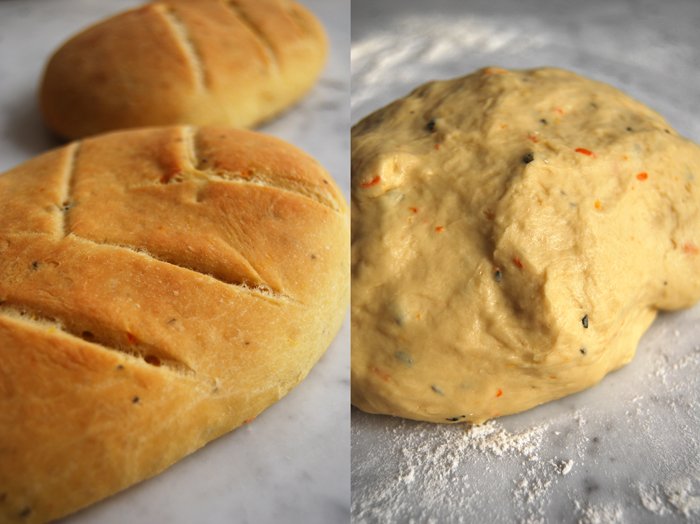
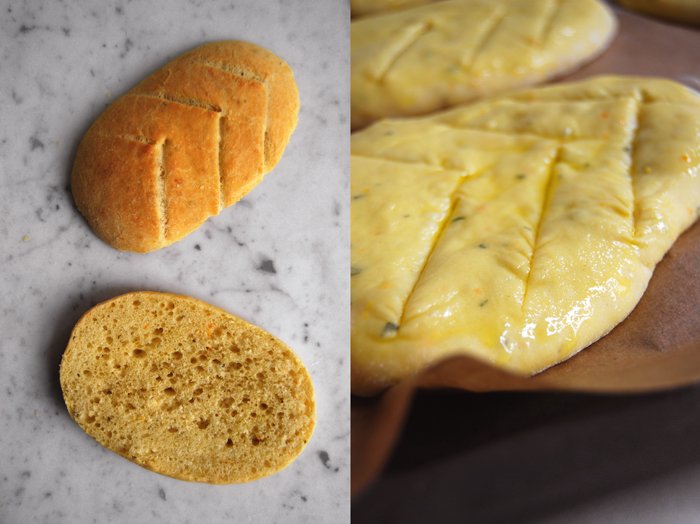
Fougasse Bread with Orange, Sage and Olive Oil
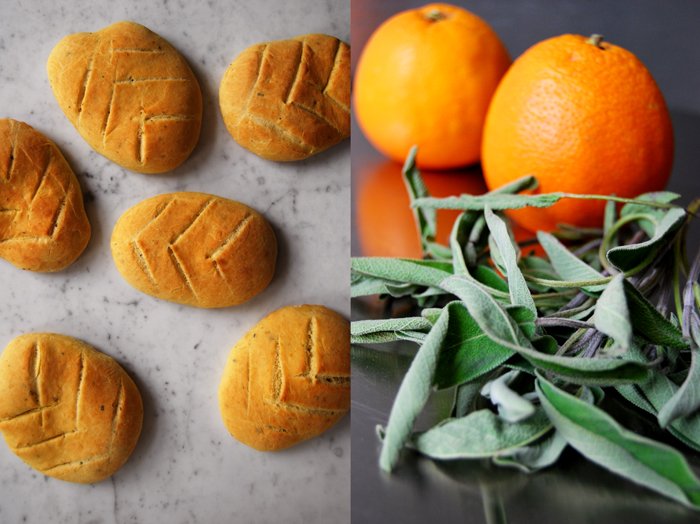
It's time to bake bread again! I use a recipe which involves sage and my beloved blood oranges, they'll be out of season soon, so I'm using every possible occasion that allows me to cook or bake with my sweet citrus fruits. I mix generous amounts of their zest and juice into the dough and the result is impressive!
My bread is a light and aromatic Fougasse, a French flatbread very popular in Provence where it's often made with olives, herbs and cheese. It's similar to the Italian Focaccia but with a leaf pattern of cuts in the dough. In some recipes, the cut goes all the way through creating holes in the bread while it's baking which makes the bread harder. I prefer to leave mine juicy with shallow cuts on the surface. Besides the orange and sage I add good olive oil in and on the bread. I use the wonderful extra virgin olive oil from the Molise region which I got from Marilena. Its strong and fruity taste is just what my Mediterranean flatbread needs!
I already have a great idea for a sandwich I can make with this bread for tomorrow's Sandwich Wednesday!
Fougasse with Orange, Sage and Olive Oil
For 6 flatbreads you need
plain flour 400g / 14 ounces (I use spelt flour type 630 but you can use any other plain flour)
dry yeast 1 package (for 500g / 1 pound flour)
salt 1 teaspoon
fresh sage, chopped, 8-10 leaves
zest of 1 medium sized orange
freshly squeezed blood orange or orange juice 100ml
water, lukewarm, 100ml
olive oil 5 tablespoons plus more for brushing the bread
organic egg 1
Combine the flour, yeast, salt, orange zest and sage in a large bowl. Add the water, orange juice and egg and mix with your dough hooks for 5 minutes. On a floured surface, continue kneading with your hands for a few minutes until you have an elastic dough ball. Put the dough back into the bowl and cover with a tea towel. Let the dough rise in a 35°C / 95°F warm oven for 45 minutes. This works really well but make sure that your oven is set to top/ bottom heat and not to fan.
Take the dough out and punch it down. Divide it into 6 pieces and roll them out into egg shaped discs (on a floured working surface, around 1 1/2 cm / 1/2″ thick). Put them on a baking sheet lined with parchment paper, cover with a tea towel and let them rise for 20 minutes.
Set your oven to 210°C / 410°F.
Brush the flatbread with olive oil and cut a pattern of 6-8 diagonal slashes into the dough to make a leaf pattern. Bake the flatbread on the lowest level for 12-15 minutes or until golden brown. Take them out and let them cool for 2 minutes.
I cut the warm flatbread in half and drizzled some more olive oil over it, it merged perfectly with the orange and sage aromas!