From my cookbook: Chocolate Olive Oil Bundt Cake with Candied Orange Peel
Berlin, 2016:
The first picture of today's post caught the moment I held my Eat In My Kitchen cookbook in my trembling hands for the first time. I had to sit down, or rather, I fell into my beloved old chair in my living room. This chair has seen many emotions, sad and happy, it's been with me all my life and it's the place I want to be when the world around me becomes a little overwhelming.
So this chair had to catch me once again. My knees were wobbly and I didn't know if I should laugh or cry, so I did both. I received a package from my publisher and I knew what it was before I even opened it: two books, my books.
Tomorrow is a very special day, my German book, Eat In My Kitchen -sssen, backen, kochen und genießen, will be published and in a week the English book will follow: Eat In My Kitchen- to cook, to bake, to eat, and to treat, on October 4th. The book is already on Epicurious' list of 'The 25 Most Exciting New Cookbooks for Fall 2016' and my heart is jumping with joy!!
So many people keep asking me how I feel about my big publishing day(s), whether I'm excited, proud, or nervous. To be honest, I can't really say how I feel. Maybe confused and overwhelmed? As much as it felt normal to write this book at one point, to cook and bake the recipes, and to take the pictures, strangely enough it's starting to feel normal to know that it'll be out soon. It may sound weird and maybe I'm wrong, maybe I'll have a nervous breakdown at one point, maybe when I present the book in front of an audience (in the next few weeks, all over Europe and in the US), or when I see it at in bookstores, or when I watch people pulling it off a shelf and buying it. I don't know.
Luckily, I don't have much time to think about it, which is sometimes the best thing that can happen. Eat In my Kitchen feels as intuitive, natural, and close to myself as it can get. The physical book just as much as this blog. I'm in my comfort zone, constantly, which I consider to be the greatest gift. I don't take anything for granted in life, I'm here and I want to learn, grow, and experience everything. I don't know if I'll fail or succeed with this book, but it's also nothing I want to worry about. Every recipe, every story and picture that fill the 256 pages of this book, is totally me, to question or doubt its relevance, would be fatal. That would mean questioning my passion and my beliefs, before this book even sees a shelf in a bookstore.
I can say that I'm unbelievably happy that this book exists. With a big smile on my face, I stand behind all I've created and written in the past year and a half to fill its pages, in both the German and the English book. I went through many lows and I took the highs with great pleasure, I suffered and I cried, I changed some decisions and stood strongly behind others. I've been through my battles, while working on these pages. But now I let go. A month ago I wrote about this transition, this process of letting go of a project. Tomorrow, this process will be complete.
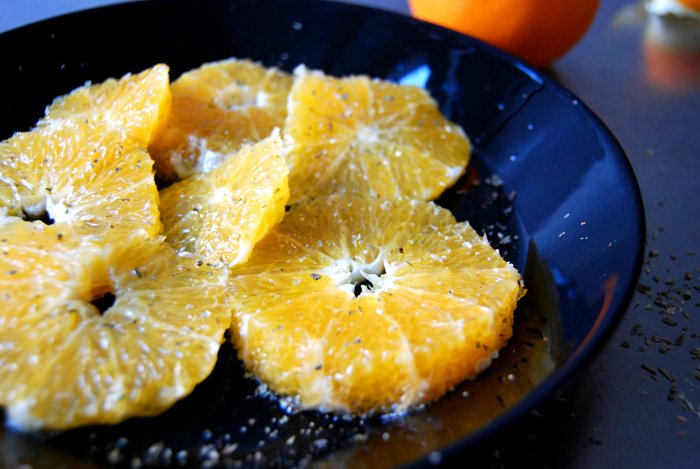
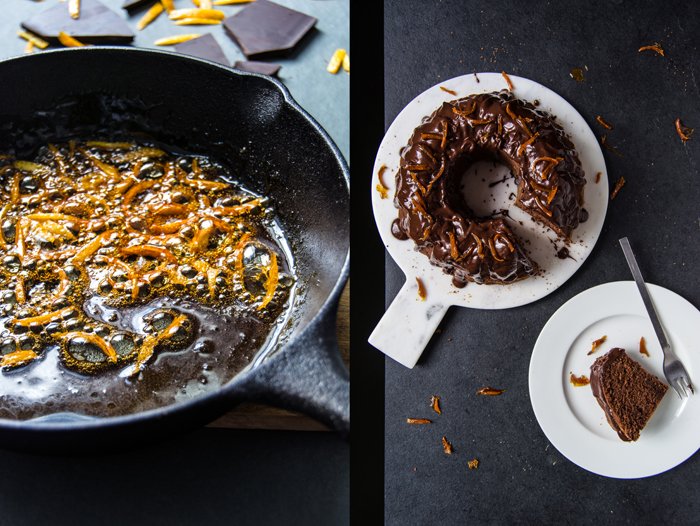
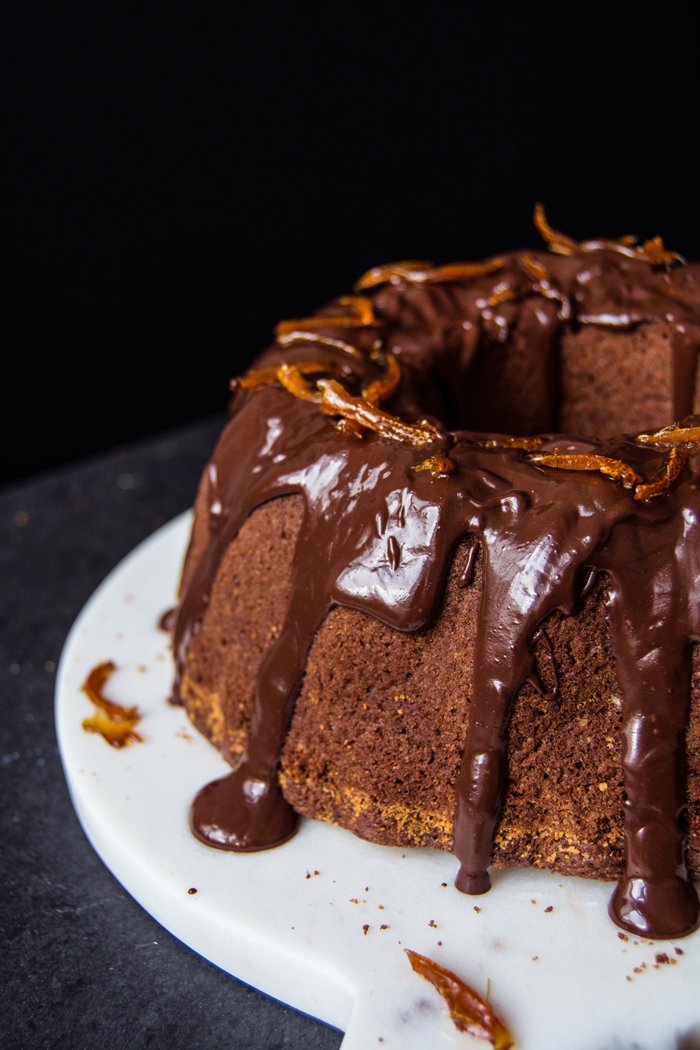
Today sees a premier on the blog, I'm sharing the first recipe from my book with you and, also for the first time, I'll share a recipe in English and in German. I get many requests to write my blog in two languages, and as much as I'd love to do that, I simple don't have enough time. I appreciate the effort of so many of you who aren't that familiar with the English language but still give it a try and follow my recipe instructions in a foreign language. Today, my German readers, you can relax and bake the most delicious, spongy chocolate olive oil Bundt cake, topped with a thick chocolate glaze and sweet and crunchy caramelized orange peel. I love this cake!
Next week, I'll share another recipe from my book with you, on the 4th October, on the day when my English readers can hold the book in their hands for the first time. I'll be in Malta at that point, celebrating the book at my launch at the gorgeous Villa Bologna before my journey takes me to London, New York, and Washington. I'll try my best to keep up with writing about all this here on the blog - and I also intend to start sharing videos on Instagram, so please come over and join my journey in the next few weeks and months.
Today I want to thank my amazing team here in Germany, all the wonderful women and men who made this book possible. Thank you everyone at Prestel in Munich, especially Pia, Julie, and Adeline. Thank you so much Ellen Mey for being my editorial guidance.
So very soon the book will be available in bookstores, and in case you can't find it on the shelves, you can order it at any bookstore in the world, or here:


Chocolate Olive Oil Bundt Cake with Candied Orange Peel
from Eat In My Kitchen - to cook, to bake, to eat, and to treat, published by Prestel
SERVES 8 TO 12
Dry breadcrumbs, for sprinkling the Bundt pan
2 cups (260 g) all-purpose flour
1 cup (200 g) granulated sugar
1 tablespoon baking powder
1 teaspoon baking soda
⅛ teaspoon fine sea salt
5 ounces (140 g) bittersweet chocolate
⅔ cup (155 ml) olive oil5 large eggs
3½ tablespoons (50 ml) whole milk
1 tablespoon freshly grated orange zest
3½ tablespoons (50 ml) freshly squeezed orange juice
FOR THE CHOCOLATE GLAZE
5 ounces (140 g) bittersweet chocolate
1 tablespoon (15 g) unsalted butter
1 to 2 teaspoons sunflower oil
FOR THE CANDIED ORANGE PEEL
¼ cup (50 g) granulated sugar
2 tablespoons water
1 small handful very thin strips of fresh orange peel
Preheat the oven to 350°F / 180°C (preferably convection setting). Butter a 7½-cup (1.75 l) Bundt pan and sprinkle generously with breadcrumbs.
In a large bowl, whisk together the flour, sugar, baking powder, baking soda, and salt.
In a large heat-proof bowl set over a saucepan of barely simmering water, melt the chocolate. Let cool for a few minutes then add the olive oil, eggs, milk, orange zest, and orange juice, and beat with an electric mixer for 2 minutes or until smooth. Add to the flour mixture and quickly mix with an electric mixer for 1 minute or until well combined. Pour the batter into the prepared Bundt pan and bake for about 35 to 40 minutes (slightly longer if using a conventional oven) or until golden brown and firm on top. If you insert a skewer into the cake, it should come out clean. Let cool for a few minutes then shake the Bundt pan a little and turn the cake out onto a plate. Let cool completely. Trim the bottom of the cake to even it out.
For the chocolate glaze, melt the chocolate and butter in a saucepan over low heat. Add 1 to 2 teaspoons of vegetable oil and whisk until smooth. Pour the glaze over the cooled cake, evening it out with a knife or leaving it in voluptuous drops.
For the candied orange peel, in a small saucepan, bring the sugar and water to a boil. When it starts to caramelize add the orange peel. Reduce the heat to medium and cook for 3 to 4 minutes or until the peel is golden and soft—mind that it doesn’t burn. While the caramel is still liquid, quickly transfer the candied peel to a piece of parchment paper. Let cool for 1 minute then peel it off the paper and decorate the cake while the glaze is soft.

German recipe:
Schokoladen-Gugelhupf mit Olivenöl und Kandierter Orangenschale
aus Eat In My Kitchen - essen, backen, kochen und genießen, veröffentlicht bei Prestel
FÜR 8–12 PERSONEN
Semmelbrösel, für die Gugelhupfform
260 g Mehl200 g Zucker
3 TL Backpulver
1 TL Speisenatron1 Prise feines Meersalz
140 g Zartbitterschokolade
150 ml Olivenöl
5 Eier
50 ml Milch
1 EL Orangenabrieb
50 ml frisch gepresster Orangensaft
FÜR DIE SCHOKOLADENGLASUR
140 g Zartbitterschokolade
1 EL Butter
1–2 TL Sonnenblumenöl
FÜR DIE KANDIERTE ORANGENSCHALE
50 g Zucker
2 EL Wasser
1 kleine Handvoll sehr dünne Streifen Orangenschale
Den Ofen auf 180 °C (Umluft) vorheizen. Eine Gugelhupfform (1,8 l) einfetten und großzügig mit Semmelbröseln bestreuen.
In einer großen Schüssel Mehl, Zucker, Backpulver, Speisenatron und Salz vermischen.
Die Schokolade in einer großen Schüssel über einem Wasserbad schmelzen. Ein paar Minuten abkühlen lassen, dann Olivenöl, Eier, Milch, Orangenabrieb und Orangensaft dazugeben und mit einem Handrührer etwa 2 Minuten glatt rühren. Zu der Mehlmischung geben und mit dem Handrührer etwa 1 Minute gut verrühren. Den Teig in die vorbereitete Gugelhupfform gießen und etwa 35–40 Minuten goldbraun backen, die Oberfläche sollte fest sein. Ein Metallstäbchen sollte nach dem Einpieksen in den Kuchen sauber sein. Ein paar Minuten abkühlen lassen, dann die Gugelhupfform ein wenig rütteln und den Kuchen auf eine Platte stürzen. Komplett auskühlen lassen und, falls nötig, den Boden gerade schneiden.
Für die Schokoladenglasur Schokolade und Butter in einem Topf bei niedriger Hitze schmelzen. 1–2 TL Sonnenblumenöl dazugeben und glatt schlagen. Die Glasur über den ausgekühlten Kuchen gießen, mit einem Messer verteilen oder in üppigen Tropfen herunterlaufen lassen.
Für die kandierte Orangenschale Zucker und Wasser in einem kleinen Topf zum Kochen bringen. Wenn es anfängt zu karamellisieren, die Orangenschale dazugeben. Bei mittlerer Hitze etwa 3–4 Minuten köcheln lassen, bis die Schale golden und weich ist – aufpassen, dass sie nicht anbrennt. Während der Karamell noch flüssig ist, die Orangenschale schnell auf einem Stück Backpapier ausbreiten. Ein paar Minuten auskühlen lassen, von dem Papier abziehen und den Kuchen damit dekorieren, solange die Glasur noch weich ist.


What it means to write a cookbook - the EAT IN MY KITCHEN book is ready for pre-order!

It's coming to life: my book cover is out, the pre-order link is out, and I'm the happiest person in the world!
Writing a cookbook feels like being on a rollercoaster for months. It reveals emotions that I didn't even think I'd be capable of. Creating a book throws you up to the highest highs and drops you back to the ground, it makes you crawl into the deepest holes to bring out the best that you can possibly do - because it's a book. But it's all worth it, as it's one of the most exciting and satisfying experiences I've ever had in my life.
Usually, a book starts with an idea, a script, that the author thinks is worth sending into the world, or at least to an agent or a publisher. In my case, it was different, I was so busy with my blog eat in my kitchen, to keep the constant flow of a new recipe every day in the first year, that a cookbook didn't even come to mind. It felt strange seeing myself as a blogger, let alone calling myself an author. Some of my readers mentioned a book, or kept asking when I'd start working on a physical version of the blog, but I never saw myself as a cookbook author. I wrote about my recipes, that felt natural, as I've always been inspired by food, so coming up with new ideas in my kitchen is quite an easy task for me. My love for good food keeps the ideas flowing. So when Holly La Due from Prestel Publishing send me an email from her New York office a bit over 1 year ago to ask if I'd like to write a cookbook, I felt surprised, shocked, and overwhelmed. But then, after a few days, when the idea had sunk in, there was just happiness and gratitude for this great chance, and so I started working on what has become my first book:
EAT IN MY KITCHEN - To Cook, to Bake, to Eat, and to Treat is a collection of 100 mainly new recipes plus a few blog classics and six meet in your kitchen features (with Molly Yeh, Yossy Arefi, the Hemsley sisters and some more). I cooked and baked everything myself, alone in my kitchen at home, I took all the pictures, and wrote the book in two languages, in English and in German. To see it come to life more and more every day is rather overwhelming, and then, when I read the quotes about my book from two people whose work I admire so much, I was close to tears:
"Eat in my kitchen is a wonderful selection of recipes, bursting with colour, beauty and flavour. Each page offers a new temptation". - Sami Tamimi, head chef, Ottolenghi restaurants, co-author of Ottolenghi: The Cookbook and Jerusalem
"Great food like great art speaks the truth. Meike’s recipes and photos are pared down, honest and revealing – I love what she does! She goes right for the sensory jugular leaving you wanting and needing more. Void of superfluous detail, Meike’s all about delicious food – brava!"- Cynthia Barcomi, pastry chef, founder of Barcomi's, and author of six cookbooks
The EAT IN MY KITCHEN book will be published by Prestel on the 4th October (in English and in German) but if you're as impatient as me, you can already pre-oder it online:
Amazon.de (the German pre-order link will be available on 8th May)
In the past 12 months, my life has been more than crazy. I pity my boyfriend and I can't thank him enough for sticking with me, despite my countless nervous breakdowns and the fact that he put on weight due to my excessive cooking and baking. But we managed, all together, with my fantastic publisher team in New York, Munich, and London, and first and foremost, with my inspiring, patient, visionary Holly. I can't thank you enough.

What it means to write a cookbook:
I had lots of doubts at the start of this process, not so much about my recipes, but mainly about my photography. I'm not a professional photographer, I've always been far more passionate about the food, and I hate editing pictures (thank you so much Jennifer Endom for taking over this job for my book). So in the first days of shooting recipes for the book, I questioned every little detail and I was sure it wouldn't be good enough. Luckily, I got over it at one point, I had to, and then it became much easier. I developed all the recipes in a relatively short amount of time, it felt like they've always been inside me, just waiting to be turned into a book. After a few skype calls with my mother - the best food consultant I could ask for - and with Holly, my recipe collection was set.
Being well organized is essential when working on a book, and luckily, that's how my mind works. I can be a bundle of emotions, but if needs be, my head is clear and focussed. It helped that I studied architecture, those days at university taught me how to structure my working steps well and keep an overview (at least most of the time). Lots of lists, excel files, and notes lead to a cooking and shooting plan, including information when certain ingredients are available, which tableware I would use, and which recipes I would cook together in one day. The cooking/ shooting process took me 6 weeks and I was done - and exhausted. I had a strict weekly plan for grocery shopping, working on the blog, as I still posted 3 recipes a week at that time, test cooking, final cooking and shooting, and for writing. There were two moments during the whole process of working on my book when I felt like I crossed my limits, physically and mentally. Taking pictures of food means you're constantly rushing, to shoot the dish quick enough so that it still looks fresh, and to catch the right light (I only work with daylight). I felt constantly stressed, running out of time, and I was willing to keep the weirdest positions for the prefect shot for longer than my back would normally manage. After those 6 weeks I felt 10 years older.
Believing that the worst - or let's say, the hardest part was over - I went to Malta for 4 weeks, as I wanted to write the stories and final recipes in my Maltese mama's house in Msida. It was a great time, not very productive, but we had fun. I went snorkeling every day, we met our friends and family, and my mother came to visit for my birthday. I couldn't complain. And then I finally met Holly for the first time in person. She came to Malta to make the final selection of the pictures for the book together with me and while I had her on the island, I showed her around. It was beautiful and I wish that working on a book would always feel this way. But my rather relaxed Mediterranean schedule soon came to an end.
Writing didn't work out as easily under Malta's burning hot sun as I had expected, too many distractions, day trips, dinner parties, and the sea of course, left me with a manuscript that I wasn't that happy with. Back home in Berlin, I had to sit down at the desk - our dining table - and re-write almost everything. But then after a few weeks back in the North, I was happy with the results and my boyfriend was happy, who's the most critical when it comes to my book, which helps me a lot. So I sent everything to Holly and our copy editor Lauren Salkeld, who helped me put the recipes in a proper, professional cookbook approved, form. And this - to my surprise - took months. We emailed back and forth, changed grams to cups and rucola to arugula, rewrote instructions to avoid misunderstandings, added spaces and deleted spaces, and then after 3 months, we were done and I felt close to a breakdown. From the start, I've been quite paranoid that there could be mistakes in the book. Be it in the writing, measurements, conversion, or whatsoever. Like a maniac, I read these pages countless times to avoid mistakes, and then every time we changed something again, I was so worried that more mistakes might sneak in (which did happen). The fact that I did the German translation right away didn't make it any better. Now, I worried about two books and not just one. You don't write a book that often in your life, and if you get the chance to do it, you want to do it right. People have expectations, they will be willing to spend their money on this book, and I want to give them something that they enjoy working with in their kitchen, a book that is inspiring, and that's also nice to look at. Everybody has been telling me from the start, "Meike, there will be mistakes, like in any other book," and I'm aware of this, but I want to keep them as rare as possible. Thanks to my proof-reading friends in LA and Berlin, we made it: Kisses to you, Pattie and Ursula!
There is one part of working on a book that I actually enjoy a lot, and that's when the designer comes in. I'm so glad to have the amazing Jan Derevjanik at my side, I trust her eyes and taste, we seem to speak the same visual language. Whatever she does, feels right and I never had to explain any of my visions to her. Be it the fonts she chose, the layout of the pages, colours, or the cover - which I love so much, it feels so much like me - Jan took a lot of weight off my shoulders as I knew I wouldn't have to worry about anything she does. Thank you for that!
So finally we're almost done and I slowly understand that there will be a printed book soon, my book. It still feels a little strange, and the moment I truly understood that "it's a book", was the moment when Holly sent me the cover design. When I saw EAT IN MY KITCHEN and my name written on the cover, and the picture of this salad that I can still taste in my mouth, I knew that we had created something great all together.
In autumn, we'll have book launch events in New York, Washington, London, Malta, and Berlin and there might be a few more, we just started working it out. So the journey continues, and wherever it may take me, I'm grateful for every single experience.And now, the biggest thank you goes to you, you wonderful eat in my kitchen readers, for being a part of this adventure! You made all this possible and I wish that you'll enjoy my book as much as I already do.
Meike xx
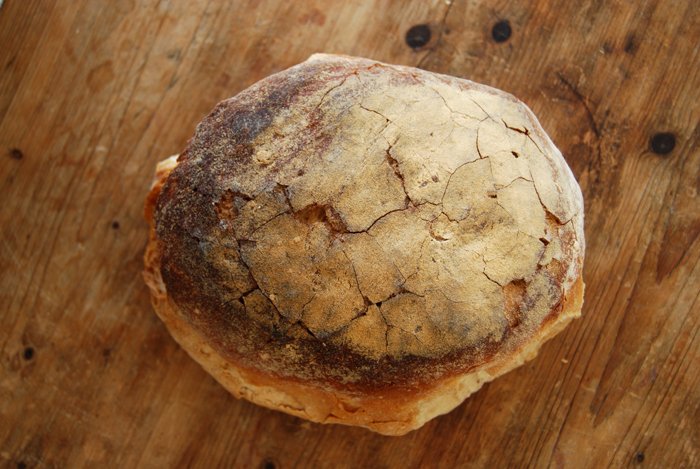
I've never shared a post on my blog without giving you a recipe, and although I intended not to write about food this time as the book is already so exciting, I can't help it:This is not really a recipe but it's my favourite food - although some people can't believe it. I love juicy white bread with olive oil, or dark German bread with butter. I need my daily dose of bread, I can't live without it. So to celebrate my appearance on Amazon as an author, we popped open a bottle of Champagne, broke chunks off a soft loaf of ciabatta, and drizzled them generously with fine Italian olive oil - I couldn't have asked for more!
Serves 2, when 2 want to celebrate
the best ciabatta bread you can get hold of, 1 loaf
the best olive oil you can get hold of, a few tablespoons
the best Champagne you can get hold of, 1 bottle
Enjoy with a special person!

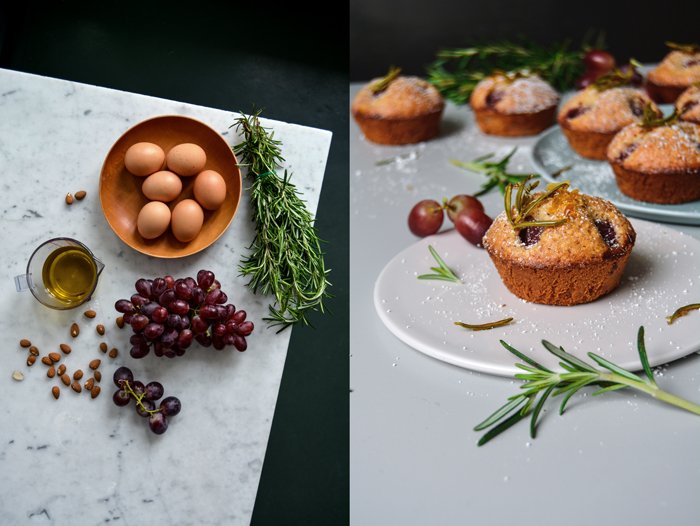
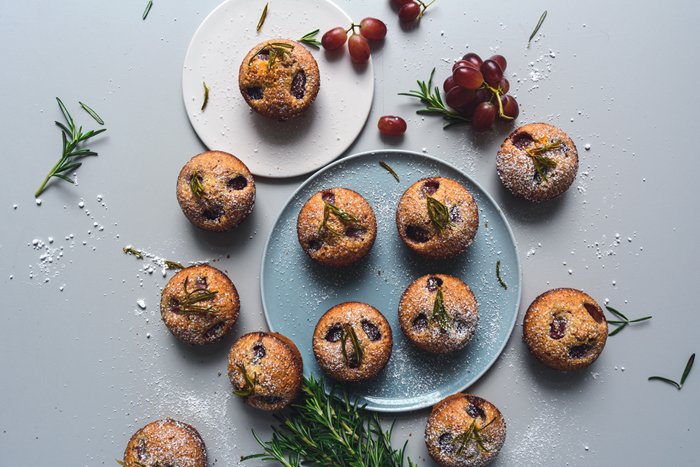
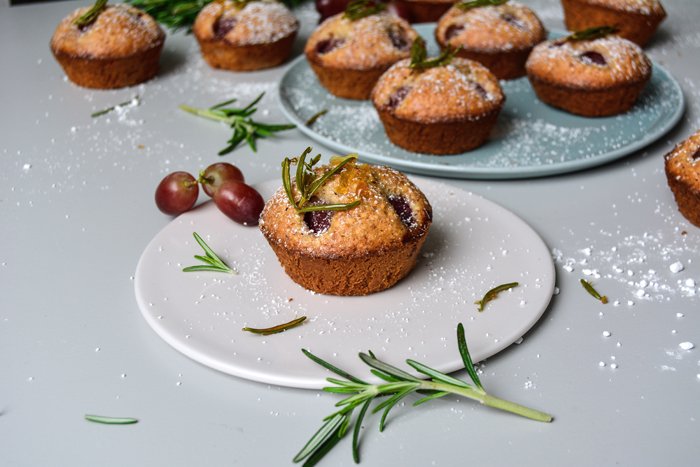
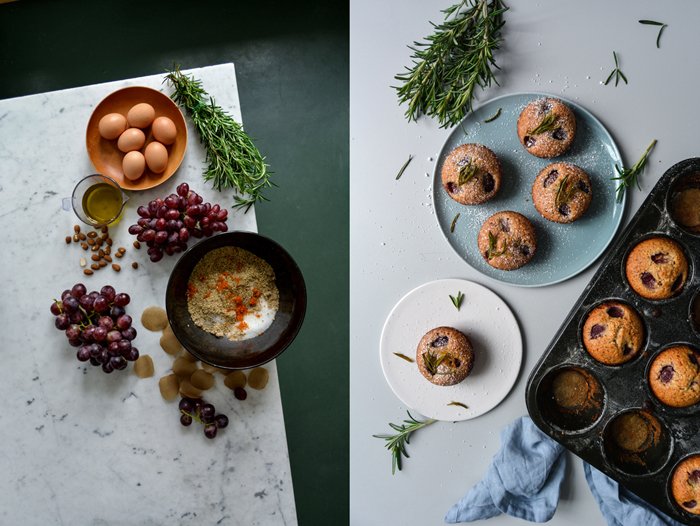
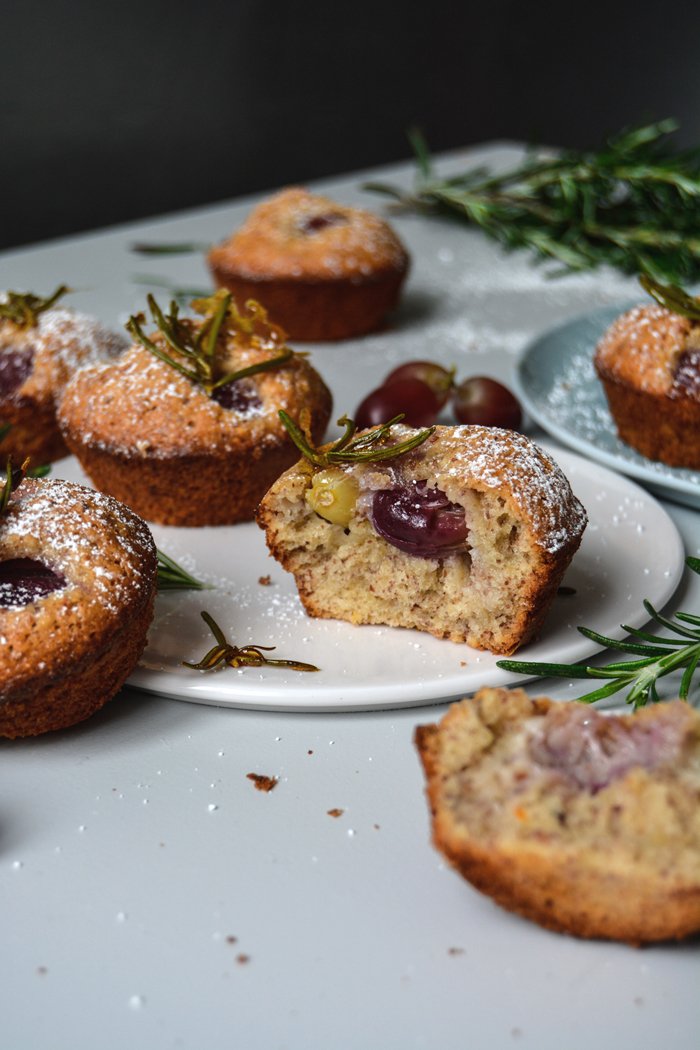
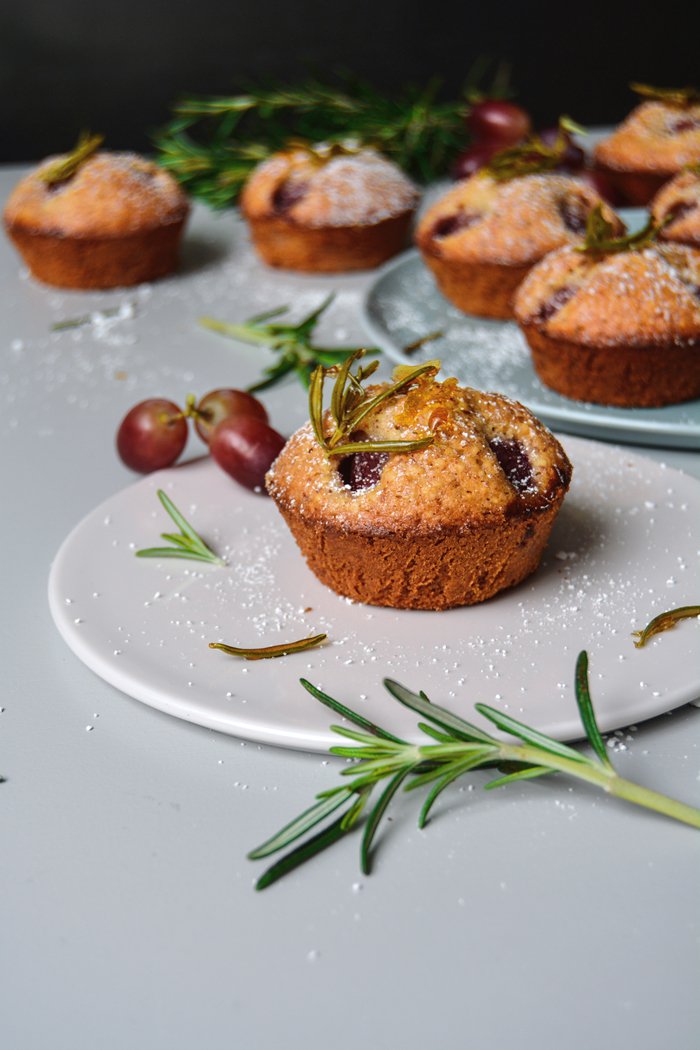
Grape and Olive Oil Friands with Caramelized Rosemary
I don't know what drove me to come up with a grape-recipe in April, but it must have had something to do with the fact that I desperately felt like baking with fruits and there was nothing else in sight that sparked my interest. I went to the shop around the corner to find some inspiration, but there were just a few tiny baskets of unripe strawberries, I spotted plump blueberries, which seem to have become available all year round, and some very delicate - and artificial - looking raspberries. I didn't get excited by any of them.
I usually try to follow the (local) seasons, but there was a bag full of South African grapes that seemed to fit perfectly to the bunch of rosemary that I had already picked. So they became the main flavours for my French olive oil friands. If we leave out the fact that it's not the fruit's season in the northern hemisphere where I live, it's a cozy sweet treat that is just right when the weather is too moody to go outside, or there's too much work on the desk, and you're forced to stay inside. A nibble of this aromatic beauty and the world looks much nicer again.
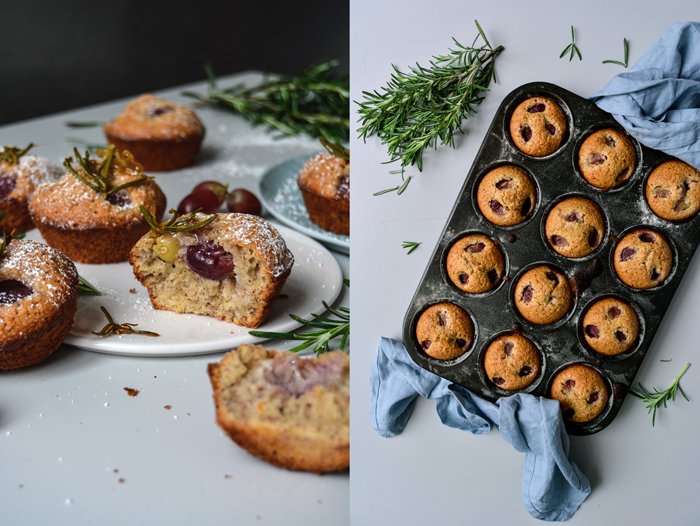
In case you've never heard of friands before - I must admit I was one of them - they are sumptuous small cakes, a patisserie classic. They look similar to muffins but the texture is actually more fine and delicate. They are made with ground almonds and just a little flour, and a generous amount of beaten egg white that helps the batter to rise instead of baking powder or baking soda. Traditionally made with melted butter, I just followed my mood and replaced the dairy product with mild olive oil. It was a good choice, especially in combination with the sweet fruit and fragrant herb.
Grape and Olive Oil Friands with Caramelized Rosemary
Makes 12 friands (in a muffin pan)
For the friands
organic egg whites 6
fine sea salt 1/8 teaspoon
granulated sugar 180g / 3/4 cup plus 2 tablespoons
ground almonds (or hazelnuts) 200g / 1 2/3 cups
plain flour 80g / 2/3 cup
freshly grated orange zest 2 teaspoons
mild olive oil 140ml / 2/3 cup
small dark grapes, preferably seedless (or seeds removed), 36 (3 grapes for each friand)
icing sugar, for the topping
For the caramelized rosemary
granulated sugar 3 tablespoons
water 2 tablespoons
the tips of 12 sprigs of rosemary (with about 4-5 needles each)
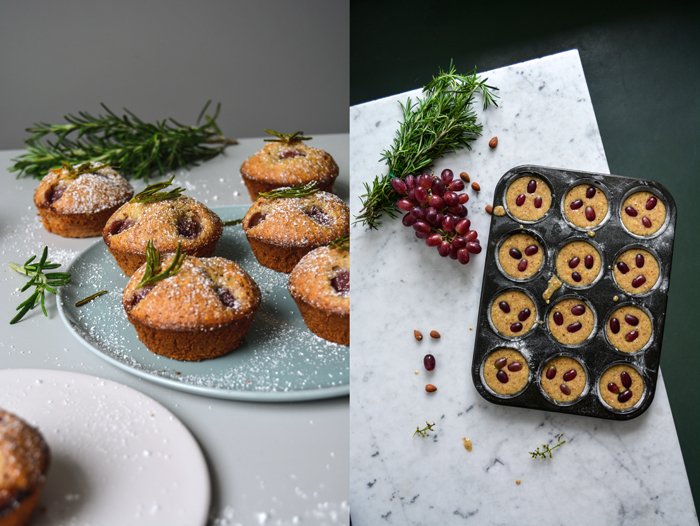
Preheat the oven to 200°C / 400°F (conventional setting). Grease a 12-cup muffin pan with olive oil, dust with a little flour, and place in the fridge. Cut 12 circles of parchment paper, large enough for the bottom of each muffin cup; set aside.
In a large bowl, using an electric mixer, whisk the egg whites, salt, and 1 tablespoon of the sugar for about 1 minute until it forms soft peaks.
In a second, large bowl, combine the remaining sugar, ground almonds, flour, and orange zest. In alternating batches, fold in the beaten egg whites and the olive oil, about 1/3 at a time. Stir gently until just combined.
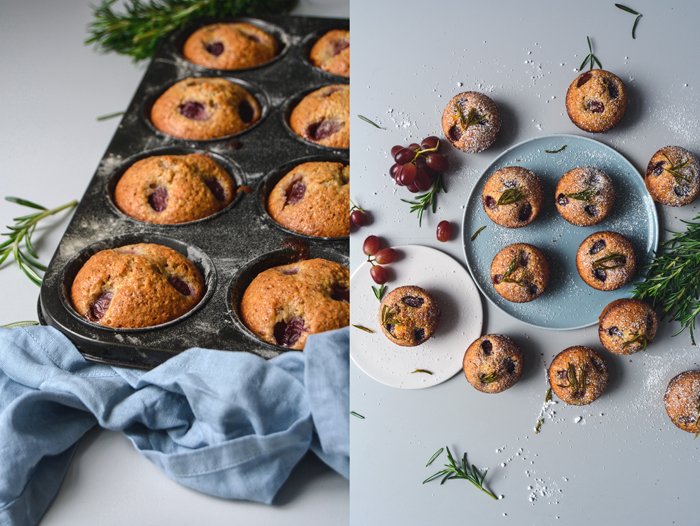
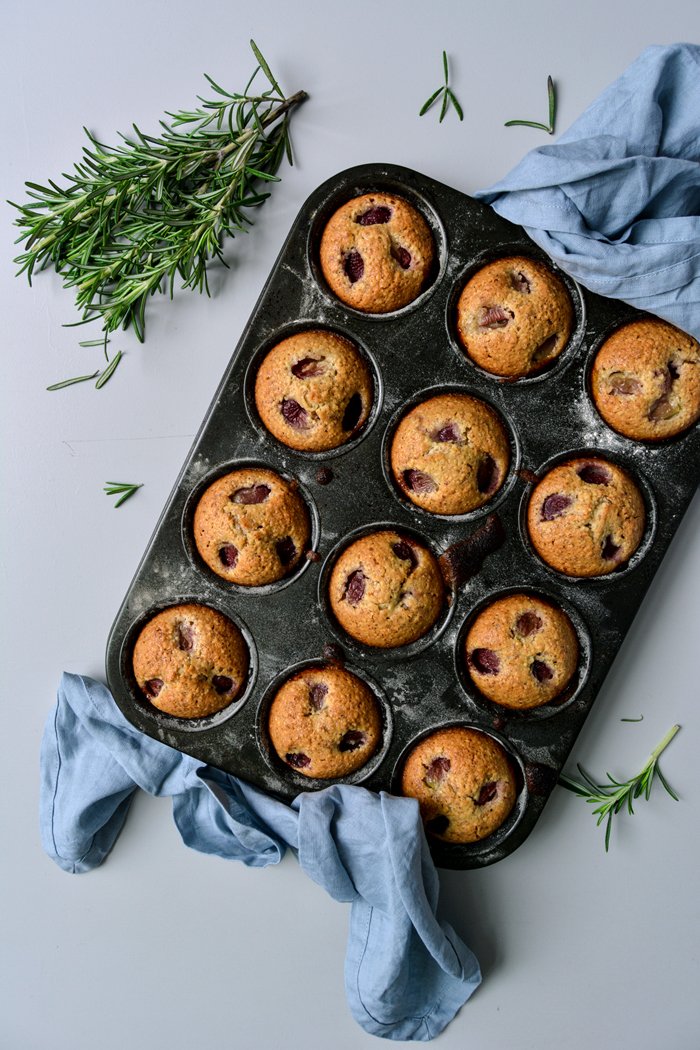
Take the muffin pan out of the fridge, lay 1 parchment circle into each muffin cup, and divide the batter between the cups. Place 3 grapes on top of the batter in each muffin cup and bake for about 20 minutes or until golden. Check with a skewer, it should come out clean. Let the friands cool for a few minutes, then, using a small sharp knife, cut along the sides of the muffin cups and lift the friands out of the muffin pan. Remove the parchment paper.
For the caramelized rosemary, place a piece of parchment paper on the counter top. In a small, heavy pan, heat the sugar and water on high heat, without stirring. When the sugar is golden and caramelized, stir in the rosemary until coated in caramel and transfer to the parchment paper. Let it cool for a few minutes before you peel it off the parchment paper.
Dust the friands with icing sugar and garnish with the caramelized rosemary. They taste best on the first day.

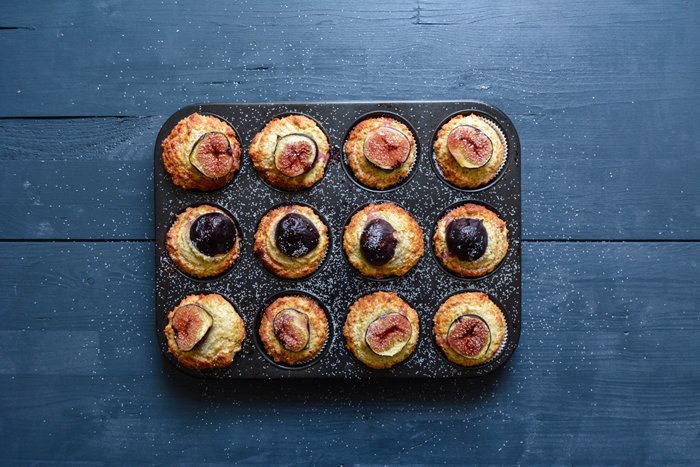
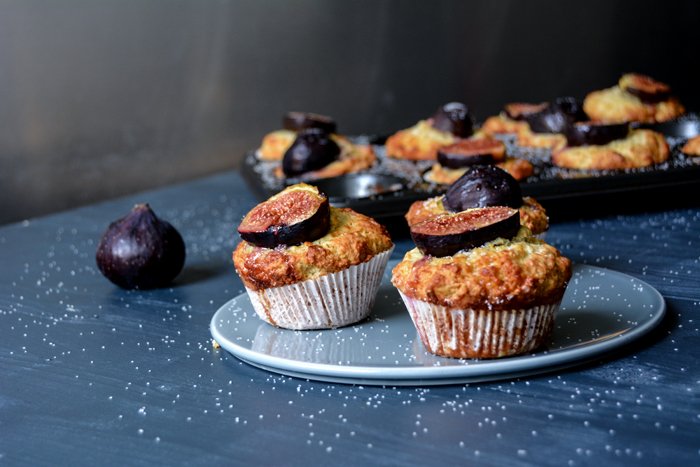
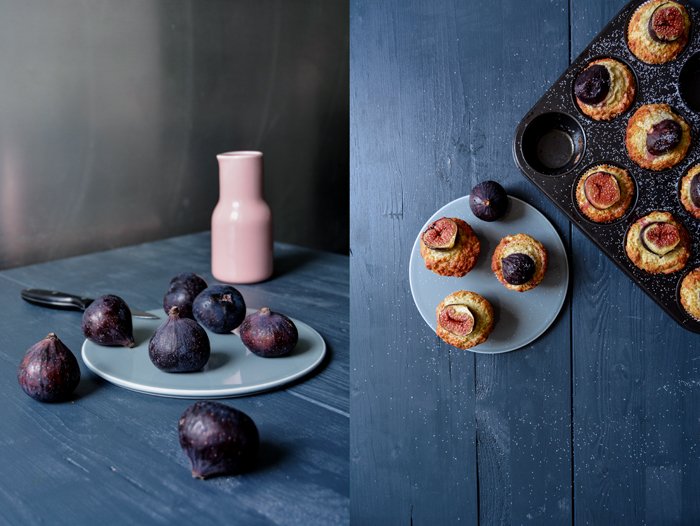
Fig, Ricotta and Olive Oil Muffins

I've been dreaming of these muffins since I went to Malta almost 2 months ago. The idea of figs, soft, ripe and sweet as honey, crowning the top of a pale muffin got stuck in my head. Still in the Mediterranean, I must have bugged almost every farmer on the island (just a slight exaggeration) to find the fruits for my creation, but nature had other plans. It simply wasn't their season yet, I was too early. Luckily we're off to our island next week for a few days, so we can catch up on them and pick them straight from the trees.
At least this was my plan until the beautiful blog Design*Sponge asked me for a recipe for their In The Kitchen With series. While I was still chatting with lovely Kristina to get an idea of what they'd like me to come up with, I had a vision - a luscious baguette sandwich inspired by a picnic in the south of France. I could see whipped chèvre, dark grapes, bacon, honey, thyme - and figs. So here was the second recipe in urgent need of this fruit. I went on a hunt and finally spotted them at my trusted organic market, fresh from Israel, dark as the night, soft skinned and ripe! I bought a huge bunch, enough to lock myself in the kitchen for a whole day, to cook and bake with my delicious finds.
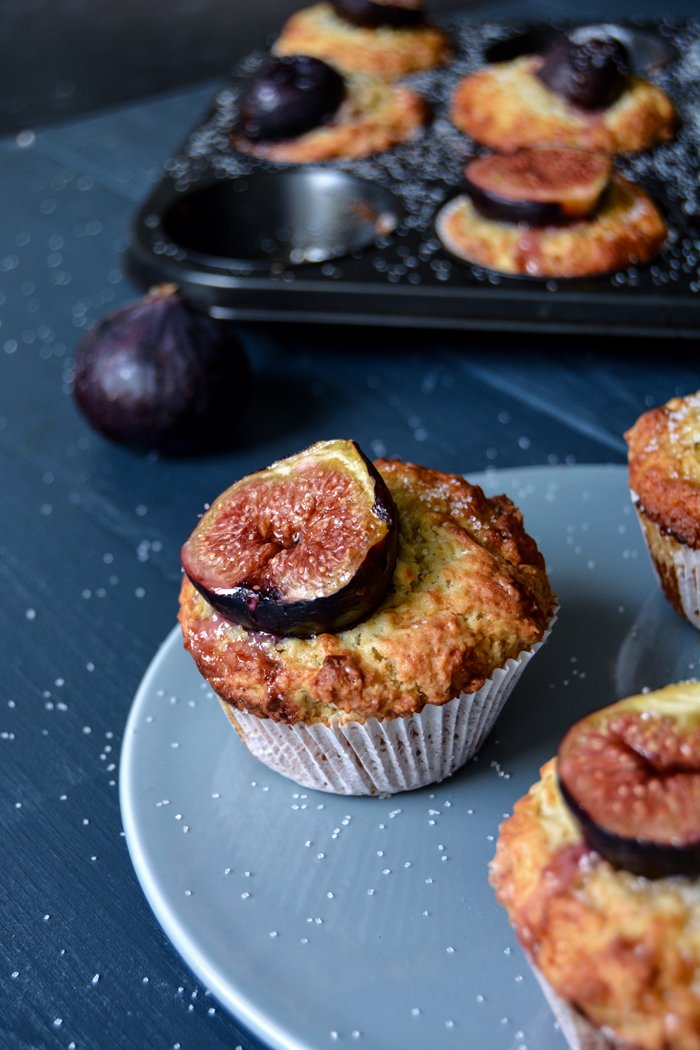
The sandwich came first and it turned out as messy and luscious as I had imagined, you can find the recipe and interview here. My muffins were my second project, equally satisfying - I had quite a successful day in the kitchen. To use my strawberry muffin recipe, with olive oil and ricotta, was part of the plan. I only added a little more sugar to the dough as the fruits lay on top, in the original recipe I stirred in the berries so they sweeten it with their natural juices. It's still not a very cakey muffin, it's more of a warm breakfast treat, to spread some butter on top and melt into the honey glazed figs. Somehow they almost taste like scones - or rather like a luxurious version of it.

Fig, Ricotta and Olive Oil Muffins
Makes 12 muffins
plain flour 320g / 2 1/2 cups
granulated sugar 130g / 2/3 cups
baking powder 3 leveled teaspoons
baking soda 1/2 teaspoon
salt 1/4 teaspoon
organic eggs 2
ricotta 250g / 9 ounces
olive oil 100ml / 1/3 cup and 2 tablespoons
freshly squeezed orange juice 30ml / 2 tablespoons
ripe figs (soft skinned), rinsed (not peeled) and cut in half, 6
liquid honey 3 tablespoons, for the topping
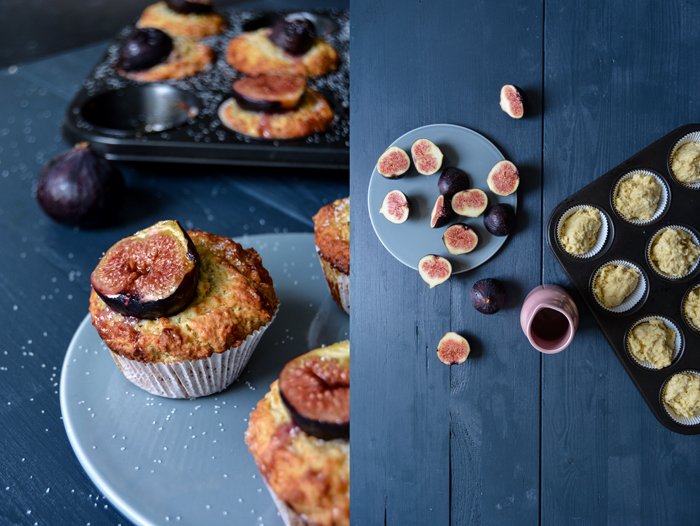
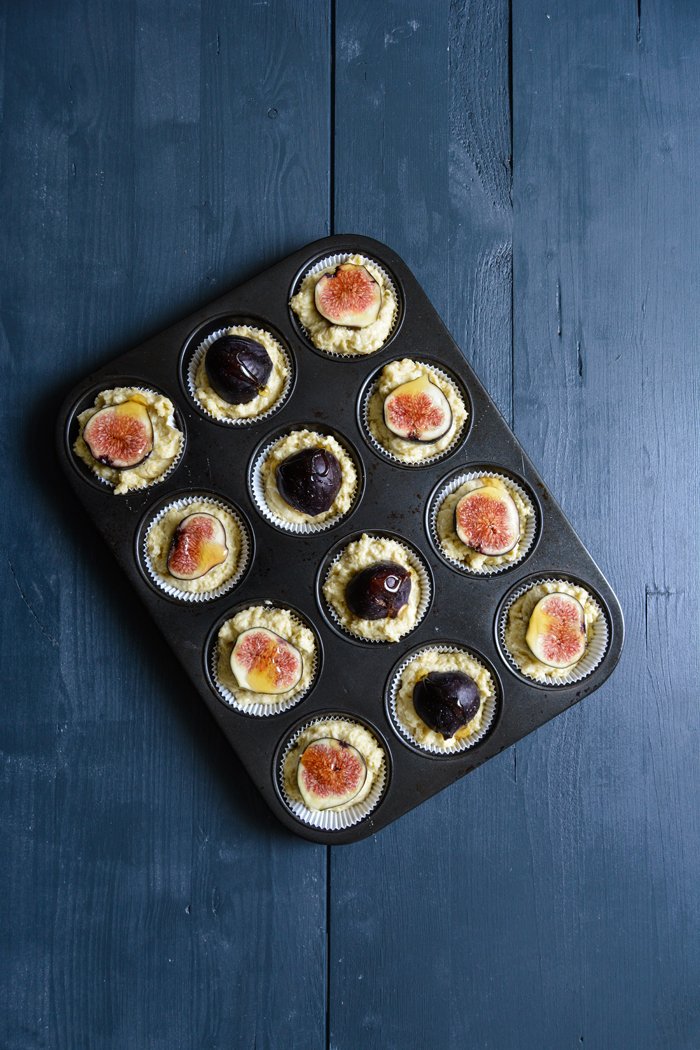
Set your oven to 190°C / 375°F (fan-assisted oven) and put paper baking cups into the 12 molds of the muffin tray.
In a large bowl, combine the flour, sugar, baking powder, baking soda and salt. In a second bowl, mix the eggs, ricotta, olive oil and orange juice until light and fluffy and pour into the bowl with the dry mixture. Stir with a wooden spoon until you have a lumpy dough (with a bit of flour left here and there). Keep in mind, the more you mix it the more it will lose its light texture.
Fill the muffin tray with the dough and push the figs lightly into the batter (I prefer them cut side up). Drizzle a little honey (about 1/4 teaspoon) over each fruit and bake for about 18 minutes or until golden. Sprinkle the muffins with a little more sugar or honey (optionally) and let them cool on a wire rack for a few minutes before you take them out of the tray. Serve warm with butter.

meet in your kitchen | Pan roasted Bread with Sam Cremona's Olive Oil and fresh Oregano
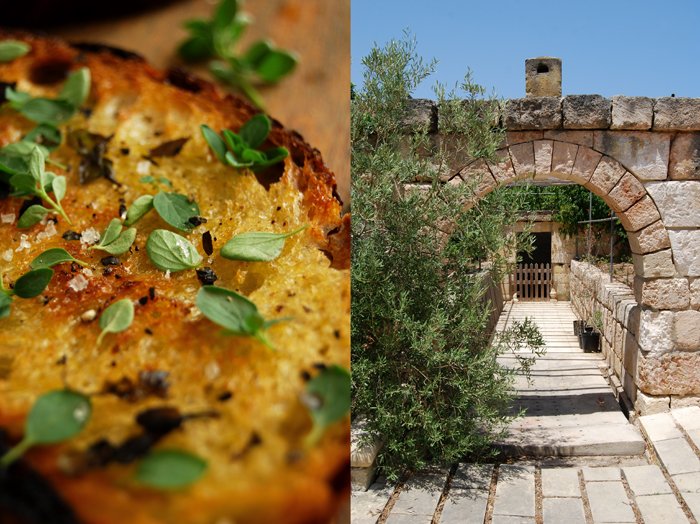
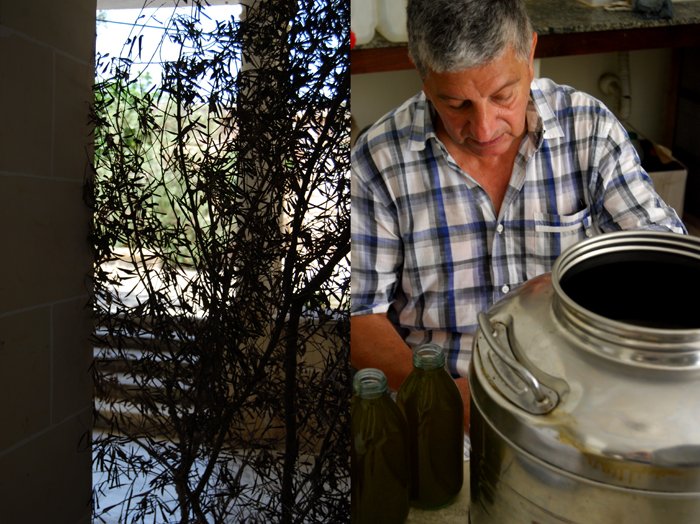
A drive through the countryside, over barren hill tops and streets lined with blossoming pink oleander leads us to a tiny village in the north of Malta, Wardija. We stopped in front of a big, green iron gate in the shade of majestic pine trees, their woody smell caught my senses as soon as I left the car! It was around noon, the sun was at its peak and the air was shimmering. The scene was peaceful and silent when Sam Cremona opened the gate and welcomed us with a big smile on his face. He is a man in his sixties, his skin darkened by the Mediterranean sun, and I had been looking forward to this meeting for months!
Sam produces his own olive oil of extraordinary quality and managed to revive an ancient kind of Maltese olive, the Bidni olive. This species has been cultivated on the island for at least 2000 years but it was on the brink of extinction, just 25 trees were left when Sam started his research. He was looking for olive trees to plant on the 1 hectare of land that surrounds his beautiful country house and the story and quality of this olive caught his attention. It's rich in antioxidants, the concentration is so high that the eggs of the olive fruit fly, one of the biggest pests for olive trees, never hatch in the fruits. The antioxidants also cause the oil's tasty bitterness and its positive effect on the immune system.
When Sam decided to work with the Bidni olive in 2002 he started a program called PRIMO, Project for the Revival of the Indigenous Maltese Olive. He uses cuttings from the few old trees left on the island and grafts them onto other trees. 40 producers joined him, hundreds of trees have been successfully planted and a wonderful olive oil has come back to life. Sam had to set up his own small olive press as there was none on the island at that time. This allows him to pick the fruits and press them on the same day, another reason for the oil's high quality.
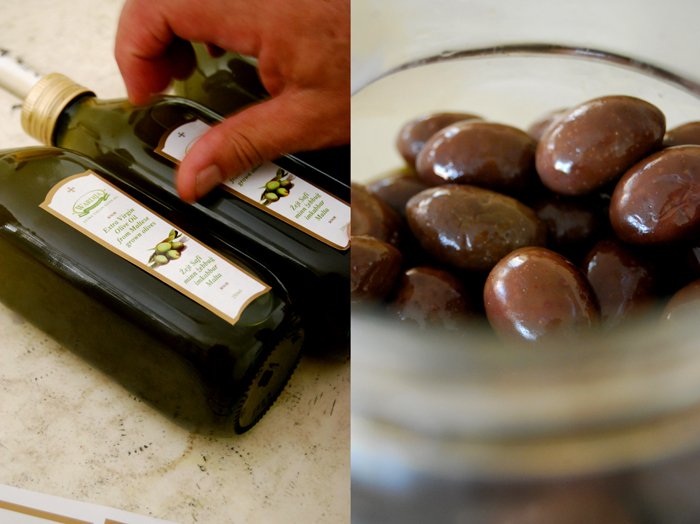
Sam invited me to his kitchen to taste two of his olive oils, one made of the Bidni olive and another that's a little less bitter in taste. Both were wonderful, fragrant and rich. I could smell citrus fruits, pine trees, tomatoes and thyme, all embodied in these delicious Wardija Olive Oils! I was so impressed that I bought some of his oil straight away, if you would like to do the same or if you would like some more information about Sam's oil and project, you can contact him at matty@vol.net.mt.
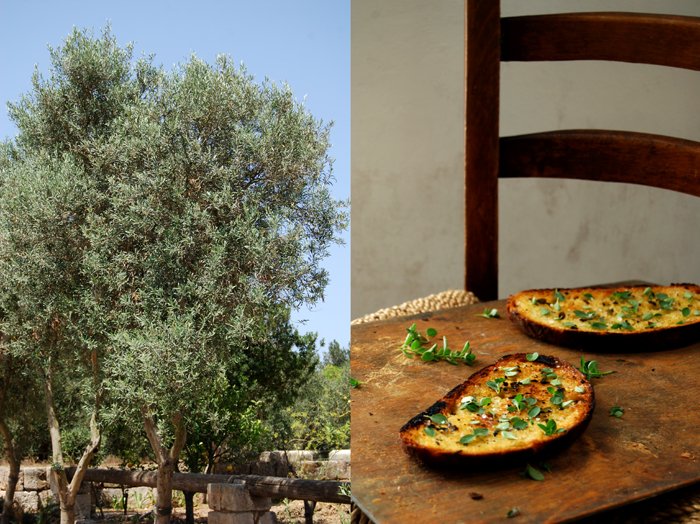
After tasting the oil we enjoyed some with a few slices of Maltese bread, one of the best ways to savor a good olive oil, but I already knew what I would use it for as soon as I got back home. I discovered a very simple, delicious little snack when I was in Sicily. Pan roasted bread, dipped in olive oil and cooked with fresh oregano leaves. When the bread is golden brown and crunchy on the outside, you take it out of the pan and sprinkle a little more oregano, black pepper and coarse sea salt on top. As always, when a recipe is so simple, choose the best quality bread, olive oil and sea salt you can get and pick fresh oregano leaves if possible. It's divine!

Pan Roasted Bread with Olive Oil and fresh Oregano
For 4 people, you need a small loaf of sourdough bread, thickly sliced, olive oil and coarse sea salt to taste, crushed black peppercorns and a handful of fresh oregano. Brush the slices of bread with olive oil on both sides and sprinkle with the herb, leave a few leaves to put on the bread when it's done. Heat a heavy pan and cook the bread for a few minutes until golden brown on each side, sprinkle it with some salt, pepper and fresh oregano.


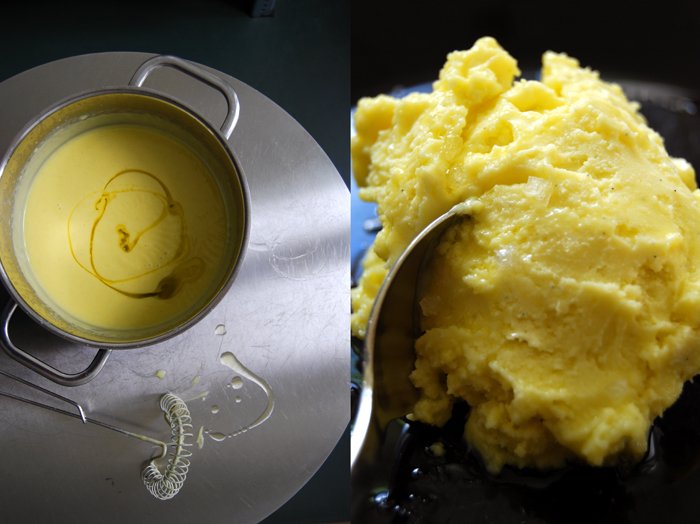
Olive Oil Ice Cream with flaky Sea Salt
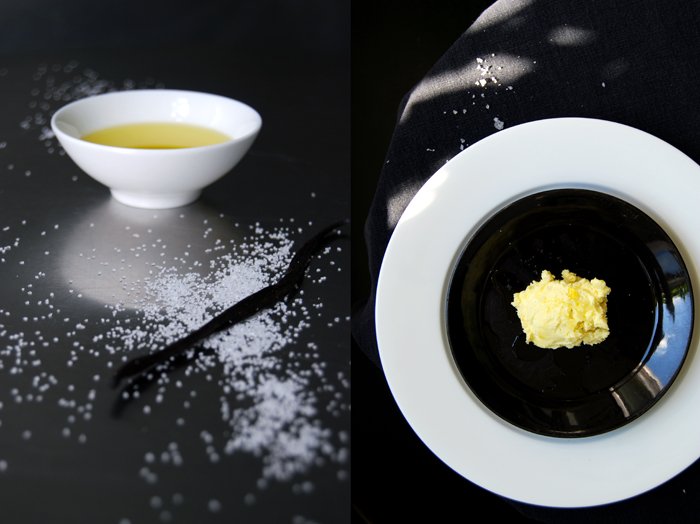
Smooth ice cream, a bit oily on the tongue, with a strong vanilla aroma and a pinch of sea salt. I experienced this combination for the first time two summers ago in Sicily, in Ragusa, where I spotted a small ice cream shop which offered flavours I had never even thought of before. They made ice cream from grapes which I know well from wine but they used them for their frozen sweets. Moscato was one of them and it became my grape ice cream favourite.
Another very sensual experience was their olive oil ice cream with sea salt, it's like frozen velvet! It's one of those things you have to taste as you can't imagine it. I got hooked on it. Both ingredients, the oil and the salt sound very unusual but make a lot of sense, much like my Mousse au Chocolat with olive oil, the oil adds a soft nuttiness which comes through even stronger through the salt. The texture it creates leaves a nice feeling in the mouth, soft and smooth. Unfortunately, I only made half the amount of my recipe, a mistake I won't repeat!
Olive Oil Ice Cream
For 4 people you need
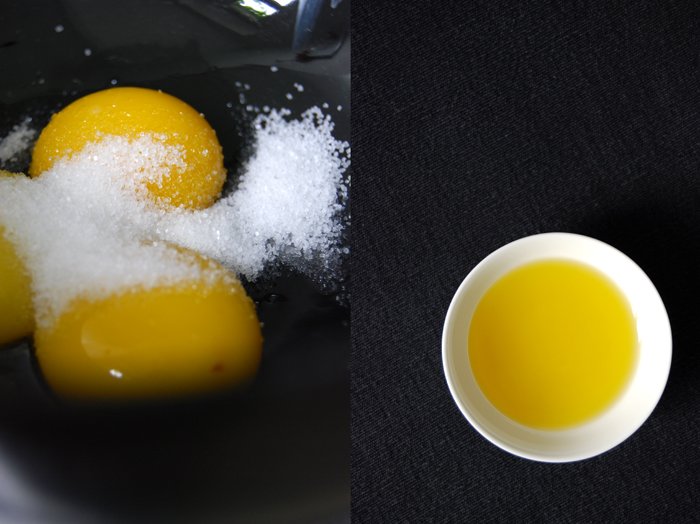
organic egg yolks 6
granulated sugar 160g / 5.5 ounces
milk 500ml / 17 ounces
heavy cream 200ml / 7 ounces
vanilla bean, slit slightly, 1
olive oil 160ml / 5.5 ounces
flaky sea salt for topping
Beat the eggs and sugar for 3 minutes till thick and creamy.
In a saucepan, bring the milk, cream and vanilla bean to a boil. Take off the heat, take the vanilla bean out and scrape the seeds out of the bean into the milk. Add the egg mixture and cook for around 8-10 minutes on a medium-low heat till it starts to thicken, whisking constantly. Stir in the olive oil and a pinch of salt and cool in the fridge. Freeze in the ice cream maker for 20 minutes and put in the freezer for 1 hour. Mix with a spoon and serve sprinkled with flaky sea salt.

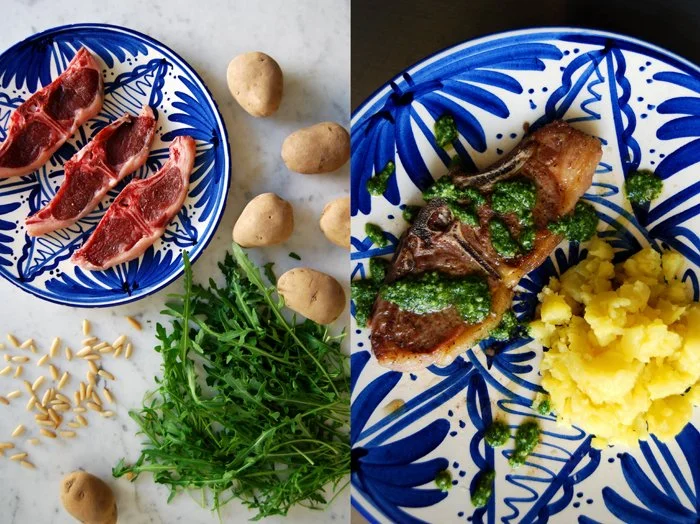
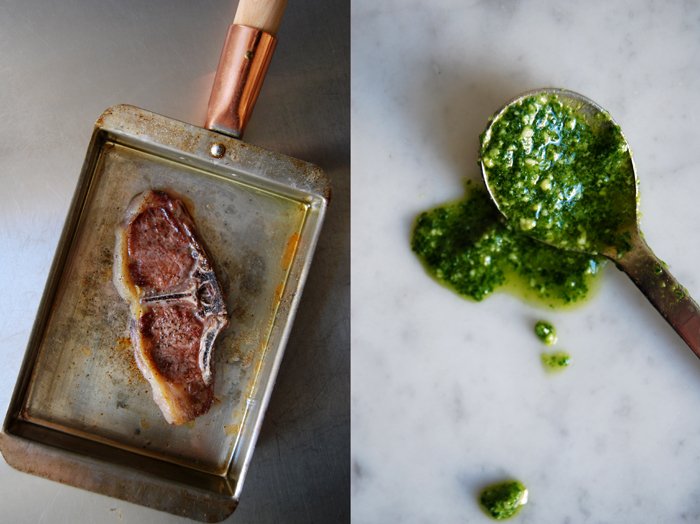
Lamb Chops with Rucola Pesto and Mediterranean Mashed Potatoes
My young sister in law came to visit us and brought a big appetite with her! She loves food as much as I do but she enjoys eating more than cooking so whenever I'm cooking and pottering about in my kitchen she joins in with excitement. She gives me a helping hand or sits at the table patiently to see what's in the pots and pans as soon as I lift their lids. When I visit her at her home in Malta, we always make lots of pesto together. We walk through the garden with the two beautiful orange and lemon trees packed with fruits and pick the herbs growing around them, plenty of basil, parsley, peppermint and rucola. When I touch the leaves and they spread their smell in the warm air I can already taste the pesto! Everything grows so fast and strong under the Mediterranean sun that I can't stop myself from picking bowls full of fragrant leaves to fill big jars with my pesto which we still manage to empty within a couple days. We mix it with dried tomatoes, pine nuts, parmesan or pecorino, black or green olives and eat it with pasta, on bread or potatoes and in salads. Every pesto tastes different, it's never the same, that's what I love about it!
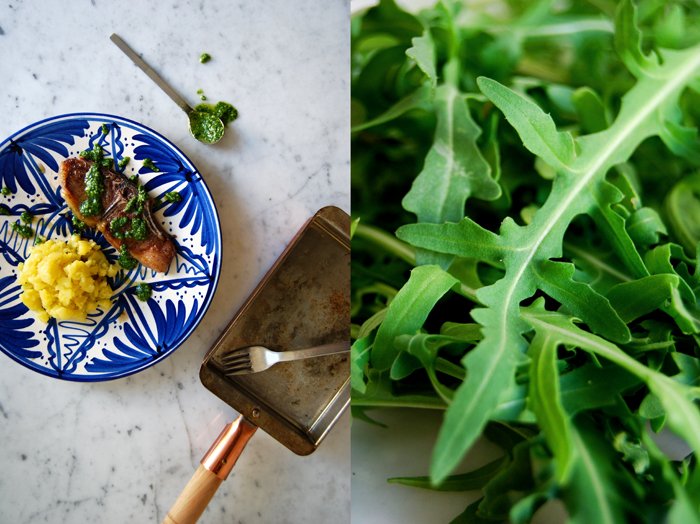
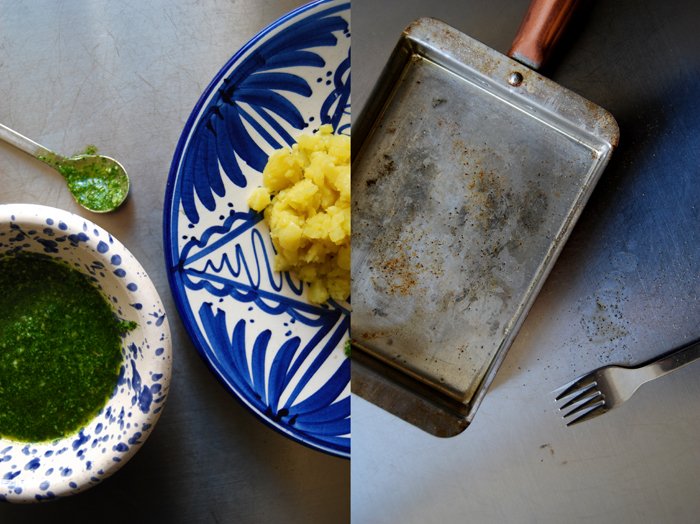
Since we have our own personal pesto tradition, I wanted to make some while Julia is here. I already made one with ramp (and she emptied the jar with her fingers) and now it's rucola! I sprinkled the pesto on some juicy lamb chops, sautéed for a minute on each side and served them with mashed potatoes. For the mash, I just chopped the cooked potatoes with a knife until they had a lumpy texture and mixed olive oil and sea salt in, no butter or milk, I wanted to keep it light and Mediterranean!
The lamb was great together with the spicy rucola, the meat's juices mixed in perfectly with the herb, but the secret star of this meal was the mashed potatoes together with the pesto which I hadn't even planned to mix together. The big pot of mashed potatoes and the bowl of pesto were emptied within minutes!

Lamb Chops with Rucola Pesto and Mashed Potatoes with Olive Oil
For 4 people you need
lamb chops, 4-8 (depending on if you have a starter before), around 100g / 3.5 ounces per person
olive oil for frying
rosemary 1 sprig
garlic, cut in half, 1
For the mashed potatoes
medium sized potatoes, peeled and cooked in salted water, 12
olive oil 40ml
sea salt
For the pesto
rucola (arugula), 60g / 2 ounces
Parmesan 20g / 3/4 ounce
pine nuts 20g / 3/4 ounce
olive oil 75 ml
a pinch of salt
Mix the ingredients for the pesto in a blender.
In a large pot, chop the warm potatoes with a knife until they have a lumpy texture adding the oil constantly, season with salt.
Heat a little olive oil in a pan over high temperature together with the rosemary and garlic. Lay the lamb chops in the pan, turn the temperature down to a medium heat and sauté the meat for 1 minute on each side until it colours. Don't overcook them as the meat should remain juicy. Depending on the size of your pan you have to cook them in batches and keep them warm under a plate or wrapped in aluminum foil but keep in mind that they will continue cooking when they are covered.
Place the meat on warm plates sprinkled with the pesto and serve with the mashed potatoes.


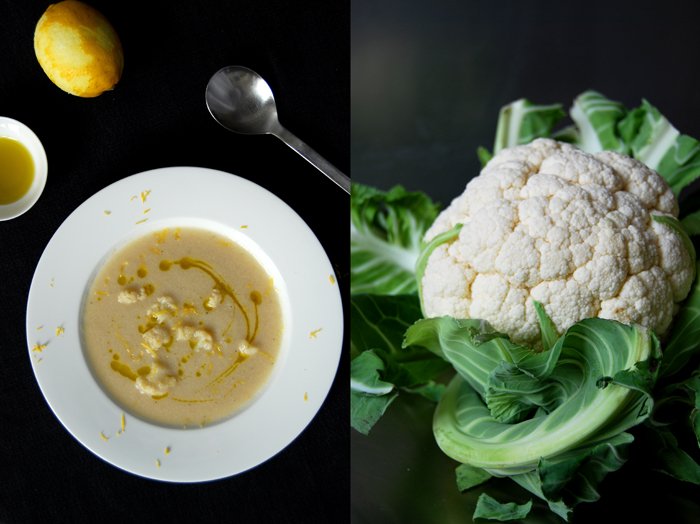
Carnival and a Cauliflower Soup with Ginger and Lemon
A couple weeks ago I wrote about our traditional family feast, a time when we all meet at my mother's house in the countryside to celebrate carnival. It's always silly, loud and involves lots of good food. The festive highlight is the making of our Berliner which involves each family member. A Berliner is a sweet speciality which looks a bit like a doughnut without a hole. It’s made of yeast dough, filled with jam, deep fried in vegetable shortening and sprinkled with cinnamon icing sugar. The jam filling changes with the years, a few weeks ago I filled mine with blueberry jam which became my favourite (for now), they tasted divine! The reason I made them at my home without my family before carnival, was a blog tour I was asked to joined. I decided to share our "Berliner" family tradition. I made them on my own for the first time in my life, they were as good as at my mother's but it's more fun with family and friends.
In the end it turned out to be (subconsciously) a wise choice as this carnival will be different. This year there is neither a family feast nor a Berliner to enjoy, for us it's soup instead. A wisdom tooth got in our way and needed to come out quick. Needless to say, a jam filled Berliner isn't the appropriate food in a situation like this, porridge and soup is more like it!
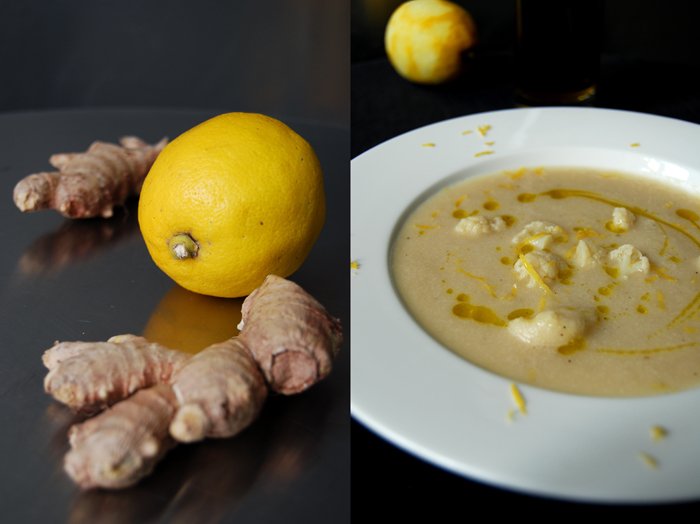
I have a big, beautiful cauliflower in the kitchen, a cabbage I don't use so often but in a velvety soup it shows its finer qualities. The sweet taste and smooth texture is great for puréed soups. I don't add any cream, just broth, onion, garlic and some tangy flavours, lemon and ginger. A piece of ginger simmers together with the cauliflower in the broth before I season it with grated ginger to taste. I add the lemon's juice and zest when the soup is done, arrange it in plates drizzled with some good olive oil and sprinkle some more lemon zest on top. I'm impressed, it's still smooth but fresh!
Last week I told you that eat in my kitchen was nominated for The Kitchn's Best Daily Read Cooking Blog Award 2014. Food52 won the award but I want to thank you all for your support and all your votes, with your help eat in my kitchen reached the final!

Ginger Lemon Cauliflower Soup
For 4 people you need
a big cauliflower, rinsed and cut into 5cm / 2" pieces, around 750g / 1.5 pounds (weight without stem)
vegetable broth 1500ml
onion, chopped, 1
garlic, cut in half, 1
bay leaf 1ginger, thumbnail sized piece plus 1 teaspoon grated
lemon juice 1 tablespoon
lemon zest 1 teaspoon
salt and black pepper
olive oil for frying and topping
In a large pot, fry the onion and garlic in a little oil until golden and soft. Add the cauliflower, bay leaf, the piece of ginger and broth and bring to the boil. Cook for 10 minutes or until the cauliflower is al dente. When it's done take out the bay leaf and ginger and put a few smaller pieces of cauliflower (a small plate full) aside before you mix the soup in a blender. Season with salt, pepper, the grated ginger, lemon juice and zest and put the cauliflower pieces back into the smooth soup. When you arrange the plates, drizzle some good olive oil on top and sprinkle with some lemon zest.

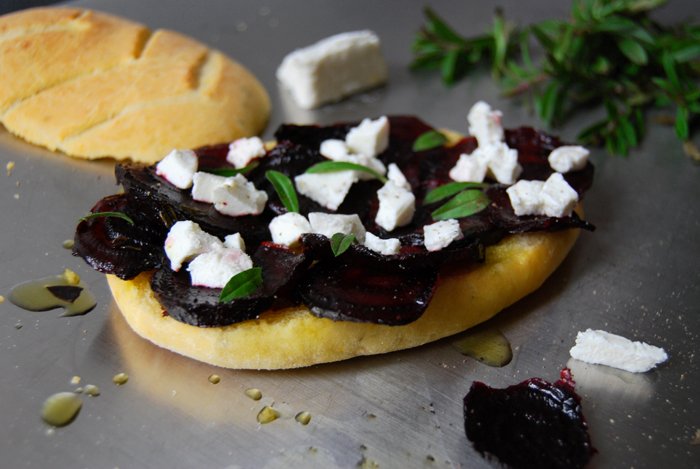
Fougasse Sandwich with Baked Beetroot, Goat Cheese and Thyme

I got really hooked on the roots and syrup combination in the past week. It all started with my ginger honey glazed Navet, yellow turnip fried as vegetarian steaks followed by caramelised maple parsnip with goat cheese combined in a warm salad and I'm still in the mood for sweet and earthy duos, at least one more.
It's Sandwich Wednesday and the first thing that came into my mind when I looked at the beautiful Fougasse bread I baked yesterday, was a baked beetroot sandwich. My flatbread has strong aromas of orange and sage, perfect to add some more earthy and sweet flavours. There are some beetroots lying on my kitchen window sill, just waiting to be baked in maple syrup and olive oil sprinkled with thyme. I found a kind of thyme at the organic store that I have never seen before, with thick, long leaves. They are stronger in taste compared to the small leaved one, a bit woody. The thin slices of the roots are done after 10 minutes in the oven, soft, syrupy and partly crisp. I let them soak into the oily bread and finish my sandwich with some mild goat cheese crumbled on top to add some fresh milkiness.
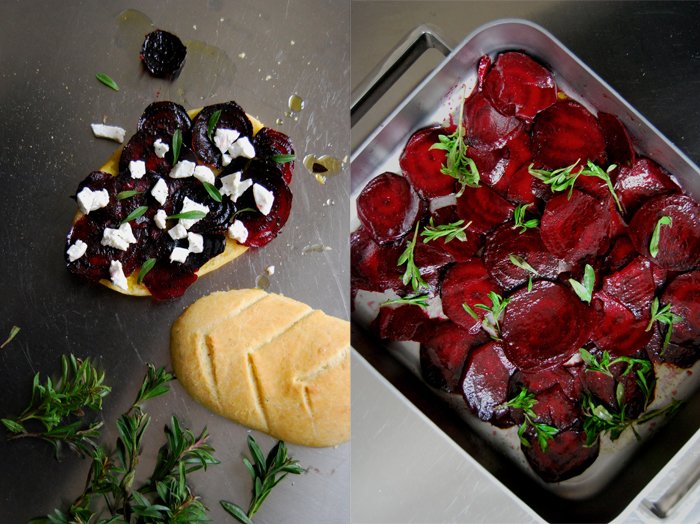
I made 3 flatbread sandwiches with 3 small beetroots peeled and cut into very thin slices and mixed with 3 tablespoons of olive oil and 2 tablespoons of maple syrup. I seasoned the roots with salt and pepper, mixed them with a few sprigs of thyme and roasted them spread in a roasting tin for 12 minutes in the hot oven set to 220°C / 430°F (Rotitherm roasting setting) until they were soft.
If you don't want to make your own Orange Sage Fougasse bread (I can just recommend it as it's fantastic), you can also use focaccia or soft buns (I made some very soft and juicy Mountain Buns with spices a couple months ago). I cut the flatbread in half, drizzled some olive oil (generously) on one side and spread the roast beetroot slices on top. After I sprinkled them with goat cheese (for 3 sandwiches I used 100g / 3.5 ounces of cheese), some fresh thyme leaves, salt and pepper, I closed my Fougasse sandwich, pleased about another great sweet root variation!


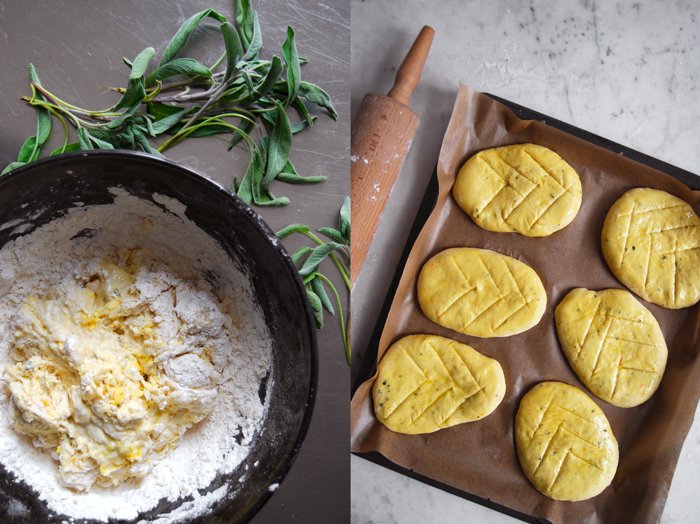
Fougasse Bread with Orange, Sage and Olive Oil
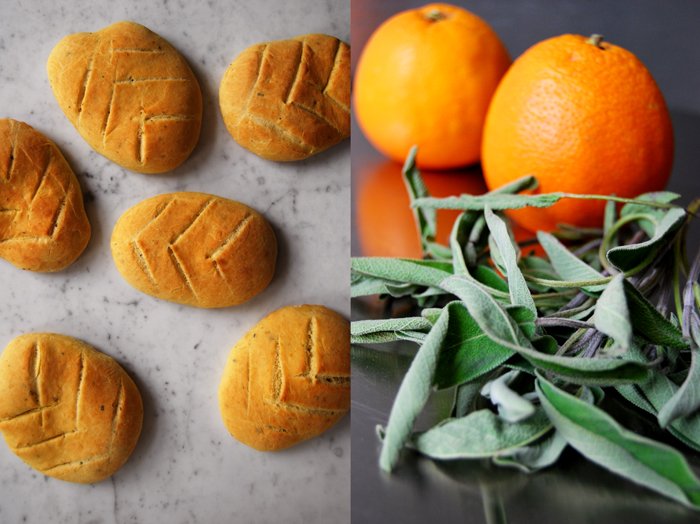
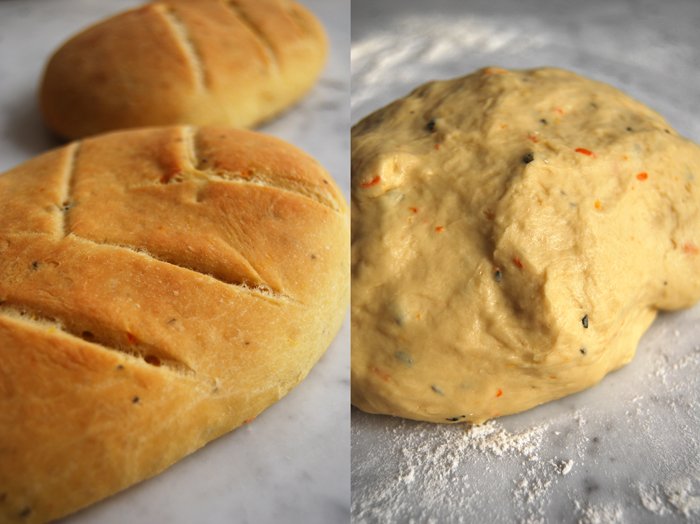
It's time to bake bread again! I use a recipe which involves sage and my beloved blood oranges, they'll be out of season soon, so I'm using every possible occasion that allows me to cook or bake with my sweet citrus fruits. I mix generous amounts of their zest and juice into the dough and the result is impressive!
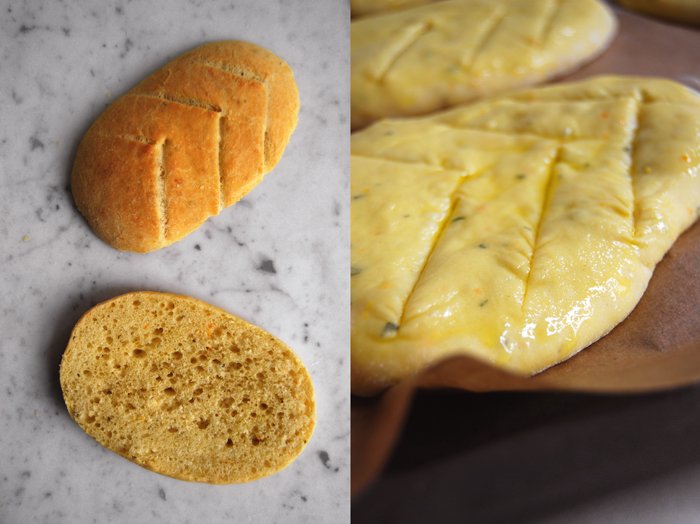
My bread is a light and aromatic Fougasse, a French flatbread very popular in Provence where it's often made with olives, herbs and cheese. It's similar to the Italian Focaccia but with a leaf pattern of cuts in the dough. In some recipes, the cut goes all the way through creating holes in the bread while it's baking which makes the bread harder. I prefer to leave mine juicy with shallow cuts on the surface. Besides the orange and sage I add good olive oil in and on the bread. I use the wonderful extra virgin olive oil from the Molise region which I got from Marilena. Its strong and fruity taste is just what my Mediterranean flatbread needs!
I already have a great idea for a sandwich I can make with this bread for tomorrow's Sandwich Wednesday!
Fougasse with Orange, Sage and Olive Oil
For 6 flatbreads you need
plain flour 400g / 14 ounces (I use spelt flour type 630 but you can use any other plain flour)
dry yeast 1 package (for 500g / 1 pound flour)
salt 1 teaspoon
fresh sage, chopped, 8-10 leaves
zest of 1 medium sized orange
freshly squeezed blood orange or orange juice 100ml
water, lukewarm, 100ml
olive oil 5 tablespoons plus more for brushing the bread
organic egg 1
Combine the flour, yeast, salt, orange zest and sage in a large bowl. Add the water, orange juice and egg and mix with your dough hooks for 5 minutes. On a floured surface, continue kneading with your hands for a few minutes until you have an elastic dough ball. Put the dough back into the bowl and cover with a tea towel. Let the dough rise in a 35°C / 95°F warm oven for 45 minutes. This works really well but make sure that your oven is set to top/ bottom heat and not to fan.
Take the dough out and punch it down. Divide it into 6 pieces and roll them out into egg shaped discs (on a floured working surface, around 1 1/2 cm / 1/2″ thick). Put them on a baking sheet lined with parchment paper, cover with a tea towel and let them rise for 20 minutes.
Set your oven to 210°C / 410°F.
Brush the flatbread with olive oil and cut a pattern of 6-8 diagonal slashes into the dough to make a leaf pattern. Bake the flatbread on the lowest level for 12-15 minutes or until golden brown. Take them out and let them cool for 2 minutes.
I cut the warm flatbread in half and drizzled some more olive oil over it, it merged perfectly with the orange and sage aromas!

Hobz biz-Zejt u Tadam and more delicious Goods from the Maltese Rock
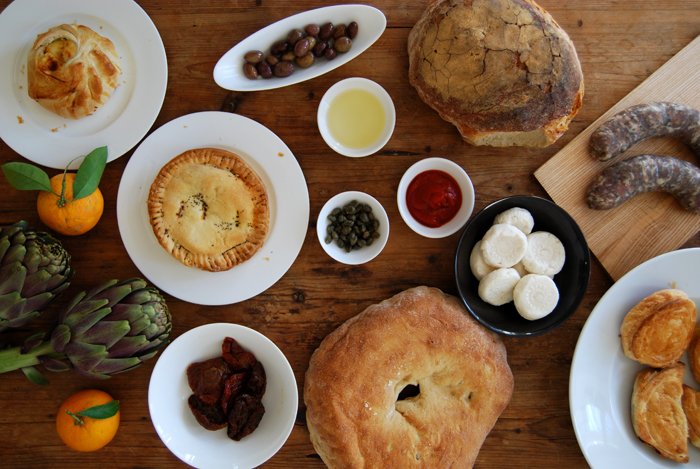
Today I will share some special food with you! I got a wonderful gift from Emma, my boyfriend's sister who lives in Malta and came to visit us for a few days. She put a big smile on my face when she opened her bag and I saw all the nice food she brought for me (well, not just for me actually). Emma knows which food I love and miss so much from her home island in the Mediterranean, especially now that it's been a few months since I was last there. Her gift reminded me of the taste and smell of this island which I got to know so well over the past years, during so many holiday trips and summers we spent there. Our family and friends, the food, the sea, so many memories connect me to this rock in the Mediterranean (this is what many Maltese affectionately call their home island).
This is a very personal introduction to Maltese food through my eyes and taste buds.
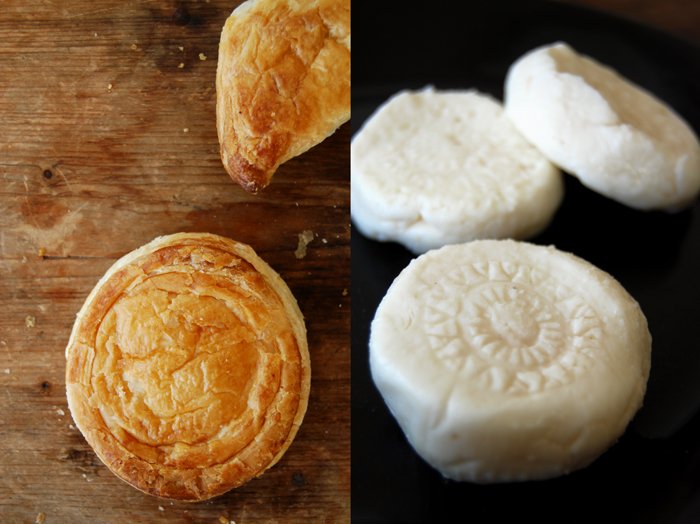
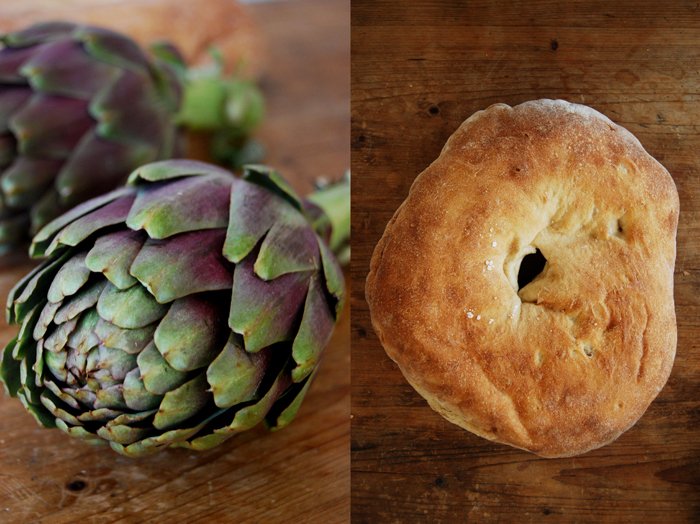
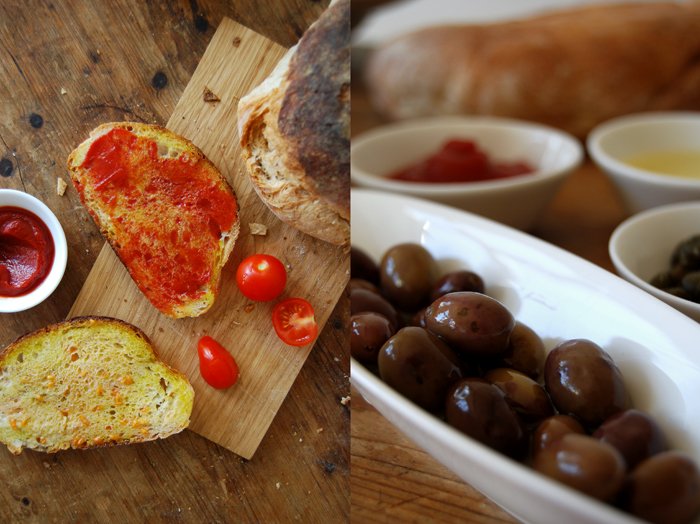
Whenever I'm in Malta, first thing in the morning I go to a wonderful traditional bakery, St. Josephs Bakery in Msida, to buy the most amazing white bread with the perfect crust. Every Maltese is proud of this bread and it's famous for good reason. There are two different types of bread, the big loaf called Hobz Malti (Maltese Bread) and the round Ftira with a hole in the middle. Usually, I cut thick slices off the loaf, dip them in olive oil and spread the sweetest tomatoes and some crushed pepper on top which makes the Hobz biz-Zejt u Tadam (Maltese bread with oil and tomato). There is also a famous (and quick) beach version which is made with Kunserva, a concentrated tomato paste full of ripe Maltese tomatoes and some mint or basil in between two slices of this amazing bread. There's nothing better than sitting on the beach after a long swim, this sandwich in your hands and your fingers staining with juicy tomatoes and olive oil - I love it!
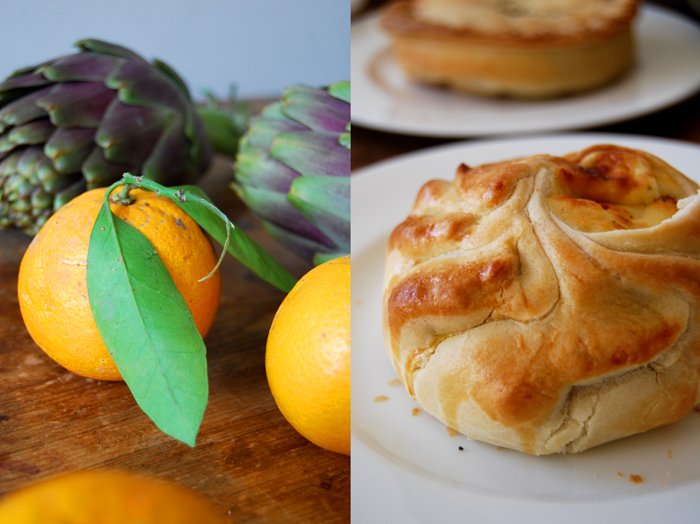
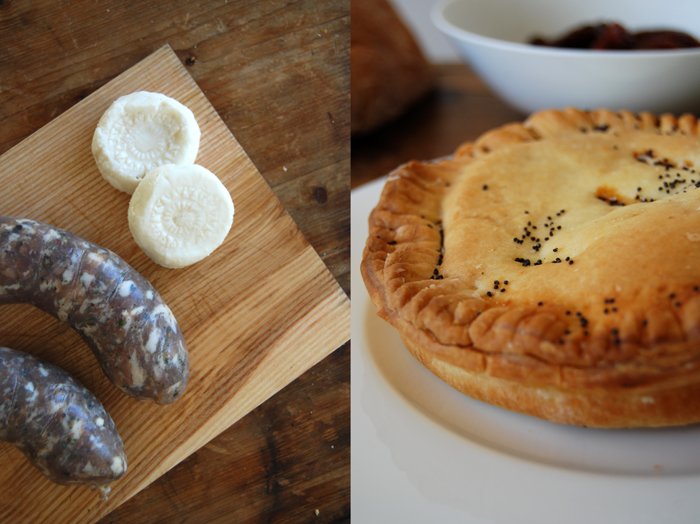
Fruits and vegetables are heavenly in this sun kissed place, strong and honest in taste, ripe, with the flavours of a soil rich in clay. There's not much water, but the sun and the ground make up for it. My taste buds are always disappointed when I'm back home and have to get used to the store bought quality again. Maltese sausage is another speciality I'm very fond of as it's full of spices, the meat is coarse, its taste so strong that you can season a meal with it. Dairy products are limited, this rock isn't really made for cows, but the Maltese make a strong cheese from goat milk which is called Gbejna, delicious tiny round cheeselets. There are two kinds, the hard one which is a bit salty, great for salad and pizza, and the soft one, milky and mild. On the photos you see the hard ones from Gozo, Malta's sister island.
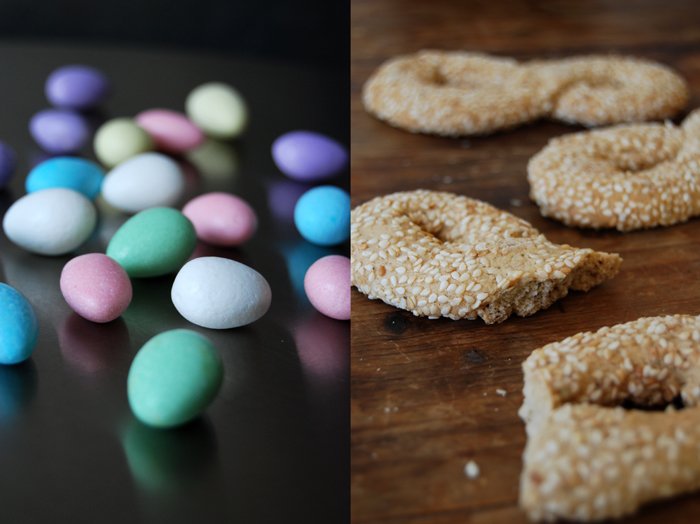
One of my favourite places is Busy Bee Confectionery where I get my daily dose of delicious cakes and pies. I love their sweet Mediterranean specialities like Cannoli, Cassata Siciliana and Ottijet (figure of 8 shaped tea time cookies with sesame seads). Unfortunately the Cannoli didn't survive the flight very well so I can't show them to you. On the savory side there is Qassata tal-Irkotta (a round short crust pie filled with ricotta), Pastizzi tal-Irkotta or tal-pizelli (puff pastry filled with ricotta or peas) and a huge Torta tal-Laham (Beef Pie), filled with tasty beef stew.
The colourful sweets are Perlini, filled with almonds, a traditional Maltese carnival treat.
Go visit and enjoy!
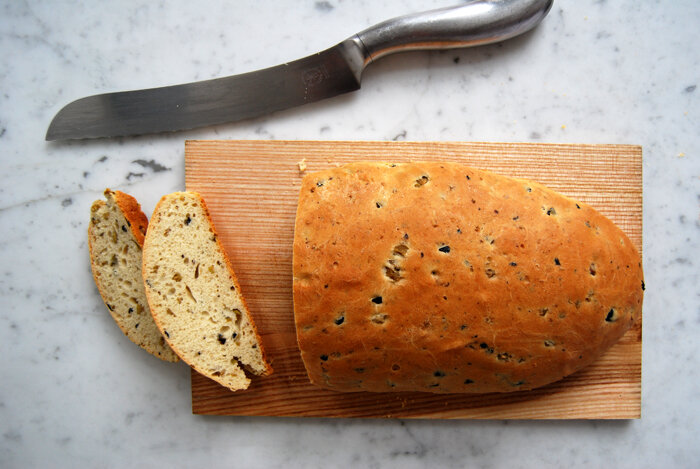
Luscious Bread with Black and Green Olives

Baking bread is a very relaxing and satisfying ritual. You mix the dough and watch it rise slowly, then you shape it and bake it in the hot oven where it doubles in size again. It's such a simple yet wonderful food, one of my favourites! Nothing beats a slice of fresh warm bread spread with butter or sprinkled with olive oil. So many people from different cultures celebrate this ritual, with similar recipes even though they live on opposite sides of the world. It's one of our traditions that connects us and shows how much we have in common.
I have a good friend who lives in Sydney and whenever he comes to Berlin we all meet at our's together with a few of our friends. Sometimes it's a big dinner, sometimes we just have some wine and snacks. The only problem is that he never tells me in advance, it's a very spontaneous thing, he's just here at one point. Followed by another 10 - 15 people. This calls for some improvisation tricks in the kitchen, we just have to eat what my fridge offers!
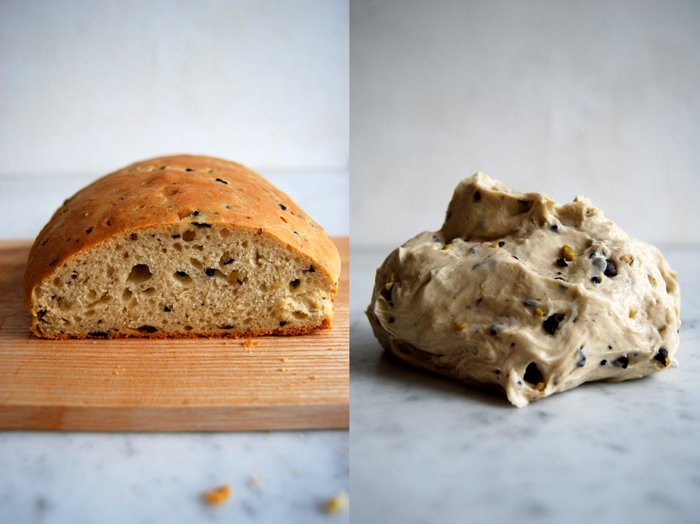
Around two years ago he called to announce his arrival and I was lucky to have a few pumpkins in my kitchen, so a soup for 10 was quickly thrown together. For whatever reason I had lots of black olives as well. I like to have more than enough good bread on my table when it's a long night so I decided to bake 2 loaves of olive bread with lots of olives and olive oil, juicy enough to nibble on after finishing the soup. The texture is light but you taste and feel the olives and the olive oil, it makes the bread really smooth. Everybody loved it and couldn't stop eating it. This was a feast to me, it always is, sitting together with friends at my long wooden table, talking, laughing and enjoying some red wine and nice bread.
Tomorrow it's my Sandwich Wednesday again and I will make a special sandwich with this bread which is very popular in the Middle East!
A Juicy Bread with Black and Green Olives
For 1 loaf of bread you need
plain flour 250g / 9 ounces (I use spelt flour type 630 but you can use any other plain flour)
dry yeast 1 tablespoon
salt 1/2 teaspoon
a pinch of sugar
water, lukewarm, 70ml
milk, lukewarm, 70ml
butter 1 tablespoon
olive oil 2 tablespoons
black and green olives, chopped, 60g / 2 ounces
Combine the dry ingredients and add the water, milk, butter and olive oil. Mix with your dough hooks till everything is combined. Add the olives and continue mixing for a few minutes. Continue kneading and punching with your hands until you have an elastic dough ball, it will be a little sticky but that's fine. Put the dough back into the bowl and cover with a tea towel.
Option1:When I prepare the dough the day before I bake it, I put the bowl with the dough in the fridge (covered with cling film) and let it rise overnight. You will have to take it out of the fridge 30-60 minutes before you can continue with the next steps.
Option 2:In case I want to bake my bread the same day, I let the dough rise in a 35°C / 95°F warm oven for 45 minutes. This works really well but make sure that your oven is set to top / bottom heat and not to fan.
When the dough has doubled in size, take it out, punch it down and knead with your hands for 2 minutes. Form the dough in a long loaf shape and put it on an oiled baking sheet. Cover with a tea towel and let it rise for another 25 - 35 minutes in a warm place.
Set your oven to 200°C / 390°F top / bottom heat.
Bake the bread for 30 minutes or until cooked through. If you're not sure if it's done turn the bread around and knock on its underside, it should sound hollow. Let it cool for 5 - 10 minutes, cut a thick slice off it and drizzle some olive oil on top, just a bit, and sprinkle with salt.


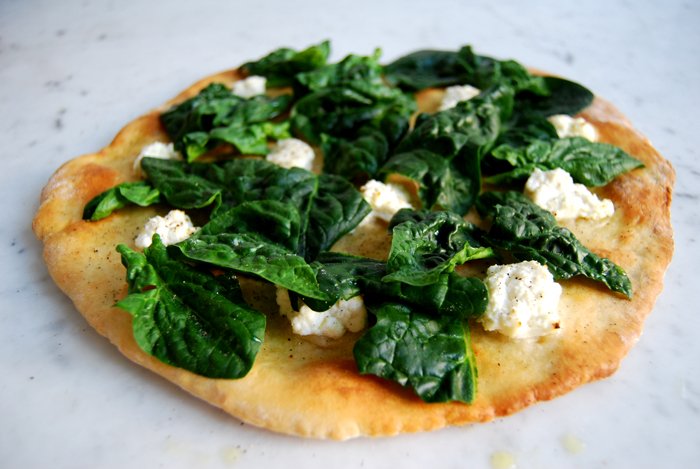
White Pizza with Spinach and Ricotta
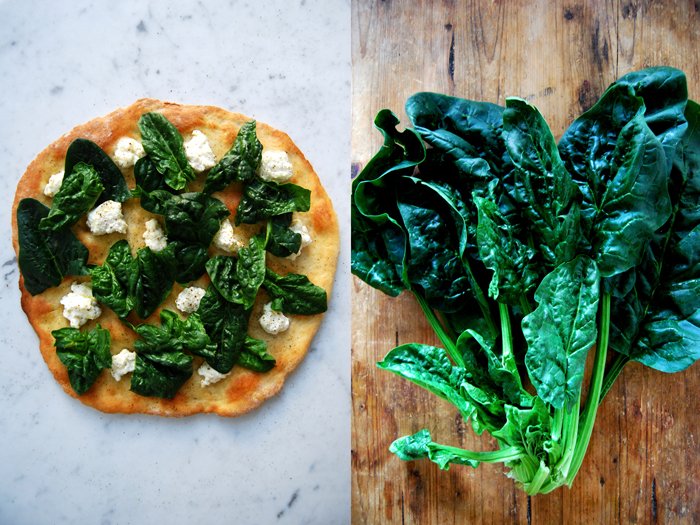
A few years ago curiosity got the better of me and I tried a "white pizza" at one of my favourite pizza restaurants. White pizza is made without tomatoes and I didn't quite know what to expect. I had my virgin white pizza moment with a spinach and ricotta topping and all my reservations melted away after the first bite. Lighter and with more space for the single ingredients, the absence of tomato sauce didn't lessen that feel good pizza pleasure.
I wrote about my Sunday pizza tradition a few weeks ago and yesterday was no exception. It has been ages since my last white pizza and, as it's been on my mind for a while, I bought some crisp winter spinach and ricotta. To finish it off I added some olive oil infused with garlic and some crushed black pepper. The dough was light and crisp, it soaked some oil, but not too much, a bit like a Focaccia. The spinach was crisp and had some bite as in winter it's a bit thicker while the ricotta brought a touch of velvety smoothness.
White Pizza with Winter Spinach, Ricotta and Olive Oil
I start to prepare the dough 2 hours before I bake it to give it enough time to rise.
For 1 big pizza (size of 1 baking sheet) you need
For the topping
fresh spinach, rinsed, 250g / 9 ounces
fresh ricotta 250g / 9 ounces
olive oil 4-6 tablespoons
garlic, cut in half, 1 clove
salt and crushed black pepper
Warm up the olive oil together with the garlic for 2-3 minutes.
For the dough
plain flour 350g / 12.5 ounces plus more for mixing
dry yeast 1 package (for 500g / 1 pound of flour)
water, lukewarm, 190ml
olive oil 3 tablespoons
salt 1 teaspoon
Combine the flour with the yeast and salt, add the olive oil and the lukewarm water, slowly, not all at once (you might not need all of it). Mix with your dough hooks for a few minutes. The dough shouldn’t be moist and sticky at all, more on the dry side. Continue kneading and punching with your hands until you have an elastic dough ball, not too hard, not sticky. Put the dough back in the bowl, cover it with a tea towel and let it rise in the warm oven (35°C / 95°F) for 40 minutes. This works really well but make sure that your oven is set to top/ bottom heat and not to fan.
When the dough is well risen, roll it out on a very well floured (this is very important!) working surface. It should be a bit smaller than the size of your baking sheet. Cover with a tea towel and let it rise for another 10-15 minutes.
The pizza
Set your oven to 260°C / 500°F. My oven has a special pizza setting but you can use top / bottom heat as well. Put the baking sheet on the bottom of your oven to heat it.
Take the hot baking sheet out of the oven, flip it over and place it carefully on two stable wooden boards or mats as it will be very hot. Place your risen dough carefully but quickly (best done by two people) on the baking sheet, push it gently into place if necessary. Sprinkle the olive oil and the ricotta in lumps on top. Put the baking sheet back into the oven, on the bottom again, and bake for a few minutes until the pizza is golden. Take it out and spread the spinach on top immediately. Season with salt and pepper, sprinkle some more olive oil on top if you like and enjoy!

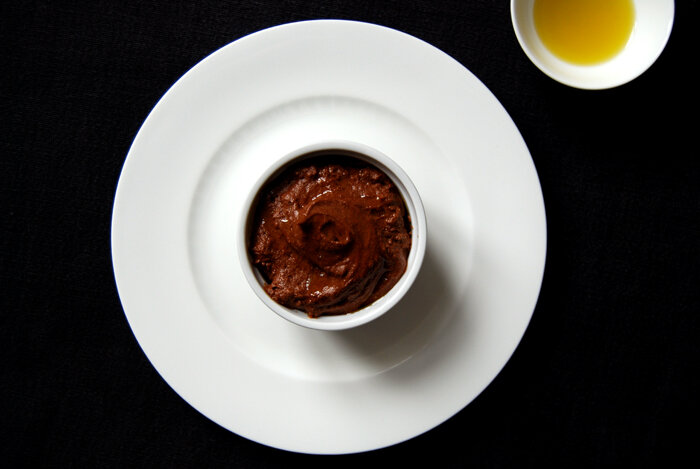
Mousse au Chocolat meets Olive Oil

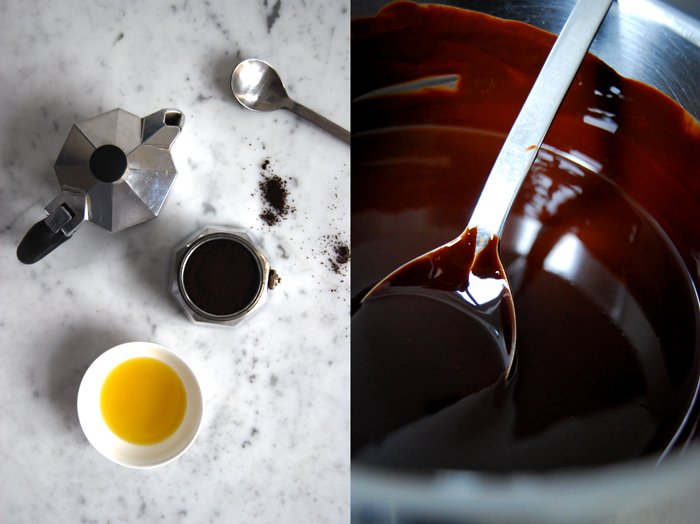
My Mousse au Chocolat has all the finer qualities of a sumptuous mousse. Bittersweet chocolate rubs against an unexpected but perfect match, olive oil, thick and nutty with a little espresso. I know it sounds unusual but this combination is absolutely delicious! It's luscious, a special treat for the weekend, perfect after an opulent dinner. I don't make chocolate mousse all too often but sometimes I just need chocolate in its most concentrated and dense form and then it's time for this dessert.
The olive oil adds something to the chocolate that is hard to describe but so easy to enjoy. If you try to imagine it you won't even get close to it, you just have to feel and taste it in your mouth!
Mousse au Chocolat with Olive Oil
For 4 people you need
bittersweet chocolate, melted, 100g / 3.5 ounces
butter, melted, 60g / 2 ounces
organic eggs 3
granulated sugar 70 g / 2.5 ounces
good olive oil 6 tablespoons
espresso 1 teaspoon
a pinch of salt
Mix the melted butter, chocolate, olive oil and espresso. Beat the egg whites together with the salt. Beat the egg yolks and the sugar and mix together with the chocolate mixture. Stir 2 spoons of the stiff egg whites under the chocolate mixture. Stir the rest of the egg whites under the mixture as well, carefully, to preserve the light fluffiness. Fill into 4 forms and cool in the fridge for at least 3 hours.
Butter Bean and Fennel Soup
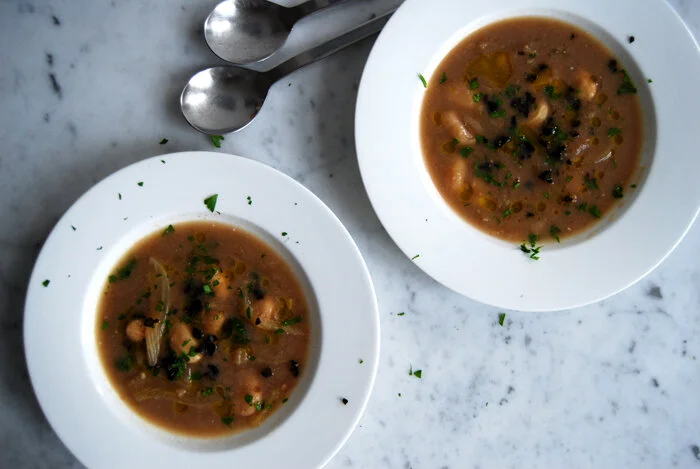
It's time for soup! The colder it gets the more I feel like food that is up-lefting and soul-warming. Something that makes me feel strong and prepares me for the cold, dark months ahead of me. Although I love winter, the snow, even the cold, when you get cosy inside, slow down and relax, it's important to treat yourself to the right food to renew your body and mind.
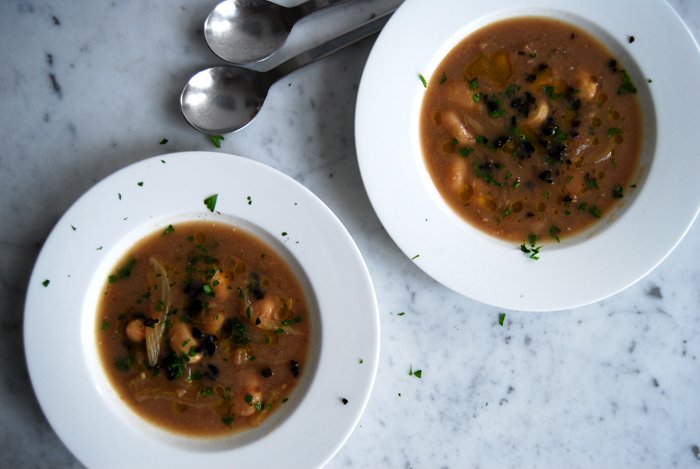
I'm in the mood for a thick soup, smooth but light - like my Minestrone with big butter beans and fennel with some parsley and black olives sprinkled on top. The texture is velvety and it tastes a bit sweet. Today I add a piece of bacon to it as I feel like something deeper in taste. Usually I cook the vegetarian version, I don't prefer one over the other, both are nice winter treats!
Butter Bean and Fennel Soup
Keep in mind that you have to soak the dried beans in water overnight. I like to cook soups in bigger batches to store some in the freezer - great for busy days. This recipe is for 4 people, sometimes I even double the amount.
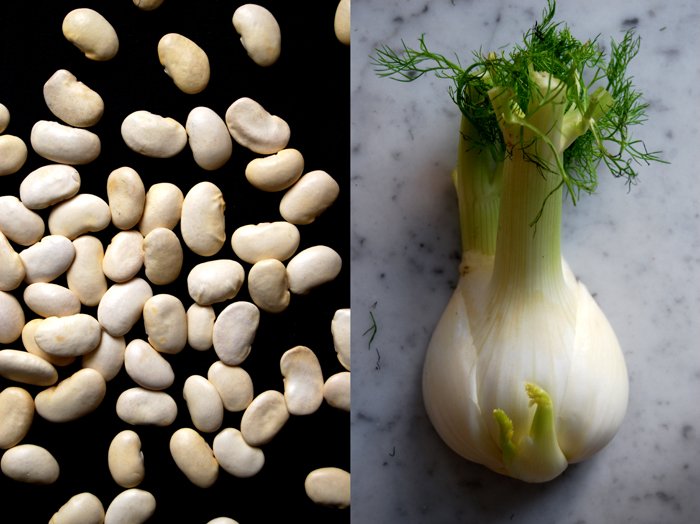
dried butter beans or Cannellini beans, soaked in cold water overnight, 250g / 9 ounces
fennel, rinsed, cut in thin slices, 300g / 10.5 ounces
celery stalk, cut in cubes, 1
onion, cut in cubes, 1
broth or water, around 1500 ml
optional: a piece of bacon, 40g / 1.5 ounces
garlic, crushed, 1 clove
bay leaf, 1
salt and pepper
olive oil for frying
parsley, chopped, for the topping, 2 tablespoons
black olives, chopped, for the topping, 4
good olive oil, for the topping
Heat some oil in a large pot. Fry the onion, celery, garlic and bacon (left in one piece) for a few minutes. Add the fennel, take the beans out of the water and put them into the pot as well. Fill with broth, add the bay leaf and close with a lid. Don't season with salt before the beans are done or they won't become soft. Cook for 30 minutes or until the beans are soft. Depending on the bean's texture it may take another 30 minutes. Mine needed 60 minutes today but I must admit that I found them in a dark corner of my shelf.
When the beans are done, take out half of the vegetables (cooked beans and fennel) and put them to the side. Mix the other half of the vegetables together with the liquid in a blender and season with salt and pepper. Put everything back into the pot together with the remaining vegetables. When you arrange the soup in soup bowls sprinkle with olives and parsley and drizzle your best olive oil on top.

A Sicilian Salad with Oranges, Oregano and Olive Oil
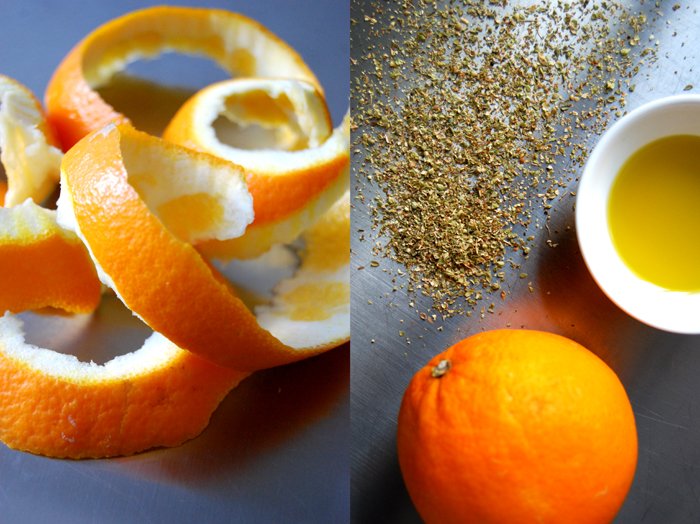
My friends and family live all over the world. On the big festive days of the year, we spend quite a bit of time on Skype to share the special moments. We talk and laugh and - very often - show each other what we cook for our festive meals. Yesterday, my boyfriend's mother Jenny, presented a beautiful piece of ham that she had just pulled out of her oven. It looked so tempting! She also told me about the orange tree in her garden in Malta which is sagging with oranges and held a huge box of oranges for me to see. I knew what I would have for lunch today: my Sicilian salad with oranges, oregano and very good olive oil!
I know this combination sounds a bit extraordinary. It is another one of my Sicilian discoveries which I had for breakfast at a little farm in Noto two years ago. They used the oregano which grew on their farm and it was the best oregano I ever had in my life. It was unbelievably good! I never thought there could be such big differences in the taste of oregano.
This salad makes a perfect snack after the last Christmas days of culinary richness - refreshing, light and comfortable. All you need to do is to peel two oranges (including the softer inner skin) and cut them in thick slices. Drizzle some good olive oil on top and sprinkle with dried or fresh oregano and a bit of salt.