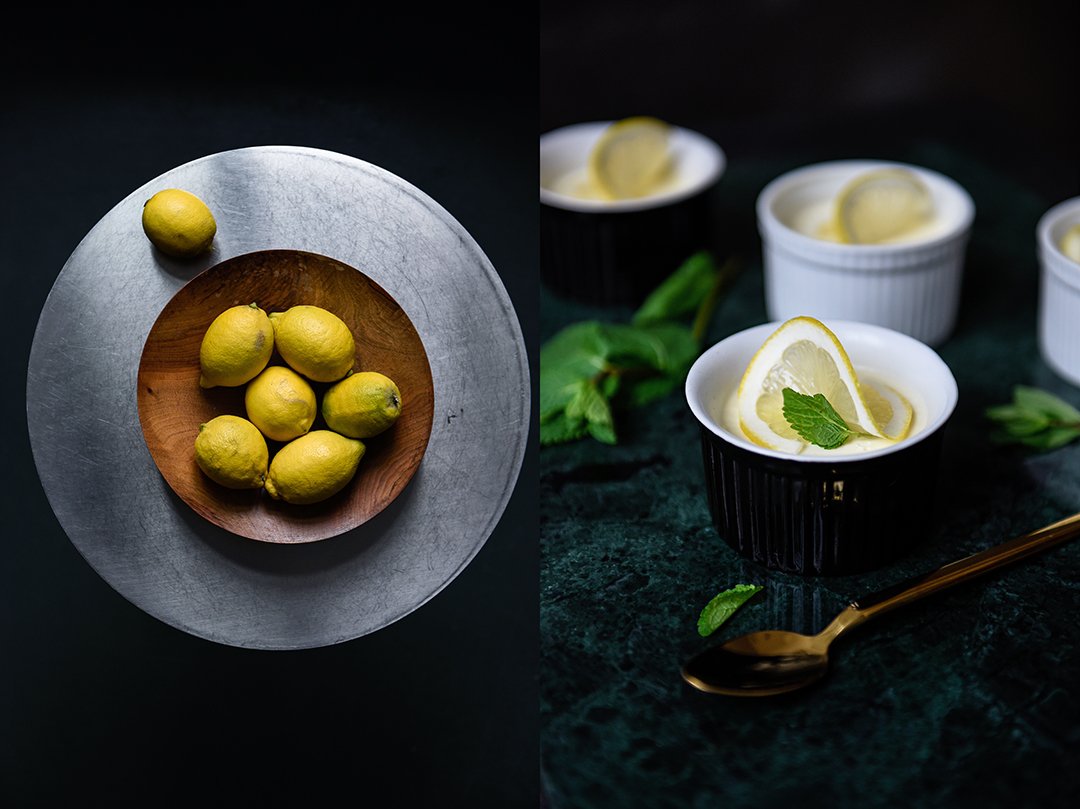
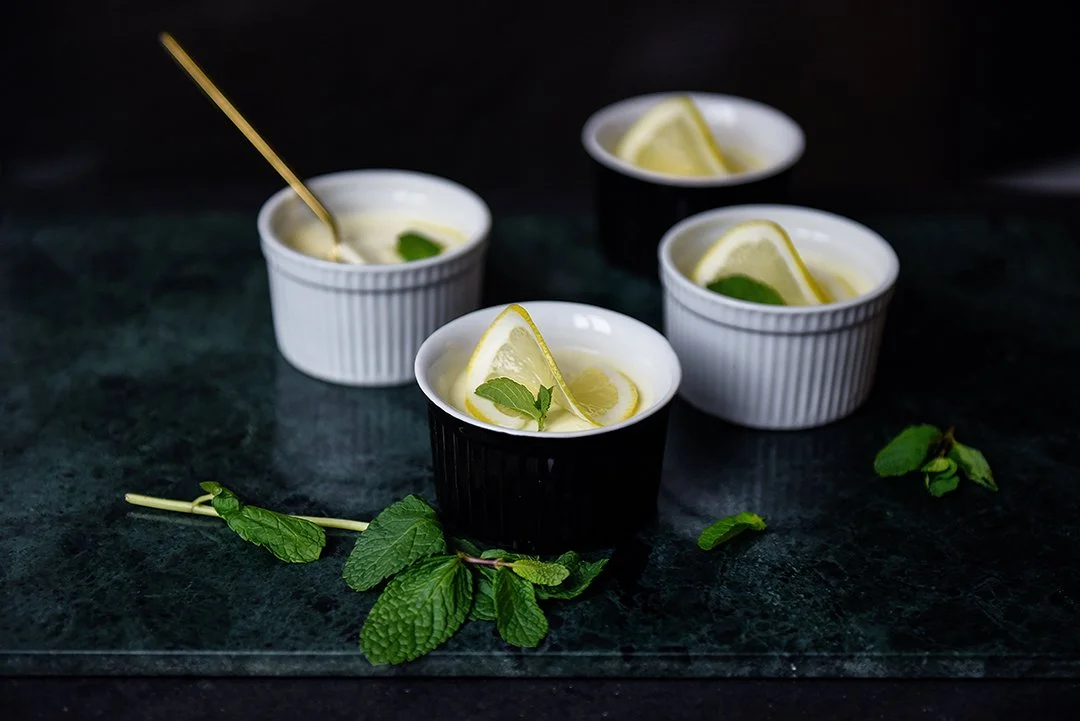
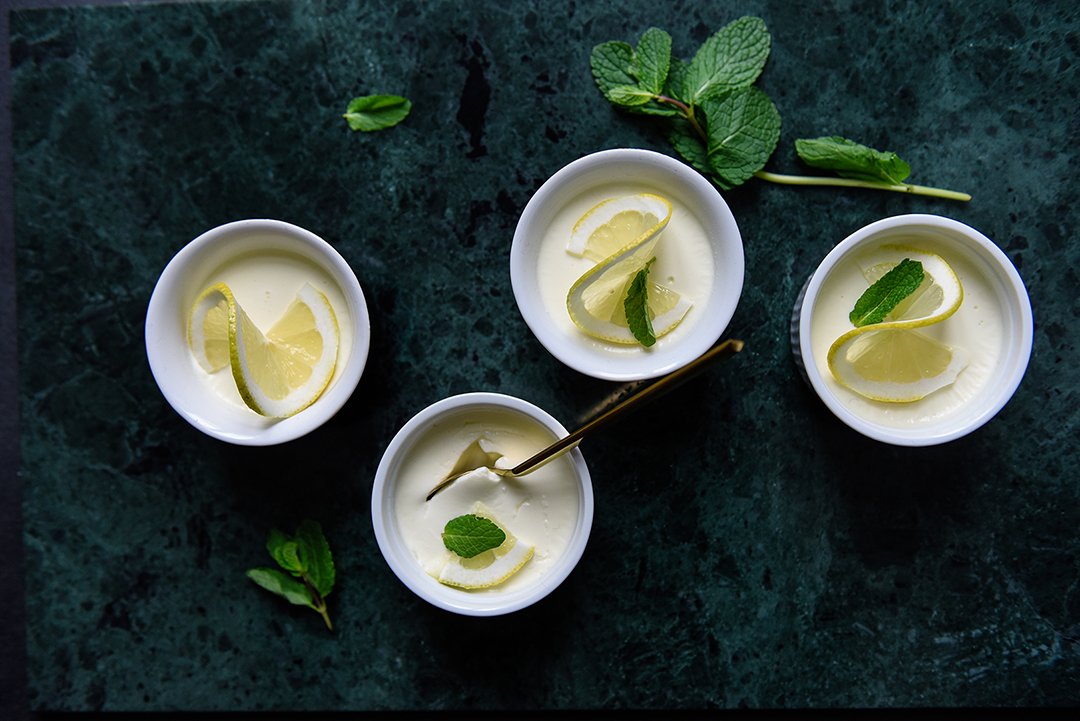
Limoncello Panna Cotta
Some years have the pace and mood of a little stream in the woods, burbling along quietly, without anyone really taking any notice of it. And then there are years that are more like a hungry wave, rolling like thunder and hitting the shore with a crash, ready to pull you off your feet and make you tumble in the most unexpected moments. 2017 had quite a few of these moments, whirling and twirling, they shook the world politically, socially, and environmentally, and also my own world on so many levels. It's exhausting when the ups and downs wear out the mind and squeeze it like a sponge, but it's also a challenge that forces us to question and grow in our own existence and that's its gift. I believe that our human mind needs to leave the known path once in a while, our comfort zone, that can easily become too comfortable and that makes us lazy. The irritating state of mess and confusion can be a great starting point to be brave and dive into the unknown, as much as I hate these moments as it's scary, I'm thankful, afterwards, when they force me to unfold the old, familiar pleats.
Just over 12 months ago, the Eat In My Kitchen book was sent out into the world and little did I know how much it would change my life and the way it used to be. In April 2017, Andrew Zimmern hung the medal for the James Beard Award for Best Cookbook in the General Cooking category around my neck, the state of bursting happiness, surprise, and thankfulness that I felt on that magical night in New York lasts until today. The world also revealed some of its culinary tricks and secrets to me as I travelled in America, Asia, and Europe during autumn. I was on the road for a new project and, for once, I let other people cook for me. I was introduced to the wonders of food in some parts of the world where I had never been before. It was pure bliss to experience new tastes and smells, to listen to unknown languages and learn about traditions and rituals that grew over centuries. And to see so many inspiring women in their kitchens, wherever I was, women who strongly believe in a gastronomic concept of respect and togetherness, women who create praised and highly celebrated restaurants, that made me happy and confident that the future will bring more and more of these fantastic female chefs into the spotlight.
In 2017, we all lost and gained, we gave and took, and as long as the exchange feels balanced, it was a good year. Before I pull the plug and go offline for a week, finally after 4 years of constant buzzing, I have one more thing to give to you: the recipe for this joy-bringing limoncello panna cotta. Now you have a sweet recipe at hand, for the moments when life gives you lemons.Enjoy food, wine, and especially time with the ones you love, have a happy Christmas and a joyful start to an exciting 2018!
Meike xxx

Limoncello Panna Cotta
Serves 2 to 4
gelatin sheets 2 1/2 (7 x 11-cm / 3 x 4-inch)
heavy cream 240 ml / 1 cup
whole milk 120 ml / 1/2 cup
Limoncello 60ml / 1/4 cup
lemon peel 2 long strips
granulated sugar 2 tablespoons
fine sea salt 1/8 teaspoon
lemon slices, very thinly cut for decoration (optional)
fresh mint leaves for decoration (optional)
Soak the gelatin sheets in cold water for about 5 minutes.
In a small saucepan, bring the cream, milk, Limoncello, lemon peel, sugar, and salt to the boil. As soon as the mixture is bubbling, take the pan off the heat. Squeeze the excess water from the soaked gelatin sheets, crumble into the warm cream mixture, and whisk thoroughly. Let the mixture cool in the pan, whisking occasionally.
Once the cream mixture is at room temperature—it will still be liquid—divide it between 4 120-ml /4-ounce ramekins. Cover them with plastic wrap and refrigerate for 1 hour. Transfer the ramekins to the freezer and chill for about 35-45 minutes or until set but not frozen. Alternatively, leave the ramekins in the refrigerator for about 3 hours or overnight.
Decorate the panna cotta with lemon slices and mint just before serving.


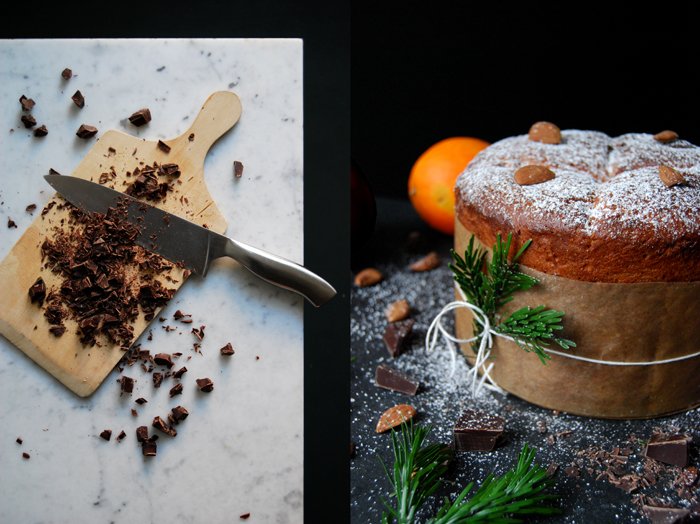
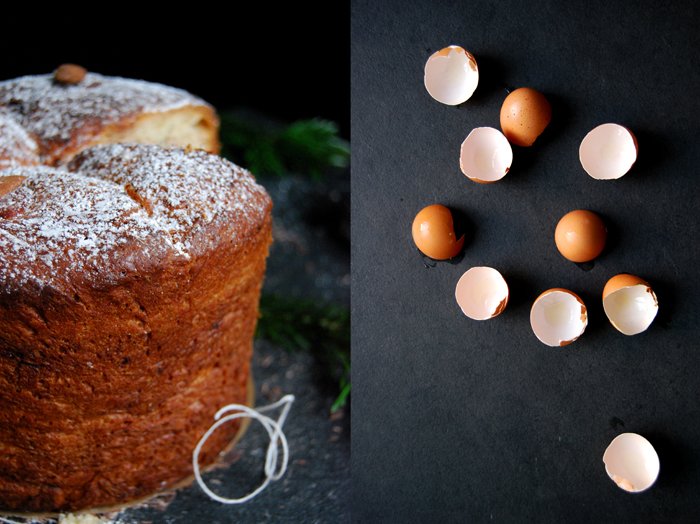
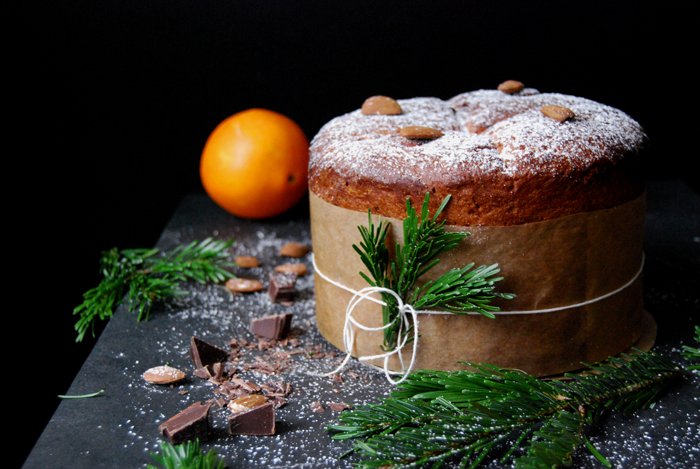
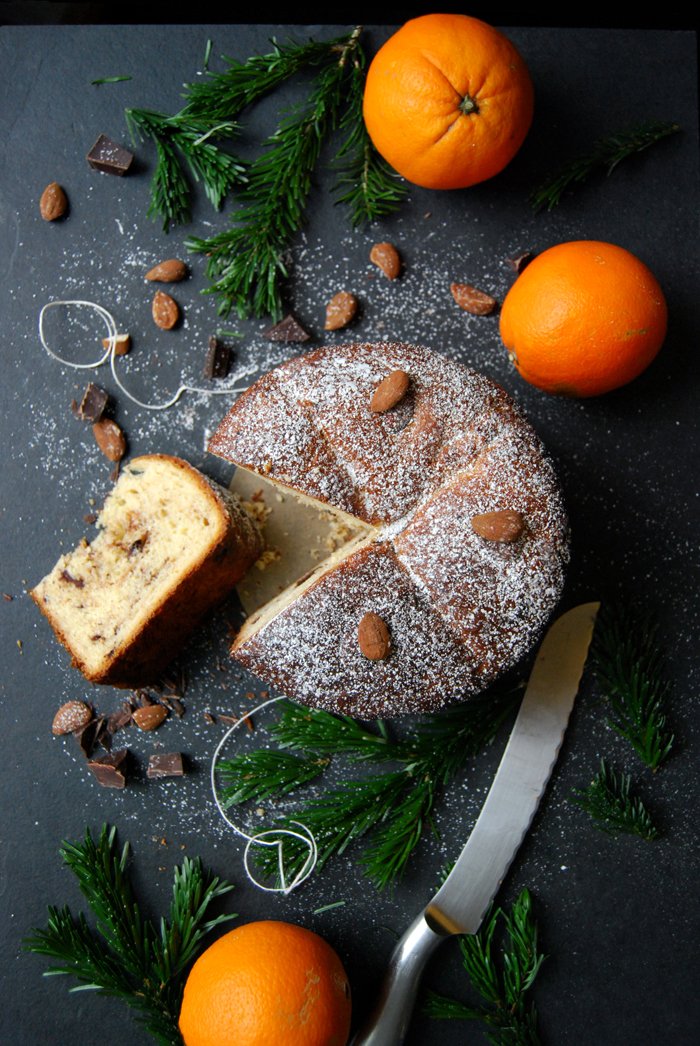
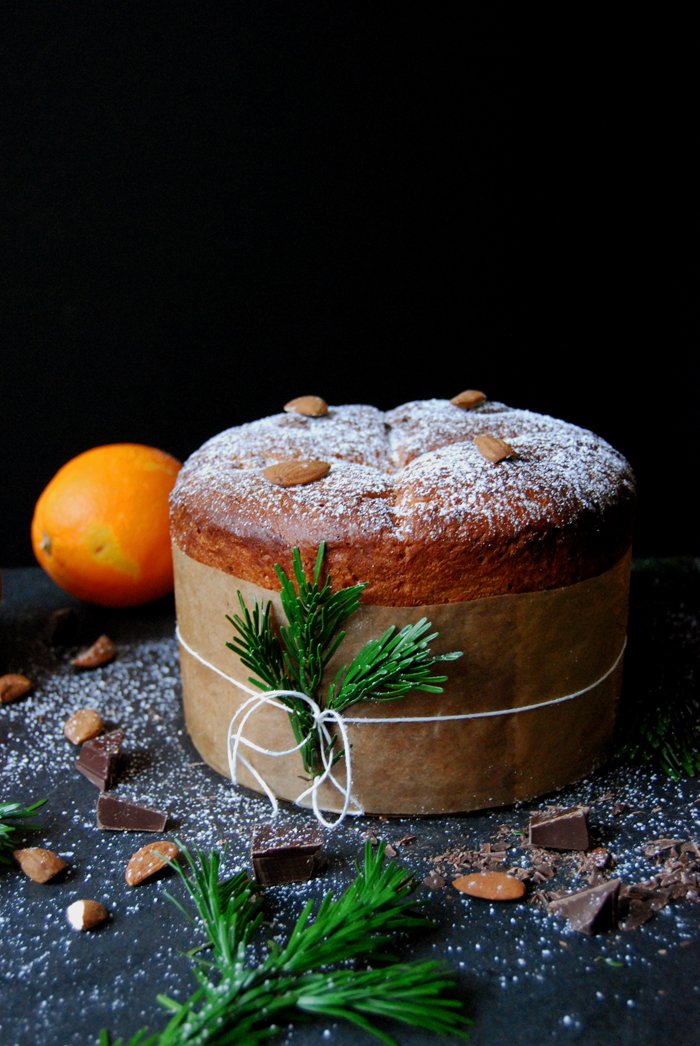
Chocolate, Orange and Cardamom Stollen
My granny Lisa was loved and adored for many of her baked goods. She truly mastered the German Sunday coffee table, filling the house with the sweetest smell of butter, sugar, and eggs every weekend. To please her six children's cravings, and later a growing pack of grandchildren, she sometimes baked seven different cakes in one day. Sponge and fruit cakes, cream tarts and crumbles were often lined up on her kitchen counter and doubtlessly influenced my own baking habits. Her Donauwelle - a marbled cake with cherries and buttercream - will always be my favourite. It's the taste of my childhood - and the beginning of my ever hungry sweet tooth.
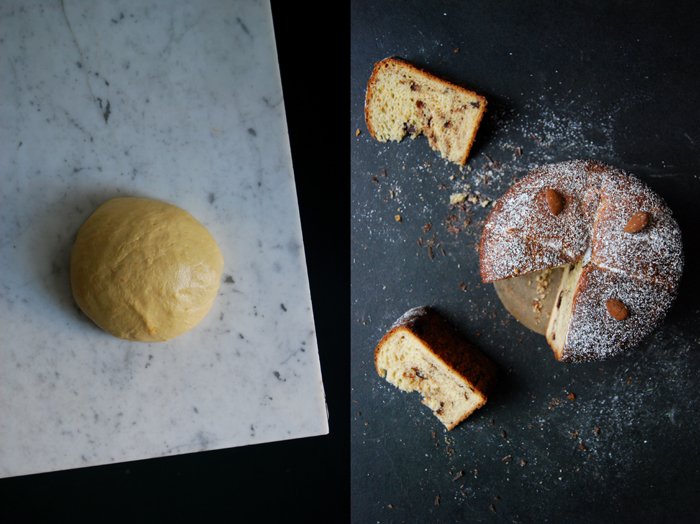
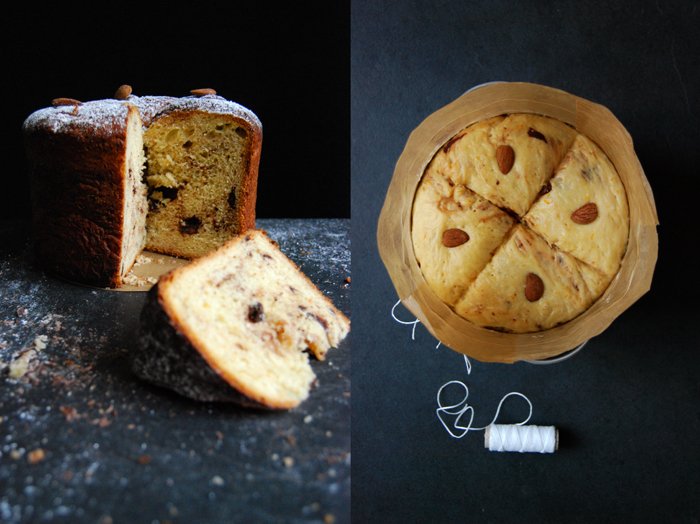
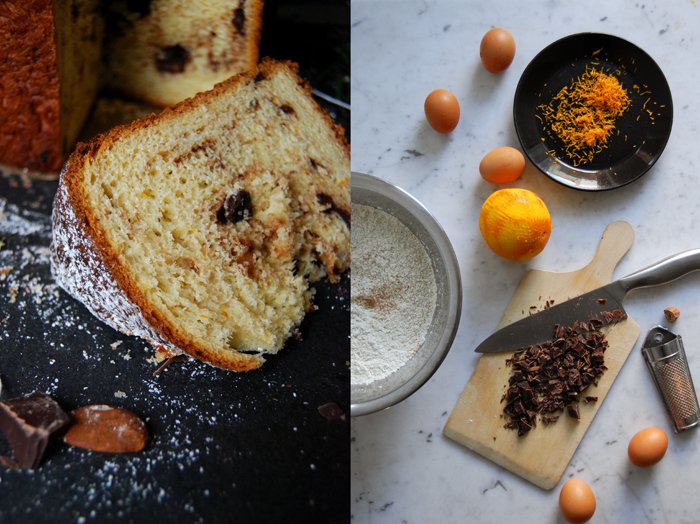
Six to eight weeks before Christmas, Lisa used to take orders from friends and family for another one of her celebrated classics: stollen. It's a German staple that you can find at every bakery, in every household as soon as the Christmas lights leave the boxes to twinkle behind wintery windows. The original stollen is quite a dense treat, it's a heavy yeast dough, the texture is crumbly like a fruit bread, but it has richness and depth. Raisins, candied orange and lemon peel infuse the cake for weeks while it sits wrapped in parchment paper in the darkness of the pantry. The top brushed with warm fat and then generously dusted with icing sugar, preventing it from drying out and giving it its snowy white Christmas look.
You can find various interpretations of the basic formula and fill the cake with marzipan, hazelnut or poppy seed paste to add taste and moistness. This is the first stollen recipe I ever created and I wanted it to be an aromatic firework of flavours without distracting from the classic's qualities. I went for bittersweet chocolate chunks, candied orange peel, and a touch of christmassy cardamom and aniseed. I'm more impatient than my granny, so we ate the stollen immediately. There's only one treat that I manage to wait for and that's English Christmas pudding.
Thanks to Kærgården for sponsoring this post, thanks for reminding me of my granny's kitchen and inspiring me to create my first stollen recipe!


Chocolate, Orange and Cardamom Stollen
For the stollen
plain flour 450g / 3 1/2 cups (divided)
granulated sugar 70g / 1/3 cup
ground cardamom 5 teaspoons
aniseed, finely ground in a mortar, 1/4 teaspoon
zest of 1 large orange
fast-acting yeast 2 sachets (7g / 1/4 ounce each)
water, lukewarm, 150ml / 2/3 cup
fine sea salt 1/8 teaspoon
soft butter, unsalted, 250g / 9 ounces
candied orange peel (preferably organic) 100g / 4 ounces
almonds, roughly chopped, 150g / 5 ounces
bittersweet chocolate (50%), roughly chopped, 170g / 6 ounces
For the topping
butter, unsalted, melted 50g / 2 ounces
icing sugar, sifted, about 4-6 tablespoons (to taste)
ground cardamom (optional, to taste)
In the large bowl of a stand mixer, combine 260g /2 cups of the flour, the sugar, cardamom, aniseed, orange zest, and yeast. Add the water and, using the hooks, mix for about 2-3 minutes or until well combined. If the dough is too sticky, add a little more flour. Cover the bowl with a tea towel and let the dough rise in a warm place, or preferably in a 35°C (100°F) warm oven, for 45 minutes or until almost doubled in size.
If the dough has almost doubled in size, add the remaining 190g / 1 1/2 cups of flour, the salt, butter, and orange peel and, using the hooks of the stand mixer, mix for about 3 minutes until smooth. Add the almonds and chocolate and continue mixing until well combined. The dough should be soft and shiny, but not sticky. Take the dough out of the bowl and, using your hands, knead for about 1 minute.
Line a baking sheet with parchment paper.
Transfer the dough to the lined baking sheet and form a short-ish loaf-shape. Flatten the dough a little, flip one long side over until it reaches the middle, then flip over the other long side (see 6th picture), pushing the layers softly together, but don't flatten the loaf, it will expand when it's in the oven! Cover with a tea towel and let rise for about 20 minutes.
Preheat the oven to 175°C / 350°F.
Bake the stollen for about 45-50 minutes or until the loaf is just baked through.
For the topping, brush the top of the warm stollen with the melted butter and dust immediately with icing sugar. If you'd prefer the cardamom to be more present (I recommend to try the stollen first), combine some icing sugar with additional cardamom (to taste) and dust the top of the stollen.
You can serve the stollen immediately, yet I prefer to eat it when it's cool and the chocolate isn't soft anymore. Keep it wrapped in parchment paper and aluminium foil.


Crème Brûlée Tangerine Cheesecake in a Jar for Christmas
Eat In My Kitchen turned 3! So much has happened around me in the past few weeks that I forgot my blog's birthday on the 23rd November.
I usually create a recipe for this special day - at least in the past 2 years - but now we're all so busy contemplating lunch and dinner menus for December's upcoming festivities, that I decided to skip the birthday bash and move straight on to Christmas. I came up with a dessert that's delicious, gorgeous, and practical in equal measure, a crème brûlée cheesecake in a jar. Its shiny golden prettiness is the perfect finish for a festive table. You can easily bake the cake a day in advance and keep it in the fridge. Sprinkled with sugar, it only needs a few seconds under the hot flame of a blow torch before you and your guests can indulge in the sweeter things in life.
My cheesecake base is made with oat cookies (you can find a recipe for oat cookies in my book on page 234), the filling is a mixture of rich mascarpone and cream cheese refined with tangerine, cinnamon, and vanilla. You could also bake one big cake in a 20cm / 8" springform pan, but it's so much more fun to present these beautiful little jars to your friends and family.
Before you jump to the recipe, I'd like to ask you for two favours:
Food52's cookbook competition, the famous Piglet Tournament, is now open. You can nominate your favourite cookbook and I'd be jumping with joy if you consider giving your vote to the Eat In My Kitchen book. 2016 has brought many wonderful cookbooks to the shelves, but luckily you can vote for more than one book. You can find the form to nominate here, the deadline is the 30th December.
And here's my second question:It would be fantastic if you could also drop a review for my book on Amazon, here are the links:
Thank you so much! Happy 3rd Advent!! xx

Crème Brûlée Tangerine Cheesecake
You'll need 10-12 maison glass jars or ramekins for this recipe.
Serves 10-12
For the base
oat cookies 210g / 7 1/2 ounces
unsalted butter, melted and cooled, 60 / 1/4 cup
For the filling
cream cheese, at room temperature 300g /11 ounces
mascarpone, at room temperature 250g / 9 ounces
granulated sugar 100g / 1/2 cup
vanilla pod, split and scraped, 1/2
large organic eggs 3
cornstarch 1 heaping teaspoon
freshly grated tangerine zest 1 tablespoon
freshly squeezed tangerine juice 3 tablespoons
ground cinnamon 1/4 teaspoon
fine sea salt 1/8 teaspoon
For the topping
granulated sugar
tangerine zest (optional)
For the base, crush the cookies in a food processor or blender until finely ground. Transfer to a large bowl, add the melted butter, and stir until well combined. Divide the cookie mixture between the glass jars or ramekins, using the bottom of a shot glass to press it firmly and evenly into the jars, especially along the edges. Freeze for 20 minutes.
Place a deep roasting pan, large enough to fit the glass jars comfortably, on the lowest rack of the oven. Preheat the oven to 160°C / 325°F. Fill a kettle with water and bring to the boil.
For the filling, in a large bowl, use an electric mixer to beat the cream cheese, mascarpone, sugar, vanilla seeds, eggs, cornstarch, tangerine zest, tangerine juice, cinnamon, and salt until well combined.
Pour the cheesecake batter on top of the chilled cookie base and transfer the jars to the roasting pan in the oven. Slowly pour the boiling water into the roasting pan until it comes about one third to half way up the sides of the jars. Bake for about 20 minutes or until the filling is just set but still slightly wobbly in the center. Turn off the oven, leave the oven door slightly open, and let the cheesecake cool for about 5 minutes, then take the cheesecake out of the oven and let cool to room temperature. Once cool, the cheesecake can be refrigerated for 2 to 3 days. Or, you can finish the crème brûlée topping right away for serving. (Don't refrigerate the cheesecake when it's still warm, or the base will turn soggy.)
For the topping, sprinkle a generous amount of sugar on top of the cheesecakes, about 1 teaspoon for each jar. Using a blow torch, burn the sugar until golden brown. Let it cool for a couple minutes until the burnt sugar is hard, sprinkle with tangerine zest, and serve immediately.


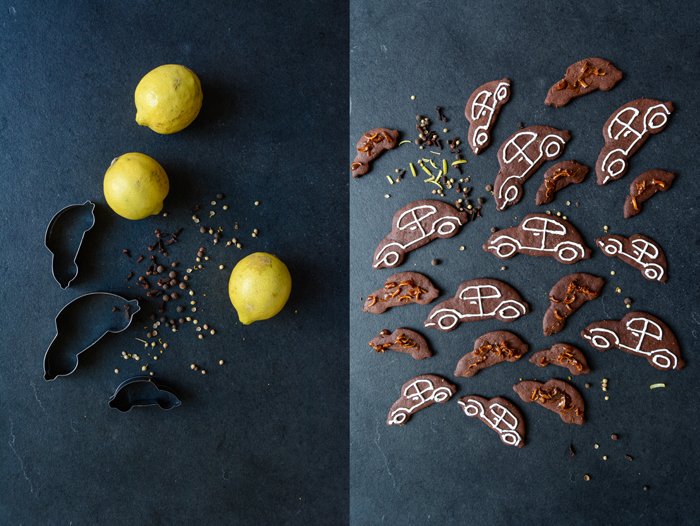
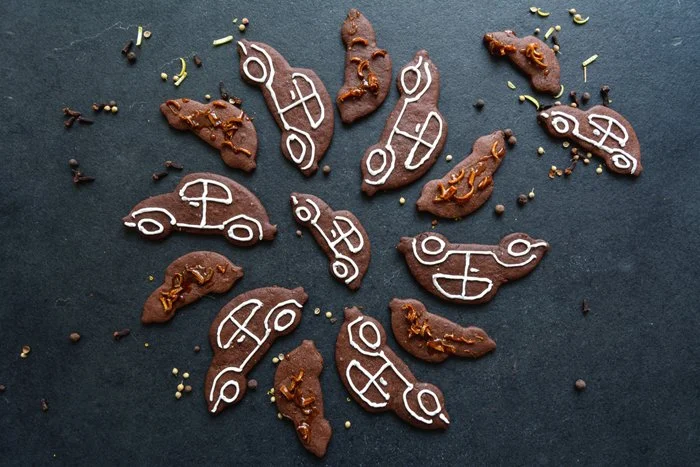
Chocolate Spice Christmas Cookies with Candied Lemon Peel
I used to have a huge spice box in my kitchen that didn't look very pretty and also wasn't particularly practical. For whatever reason, I decided in my early kitchen years to store all my spice filled glass jars and tiny metal tins in this box and that's where I kept them for two decades. This beaten and buckled box still exists, I just use it for potatoes at the moment (even a box has to stay flexible in life). I used to arrange my spices in two layers of jars, so when I needed juniper berries from the bottom, I would always have to empty the whole thing. Rather impractical.
Around two years ago, I renovated my kitchen, I changed the sink and cupboards on one side of the room. When everything was set up, I had a skype call with my Maltese mama Jenny to proudly present my work to her. Not that she's particularly experienced in kitchen renovation, it's rather the opposite, she still works in her gorgeous sea-blue kitchen gem from the 60s. I don't remember why, but we started discussing the spice-situation in my kitchen. There's a slim cupboard with two sliding drawers next to my sink, so when we had our video chat, we both looked at this drawer and decided that it should become my spice cupboard. I arranged everything that same day and since then I'm more than happy to have such a luxurious overview of my spice collection.
The spices I use the most, right at the front when you open the door, are Maltese fennel and coriander seeds, the whole range of peppercorns in black, green, white, and pink, cinnamon, and cardamom. Jars of cumin, cloves, aniseed, allspice, juniper berries, and mustard seeds are right behind. Then there's the hot section, with cayenne and urfa chilli, plus sumac and a few spice mixtures. I love this cupboard, it's a bit chaotic, and it's still a colourful collection of various jars and containers, but it smells beautiful.
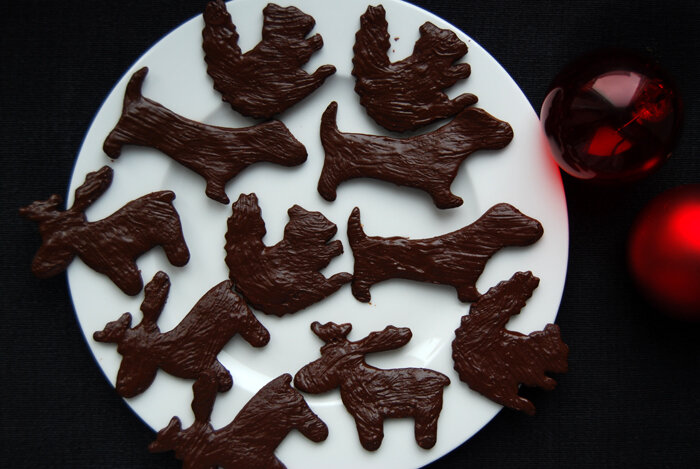
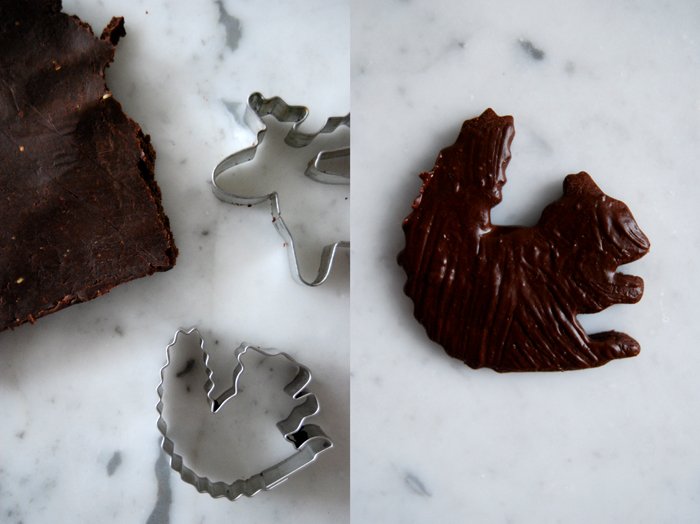
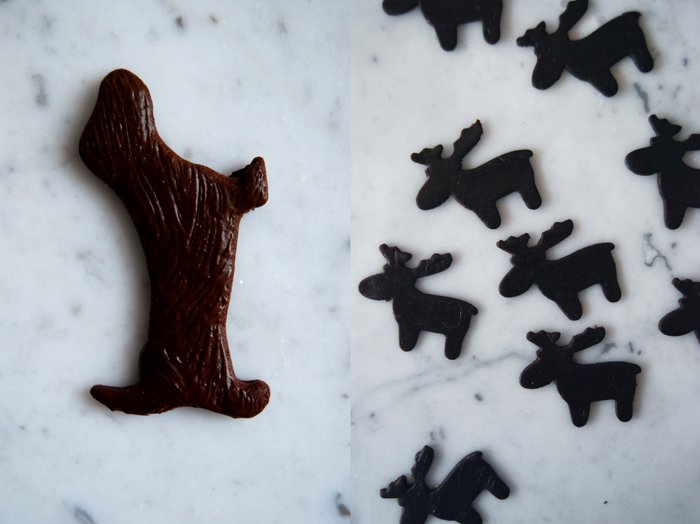
Although I generally prefer a certain order in my kitchen, there are zones and tools in this room that seem to follow their own rules. Cookie cutters, for example, tend to end up in places where I don't even know how they got there. I bought a large metal ring at one point to get my growing collection under control. Every year I buy a couple new ones to add to the classics, to stars, angels, and Santa. I tend to have annual favourites. Squirrel, sausage dog, and deer were popular for a long time, which might speak for my love of cute animals. My collection of three beetles is relatively new, maybe I need a car? Who knows. But apart from giving my cookies a cute look, a cutter should be practical. For example, I barely use the deer anymore because the cookies tend to lose their antlers in the oven, so it looks rather sad. My beetles however are very cooperative, roundish, no narrow parts, and they are even big enough to get a proper royal icing decoration.
I must admit that decorating sweets is not one of my best talents. But I thought it would be nice to bake some cookies at this time of year that you can decorate - especially if there are kids around the baking table. And if you're as lazy as I am and you have a soft spot for citrus, I have a great alternative for you. Decorate half the batch of these delicious chocolate spice cookies with royal icing (I recommend you trust the pros and buy the mixture from a baking shop) and make your children happy. For the other half, caramelize lemon peel until sweet and crunchy, sprinkle this sticky golden mixture over the remaining cookies and make yourself happy. These are the adult cookies. They aren't as pretty as the cute hand decorated ones, but the combination of dark chocolate, cinnamon, cloves, coriander, aniseed, and candied lemon peel makes up for it. They taste so unbelievably good that you won't even mind the looks.
For more delicious recipes and kitchen inspiration, visit Volkswagen's Pinterest community board Food Bloggers for Volkswagen.

Chocolate Spice Christmas Cookies with Candied Lemon Peel
Makes about 50 cookies
For the cookies
plain flour 260g / 2 cups
unsweetened cocoa powder 50g / 1/2 cup
baking powder 1/4 teaspoon
freshly grated lemon zest 1 tablespoon (from 1 large lemon)
ground cinnamon, 1 teaspoon
cloves, ground in a mortar, 10 (about 1/2 teaspoon ground cloves)
coriander seeds, ground in a mortar, 2 teaspoons
aniseed, ground in a mortar, 1/2 teaspoon
allspice berries, ground in a mortar, 4
fine sea salt 1/8 teaspoon
butter, at room temperature, 130g / 1/2 cup plus 1 teaspoon
icing sugar 120g / 1 1/4 cups
organic egg 1
For the decoration
(if decorating half the cookies with royal icing and the other half with candied lemon peel)
royal icing mixture, whisked with a little water, about 60g / 2ounces
granulated sugar 50g / 1/4 cup
water 2 tablespoons
very thin strips of fresh lemon peel, 1 small handful
In a large bowl, combine flour, cocoa powder, baking powder, lemon zest, cinnamon, cloves, coriander, aniseed, allspice, and salt.
In the bowl of a stand mixer, fitted with the paddle attachment, beat the butter and icing sugar until fluffy. Add the egg and mix for about 1 minute or until well combined. Replace the paddle attachment with the dough hook, add the flour-spice mixture to the bowl with the butter, and mix until well combined. Form a thick disc, wrap in cling film and put in the freezer for about 20 minutes.
Preheat the oven to 160°C (325°F) and line 3 baking sheets with parchment paper.
In batches, roll the dough out thinly (about 3mm / 1/8" thick) between cling film and cut out cookies in whatever shape you like. Keep the remaining dough in the fridge while cutting the cookies. Arrange the cookies on the lined baking sheets and bake, one baking sheet at a time, for about 6 minutes or until golden. Let them cool for a few minutes before you transfer them to a cooling rack.
For the royal icing, whisk the royal icing mixture with a little water (following the instructions on the package) and, using a piping bag with the smallest attachment you can find, decorate half the cookies.
For the candied peel, in a small saucepan, bring the sugar and water to the boil. When it starts to caramelize add the lemon peel. Lower the heat to medium and cook for about 3 to 4 minutes or until the peel is golden and soft—mind that it doesn't burn. While the caramel is still liquid (you can leave the saucepan on lowest heat), quickly sprinkle the remaining cookies with the candied lemon peel.
Happy baking!


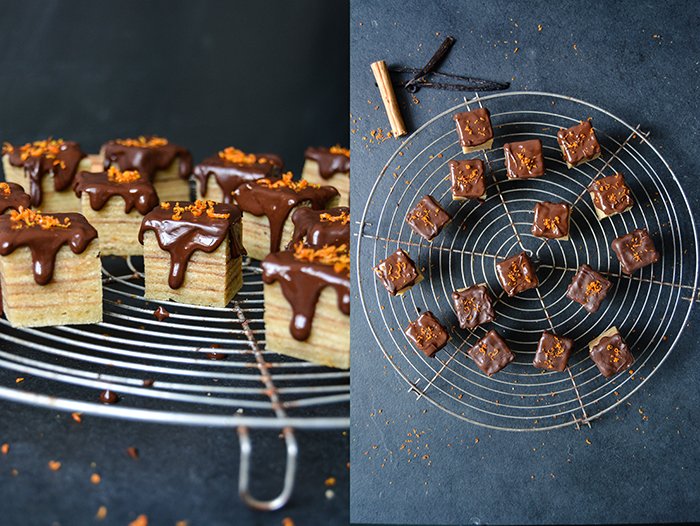
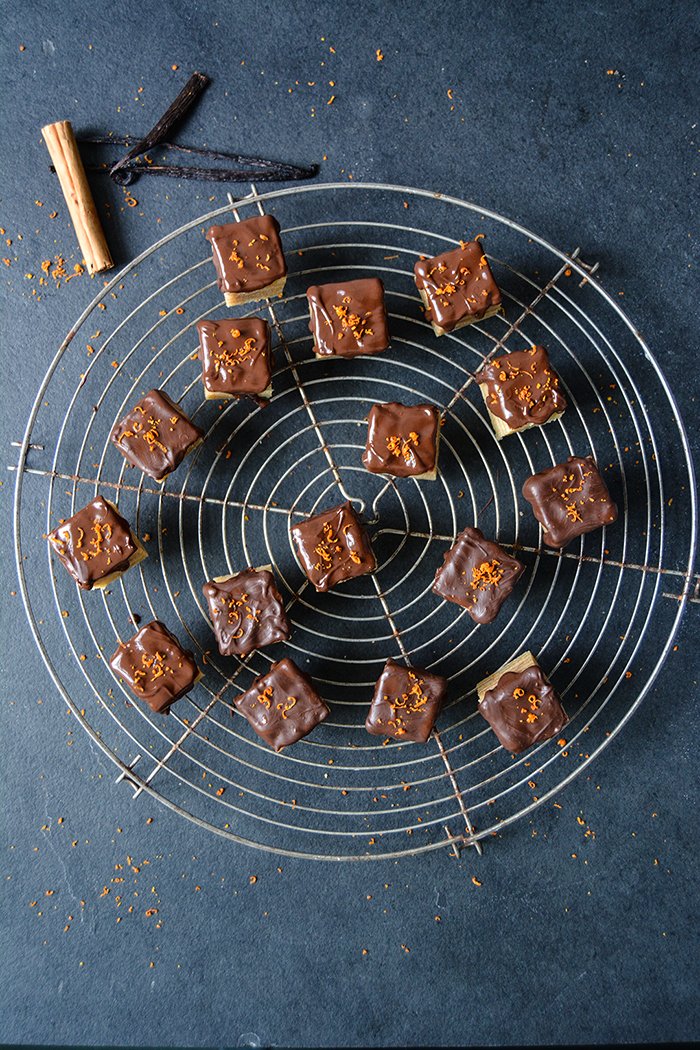
A Christmas treat - the famous German Chocolate Baumkuchen
A few days ago, I walked through a little park that's close to my apartment. It's a very quite place, you don't see many people there. I like to go on my own when I need a break from the world, to feel some fresh air on my skin and think clearly again. That afternoon the air was crisp, the last golden leaves fell off the trees, and a trio of squirrels was busy collecting their nuts. I felt a bit chilly and as I pulled my scarf closer to my neck, I noticed a change, I could smell winter.
Winter brings many changes, I could sleep more, eat more, and bake more. Baking always plays an important role in my life, especially on the weekends, but during the Christmas season I become excessive. There are so many recipes on my list, my classics, but then I also want to try out new creations. The fabulous Baumkuchen has been on my mind since summer, I love this traditional German Christmas cake that's usually baked on a spit. The name means tree cake, referring to the fact that it looks like the growth rings of a tree. This cake takes time and it's a bit of work to prepare. First you bake a thin layer of batter for just a few minutes, then you brush on the next layer and continue until you end up with up to 20 layers (mine has 12, that's more than enough). It's a hit at Germany's Christmas markets where you can see it being baked on rotating spits, close to a grill (broiler) or wood fire.
Baumkuchen has always been one of my Christmas favorites, especially to sweeten my teatime in December's dark and cold afternoons. I usually buy the cake from the store, but then I had an idea. It was in summer. I don't remember why I gave it a thought in the heat of July (I guess I felt some Christmas longings), but never mind. It dawned on me that I don't need a spit and wood fire to enjoy this treat, that I could also bake it in a normal cake pan under the grill (broiler) of my oven. Cut into squares, it almost counts as Christmas cookies, but if you prefer, you can cover the whole Christmas beauty in chocolate and serve it as a cake.
My Baumkuchen is moist, refined with cinnamon and orange, with a strong taste of marzipan. If you have a free afternoon, get cozy next to your oven and bake a tree cake. I wish you a peaceful 1st advent!
For more recipes for Christmas baking, click here!


Chocolate Baumkuchen
Makes about 20 Baumkuchen squares
plain flour 60g / 1/2 cup
cornstarch 30g / 1/4 cup
organic eggs, divided, 6
fine sea salt 1/8 teaspoon
marzipan / almond paste, crumbled, 120g / 4 ounces
unsalted butter, soft, 200g / 3/4 cup plus 1 tablespoon
brandy 2 tablespoons
granulated sugar 200g / 1 cup
vanilla bean, split and scraped, 1
ground cinnamon 1/4 teaspoon
freshly grated orange zest 1 teaspoon
For the topping
bittersweet chocolate 100g / 3 1/2 ounces
butter 1 teaspoon
orange zest (optional)
Turn on the grill (broiler) of your oven or preheat to 220°C / 425°F (this only works if you can set the heat to come just from the top). Butter and line the bottom and sides of a 20cm / 8" springform pan or a tall 15 x 20cm / 6 x 8" cake pan with parchment paper.
Sieve together the flour and cornstarch.
Beat the egg whites and salt until stiff.
In a large bowl of a stand mixer, using the paddle attachment, beat the marzipan, butter, and brandy until creamy. Add the sugar, vanilla seeds, cinnamon, orange zest, and egg yolks and continue mixing for about 3 minutes or until fluffy. Add the flour mixture and, using a wooden spoon, stir until well combined. Gently fold the egg white into the flour-butter mixture until combined.
Add about 3 generous tablespoons of the batter to the lined springform pan, it should only be a thin layer to cover the bottom. Using a wide spatula, spread the batter evenly. Place the springfrom pan in the top third of the oven and bake for about 3-4 minutes or until golden/ light brown, but not dark. Watch well and mind that the batter can burn within seconds. Take the pan out of the oven, add 3 tablespoons of the batter on top of the first baked layer of cake, spread well, and bake for 3-4 minutes or until golden / light brown. Continue the same way until you have used all the batter, you should end up with about 12 layers. Let the cake cool in the pan for 10 minutes, take it out of the pan, and let it cool completely. Once cool, cut the cake into little squares.
In a small saucepan, heat the chocolate and butter over low heat or in a bain marie. Let it cool for a few minutes before you decorate the cake.
Drizzle the Baumkuchen squares with the chocolate and decorate with a little orange zest.


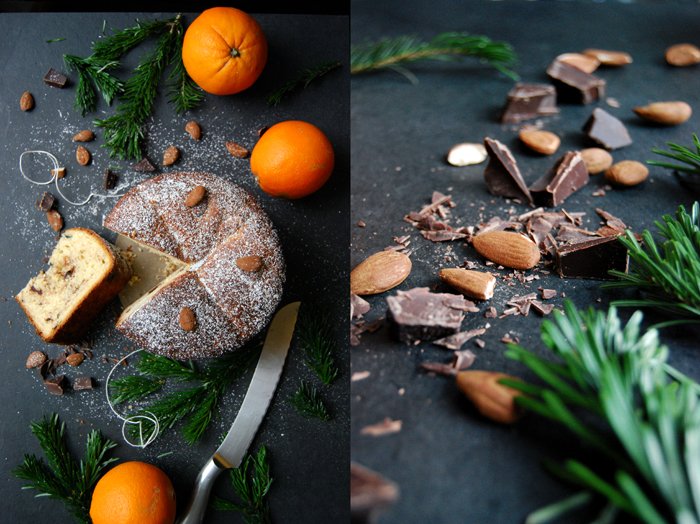
A Christmas Chocolate Panettone
We always had at least one huge panettone under our Christmas tree and I used to be more fascinated by the packaging than the actual bread. I love the Italian way of dramatically packing everything in glossy boxes with bright bows in candy colours. My style is usually so minimal that at Christmas time, I enjoy indulging in a little kitsch and opulence - too much is just right at this time of year. Although I used to enjoy the wrapping so much, the content of the boxes couldn't always keep up with my expectations. The panettone was often too sweet, too dry or so light and airy that it felt (and tasted) artificial.
When I decided to bake my own panettone this week, for the first time in my life, I got more and more intimidated the more I read about it. Often it's described as a moody and difficult bread and some bakers had to bake hundreds of loaves before they found the right formula. I didn't have that much time, I'm too impatient, so I thought that a good panettone resembles a French brioche in some ways, the richness and colour, the flowery taste, the subtle sweetness. The Italian bread is just not as soft on the outside and a bit more airy and fluffy inside. So what makes a good brioche? Lots of egg yolks and butter! That was my starting point. Although the most popular panettone feature raisins and candied peel, I went for lots of bittersweet chocolate chunks and orange zest and that was a good choice. When the bread was in the oven, a friend came over spontaneously and said "It smells like Italy, like real panettone!" That relaxed me a bit, at least I had the right smell in the house.
The preparation of the panettone dough takes some time, it has to rise twice, 90 minutes for the first time and 60 minutes when it's already in the form. I made it with dry yeast and let it rise in the warm oven at 35°C / 95°F. I follow this technique with all of my yeast based doughs and it works wonders. It just rises much quicker. You could also use your heater but I find that the oven works best. I didn't buy a special panettone form, I just used a normal cooking pot lined with buttered parchment paper which I let come up high enough for the bread to bake in the shape of a tall cylinder. The baking paper went up 20cm ( 8") which was a bit too high, I could have cut it shorter for the dough to rise above the rim like a mushroom, next time... A panettone is quite dark on the outside but it's important that it doesn't burn. At one point the top has to be covered with aluminum foil and the temperature changes, from 200°C (390°F) to 180°C (355°F) and then to 160°C (320°F) for the last 10 minutes. I took the bread out of the oven after 40 minutes to check if it was done and gently knocked on the bottom (it's quite fiddly to do as it's very hot and fragile), but it needed some more time on a lower temperature setting for the centre to bake through.
When you bake bread for the first time you can just follow and trust your nose, your ears and fingers. When you knock on the bottom it's always exciting, you don't know if it worked out, and in the case of this bread, it made me quite nervous. I had to wait until the next day to cut and taste it as I didn't want the chocolate to still be liquid. So the next morning, I solemnly cut the first slices of my first Christmas panettone, the centre was baked through but soft, so baking time and temperature were right - I felt relieved. The bread was fluffy but rich and it tasted like Mediterranean Christmas, this was all I had hoped for. The flowery aroma of the orange merges beautifully with the bittersweet chocolate. I spread a bit of butter on top and enjoyed my work in peace. Happy Advent!

Chocolate Panettone
For 1 panettone (18cm / 7") you need
plain flour 500g / 1 pound (I used white spelt flour type 630)
dry yeast 2 sachets (each 7g / 1/4 ounce)
granulated sugar 100g / 3.5 ounces
salt 1/2 teaspoon
a pinch of nutmeg
zest of 1 orange (about 1 1/2 tablespoons)
organic egg yolks 5
butter, melted, 170g / 6 ounces
milk 220ml / 1 cup
bittersweet chocolate, roughly chopped, 100g / 3.5 ounces
almonds 4, for the topping
heavy cream 4 teaspoons, to brush the top
icing sugar, for the topping
Mix the melted butter with the milk and egg yolks, the mixture should be lukewarm.
In a large bowl, combine the dry ingredients (flour, yeast, sugar, salt and nutmeg) and orange zest. Add the milk/ butter/ egg mixture and mix with the dough hooks for about 5 minutes or until well combined. Knead with your hands for about 1 minute, it should be soft and glossy. Put the dough back into the bowl, cover with a tea towel and let it rise in a 35°C / 95°F warm oven ( top / bottom heat, no fan!) for about 90 minutes or until doubled in size. While the dough is rising, put the chocolate in a plastic container and keep it in the freezer.
Butter the inside of an 18cm / 7" cooking pot (about 10cm / 4" high). Cut a 15cm / 6" wide strip of parchment paper, long enough to be wrapped around the inside of the pot with both ends overlapping generously. Butter the parchment paper on one side. Line the sides of the pot with the parchment paper (the butter side should be facing inwards). Push the overlapping ends of parchment paper together.
Punch the dough down and take it out of the bowl, give it a quick knead and mix in the cold chocolate with your hands. Form a ball and put it into the prepared pot. Carefully cover it with a light tea towel (on top of the parchment paper) and let the dough rise in the warm oven for another 60 minutes or until doubled in size.
Take the pot out and set the oven to 200°C / 390°F, fan-assisted oven (210°C / 410°F top/ bottom heat).
Brush the top of the dough with the cream and cut a cross into the surface with a sharp kitchen knife. Decorate with the almonds. Bake the panettone for 10 minutes and turn the temperature down to 180°C / 355°F (190°C / 375°F top/ bottom heat). Bake for 20 minutes, cover the top with a piece of aluminum foil if the top gets too dark, and bake for another 10 minutes. Turn the heat down to 160°C / 320°F (170°C / 340°F top/ bottom heat) and bake for another 10 minutes. If you use top / bottom heat bake for another 5-10 minutes. Carefully take the pot out of the oven (it will be very hot!) and let the panettone cool in the pot for at least 30 minutes or until it's stabile enough to cool on a wire rack. When it's completely cool, dust with icing sugar.

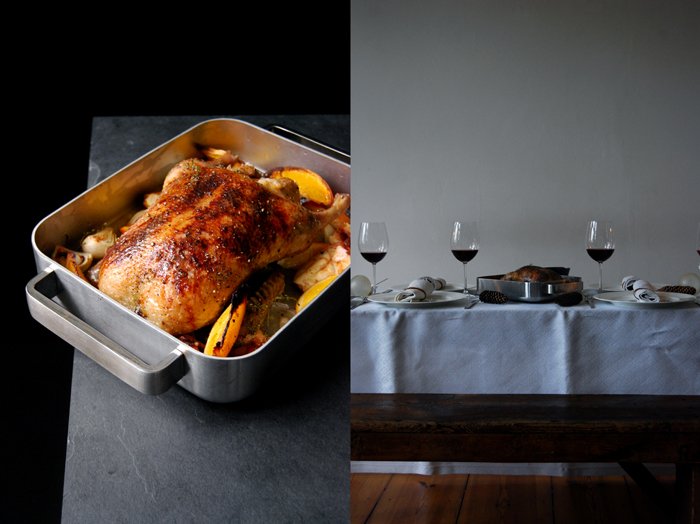
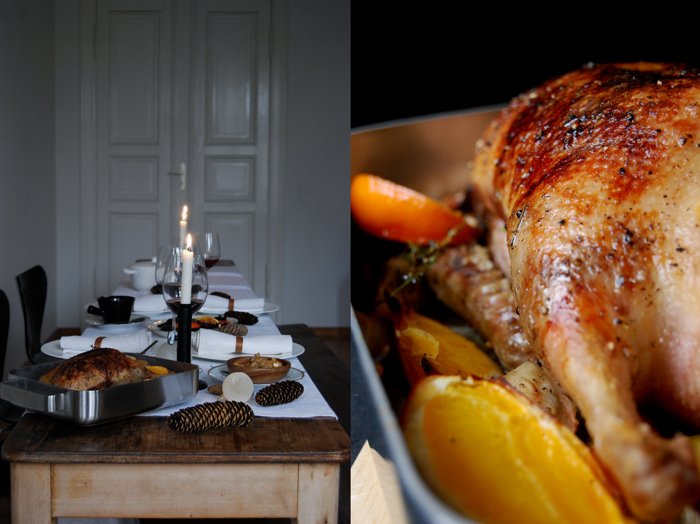
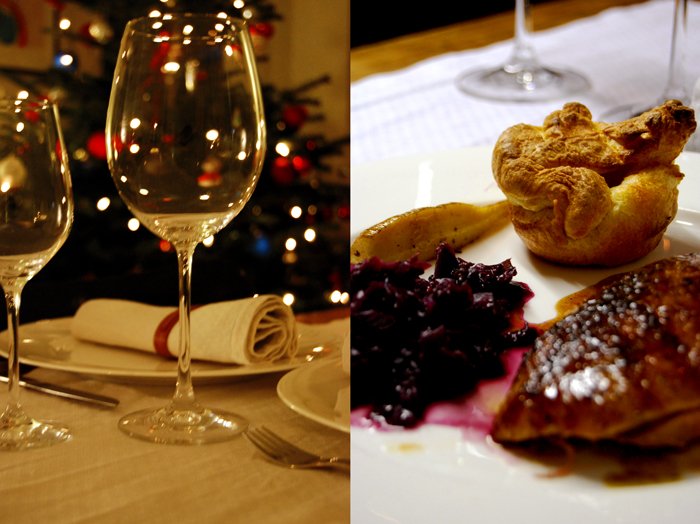
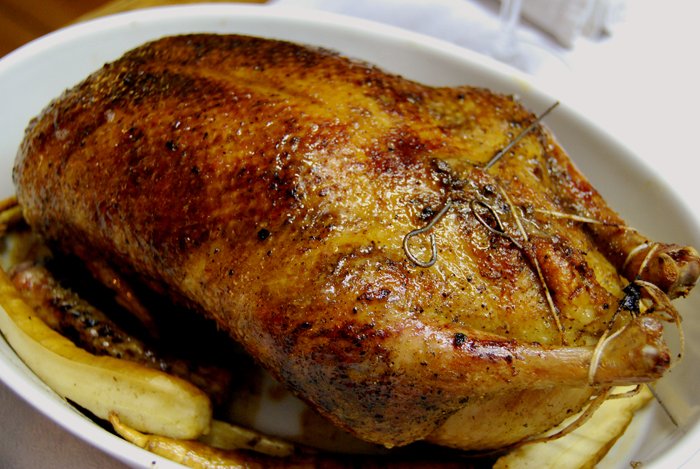
Slow-Roasted Duck a l'Orange with Lingonberry-Port Gravy & Chestnuts
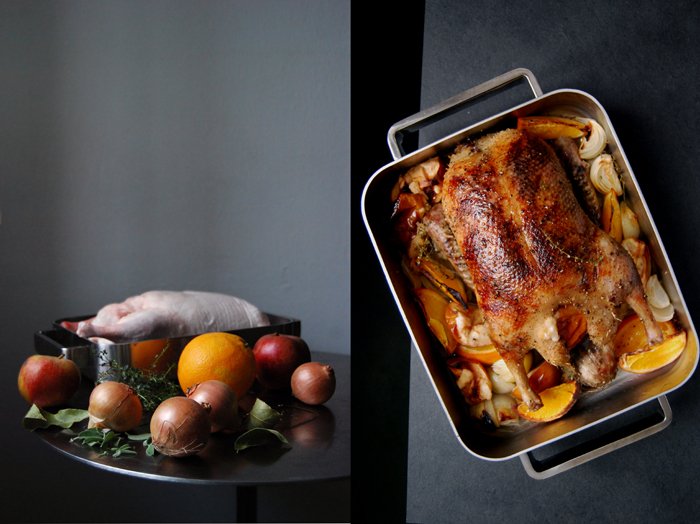
So many options for the Christmas table and so many choices to be made! In the past few weeks I've been coming up with various menus in my head, circling around roasts, stews and poultry, and so far, just one thing is set: there will be one (or rather two) slow roasted ducks on the table.
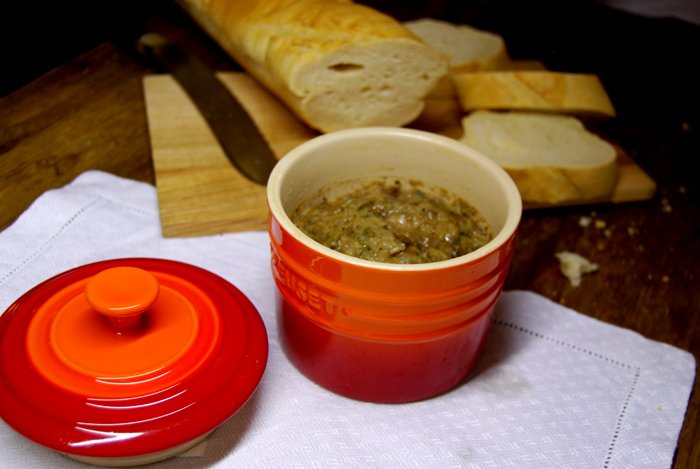
This is my little tradition, which I'm not willing to compromise on. The recipe I use guarantees the most tender meat, it tastes fantastic with red cabbage and spaetzle on the side, and gravy, of course. Lots of gravy, I love it. I often used to fill the duck with a rich meat-and-liver-stuffing similar to paté, a recipe by my Mama, but it's time to try something new.
For my pre-Christmas test dinner, I stuffed the bird with oranges, apples, chestnuts, onions and herbs. The focus is on the citrus' fruitiness, and letting that merge with the meat's juices - it makes such a fabulous sauce. I mixed in some lingonberry jam and port wine, a quick sauce that makes you hear the angles sing. I didn't change the method of cooking though, I worked with the same time and temperature as every year (3.5 to 4 hours at 85°C / 175°F, with the broiler switched on in the last few minutes). The result is so reliable that I wouldn't ever dare to mess with it. This is how my mother cooks her duck and I trust her blindly when it comes to poultry (with a few other things too).
She only failed once - and that wasn't her fault - and it was funny. Years ago, she made a huge turkey for the whole family that had to be roasted in the oven for hours. At one point, we covered it with foil, following the recipe, which seemed to work fine. When my mother took the turkey out of the oven we all gathered around a little table. I remember the pride on her face, the pride of a cook who's waited impatiently to show the fruit of hours of work. She lifted the foil but the bird was pitch black - it almost looked mummified. And to make it even worse, a leg fell off with a dull thud. In a dry tone, all my mother could say was "I think it's done." We looked at each other and couldn't stop laughing! The thermostat in her oven had broken and changed the temperature setting…
Although things didn't turn out as we had planned, what I love about this night is that, even years later, we still talk about it and it makes me laugh till I cry whenever I think about it and picture the scene of my family gathering around the burned turkey. We tried to make the best out of it and cut off a few (edible) pieces and enjoyed it with lots of gravy on sandwiches.
No matter how many lemons life gives you, turn them into something edible, always!

Slow roasted Duck a l'Orange with Lingonberry Port Gravy and Chestnuts
This recipe is also in my 2nd cookbook
365: A Year of Everyday Cooking & Baking
Serves 3-4
Olive oil
1 (5 ½-pound / 2.5-kg) duck, with neck and giblets reserved
2 tsp flaky sea salt
1 tsp black peppercorns, crushed with a mortar and pestle
3 medium onions, cut into thin wedges
2 medium, tart baking apples, peeled, cored, and cut into wedges
1 large orange, cut into thin wedges
1 handful vacuum-packed whole cooked chestnuts
1 small bunch fresh thyme
10 fresh sage leaves
1 bay leaf
¼ cup (60 ml) port (or brandy)
¼ cup (60 ml) full-bodied red wine
2 tbsp freshly squeezed orange juice
1 tbsp lingonberry jelly (or another berry jelly), plus more to taste
Fine sea salt
Finely ground pepper
Ovenproof cotton string
Preheat the oven to 175°F (85°C).
In a large, heavy pan, heat a splash of olive oil over high heat and sear the duck, turning, for a few minutes or until golden brown on all sides. Transfer the duck to a medium baking dish and carefully pour the fat from the pan into a small bowl. Season the duck, inside and out, with the flaky sea salt and crushed black peppercorns and rub into the skin. Stuff the duck with some of the onion, apple, and orange wedges, 1/3 of the chestnuts, 1 /2 of the thyme, 1 /2 of the sage, and the bayleaf and tie the legs together with ovenproof cotton string. Arrange the remain-ing onion, apple, and orange wedges, the chestnuts, thyme, and sage around the duck and roast, spooning a little of the reserved duck fat and the juices from the baking dish over the duck every hour, for 4 hours. After 4 hours, check to see if the duck is done by pricking the thickest part of a thigh with a skewer—the juices should run clear. Turn on the broiler for the last 1 to 2 minutes or until the skin is golden brown and partially crispy, but mind that it doesn’t burn.
Let the duck rest for a few minutes while you make the gravy: Heat 2 teaspoons of the reserved duck fat in a large, heavy pan over medium-high heat and sear the neck and giblets, turning, for 2 minutes. Add the port, stir, and then add the red wine and orange juice and bring to a boil. Remove the neck and giblets, whisk in the lingonberry jam, and season to taste with additional lingonberry jam, fine sea salt, and finely ground pepper.
Carve the duck and serve the meat with the gravy, onions, apples, oranges, and chestnuts.
For the sides, you can also make red cabbage and spaetzle (just she spaetzle, without the cheese and onions).


Slow Roast Duck and Yorkshire Pudding - our Christmas Dinner

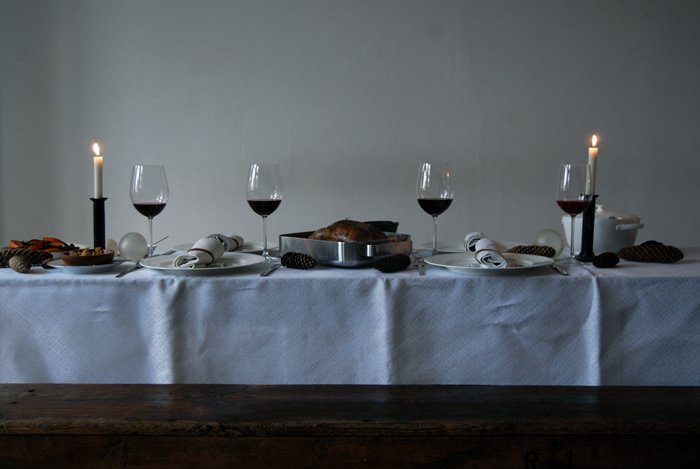
Christmas is one of the special silent moments of the year, it feels like time stops for a few hours. The streets are empty and we share some precious time with the ones we love. It's a beautiful celebration of love and gratefulness - I wish you all a wonderful and joyful Christmas with the ones who are special to you!
At Christmas time, we share many traditions but each family also creates their own, especially regarding the festive meal. Some of my friends have sumptuous meals and cook for hours, some prefer it simple - like my aunt and uncle - they always celebrate Christmas night with Wiener sausages and potato salad. For me, it has to be duck - together with Yorkshire pudding on the side for the gravy and red cabbage, that's my tradition.
My duck takes its time and cooks very slowly. It stays in the oven for around 4 hours and cooks on very low temperature (85°C / 185°F) which guarantees the juiciest and most tender meat you can imagine. It never fails! I always make a rich filling with apples, mushrooms, minced meat, liver, bacon and lots of herbs. It's more like a terrine than a traditional filling - it could be a meal on its own. I prepare a bit more than I need for the duck and cook it in a little terrine dish in the oven (not as long as the duck, just for an 1 1/2 hours). It is similar to French Paté and I love it cold on bread the next day.

A duck that takes its time
For 4 people you need
whole duck, rinsed, dried, rubbed with salt and pepper, around 2kg / 4 pounds (with neck, liver and kidneys)
olive oil for frying
For the gravy
chicken, duck or goose broth 500ml
rind of 1/4 orange cut in strips
a sprig of fresh thyme
brandy for deglazing
balsamic vinegar
plum chutney or plum butter
salt and pepper
sugar for caramelizing
For the filling
minced beef 80g / 3 ounces
thin slices of white bacon, finely chopped, 2
organic chicken liver, finely chopped, 60g / 2.5 ounces
thin slices of ham, finely chopped, 2
mushrooms, finely chopped, 50g / 2 ounces
tart baking apple, peeled and finely chopped, 1
organic egg 1
dry breadcrumbs, soaked in cream or milk, 1/2 cup
a small onion, finely chopped
clove of garlic, crushed, 1
fresh parsley, chopped, 1 tablespoon
fresh thyme leaves of 1 medium sprig
lemon zest 1/2 teaspoon
bay leaf, ground in a mortar, 1
juniper, ground in a mortar, 1
nutmeg, grated
brandy for deglazing
butter for frying
salt and pepper
Heat some butter in a large pan and fry the bacon, mushrooms, apple, onion, garlic, juniper and bay leaf until golden and deglaze with brandy. Put in a large bowl and mix with all the other ingredients.
The duck and the gravy
Set your oven to 85°C / 185°F. Our oven has a Rotitherm roasting setting which works perfectly for poultry.
Heat a splash of oil in a large pan and fry the duck on all its sides until golden brown. Take the duck out, place on an oven dish and fill with your prepared filling. If you have some filling left put it in a terrine dish and cook in the oven together with the duck (covered with a lid, for 1 1/2 hours). Leave the duck in the oven for around 4 hours. Check with a skewer after 3 1/2 hours to see if the duck is done, when only clear juices come out, the duck is ready. Brush the top of the duck with gravy (see below) and put under the grill for 3-5 minutes until the skin is golden brown.
My gravy isn't thick as I prefer it natural without thickening agents. After you put the duck in the oven, fry the duck's neck, liver and kidneys in the pan you used for the duck and deglaze with brandy. Take the giblets out, pour the broth into the pan and let it simmer down together with the other ingredients for the gravy, until it reached its right concentration and taste. Take out the orange rind and thyme sprig and season with salt, pepper, vinegar and chutney. Caramelize 1-2 tablespoons of sugar until brown and add to your gravy. You can also add some dark chocolate, honey or a tiny bit of orange juice. Play around with it but always use very small amounts of whatever you add and taste in between.
For the red cabbage
Chop a small red cabbage into very thin strips. Rinse the cabbage and fry it - still wet - in some oil or lard in a large pan with a closed lid for 5 minutes (on medium heat). Add 2 glasses of red wine, a chopped apple, some grated ginger, a bay leaf, 6 cloves, 4 juniper berries, 2 tablespoons of honey and season to taste with salt and pepper. Cook for 1 - 1 1/2 hours.
For the Yorkshire pudding
Mix 200ml of milk together with 2 eggs, 200g / 7 ounces of plain flour and 1/2 teaspoon of salt. Fill a bit of oil in little oven dishes (like the ones you use for crème brulée) or in the cups of a muffin pan and place the oven dishes in the hot oven (250°C / 480°F) for a few minutes or until the oil is hot. Pour the batter carefully into the hot oil in the dishes and bake for 12 minutes or until well risen and golden brown. Don't open the oven door before the puddings are done as they will collapse.
Prepare your dinner table with all your festive food. Enjoy with loved ones!
Grown up Chocolate Cookies
This is already the beginning of my last cookie baking weekend before Christmas! I can't believe it, time flew - as always during Christmas season. I baked and ate so many cookies this year! Whenever friends came over we sat under our Christmas tree, enjoyed the festive mood and emptied the cookie boxes. But I can definitely take another round before closing the 2013 cookie season, so let's start!
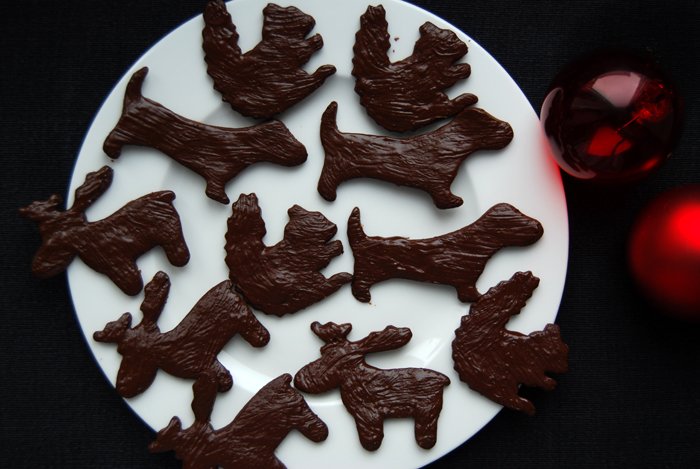
If you don't really have a sweet tooth these will be your cookies! Bittersweet chocolate and lots of spices: cinnamon, coriander, cloves, aniseed and allspice. The texture is light and crumbly with a thin layer of melted dark chocolate on top. They taste grown up - dark, bittersweet and rich in flavours. I thought some foresty animal shapes would do them good.
Chocolate Spice Cookies
For around 80 cookies you need
plain flour 250g / 9 ounces
cocoa powder 50g / 2 ounces
icing sugar, 90g / 3 ounces
baking powder 1/4 teaspoon
butter, soft, 130g / 4.5 ounces
organic egg 1
cinnamon, ground, 1/2 teaspoon
cloves, ground, 8
coriander seeds, ground, 1 heaping teaspoon
aniseed, ground, 1/4 teaspoon
allspice berries, ground, 2
a pinch of salt
bittersweet chocolate, melted, to brush the cookies, 100g / 3.5 ounces, mixed with cinnamon (1/4 teaspoon) and Chinese 5 Spice (1/4 teaspoon) or some of your cookie spice mixture
Combine the dry ingredients (except the sugar). In a separate bowl, beat the butter till fluffy, add the sugar and continue mixing till combined. Add the egg and mix for another 2-3 minutes. Put the dry mixture into the bowl with the butter mixture and continue mixing with the hook of your mixer until you have a crumbly mixture. Form a disc, wrap in cling film and put in the freezer for 45 minutes.
Preheat the oven to 160°C / 320°F and prepare a baking sheet with parchment paper.
Roll the dough out thinly (about 3mm) between cling film and cut out your cookies in whatever shape you like. Place your cookies on a baking sheet and bake them for 6 minutes. Let them cool and brush with the melted chocolate.

The Family Cookies
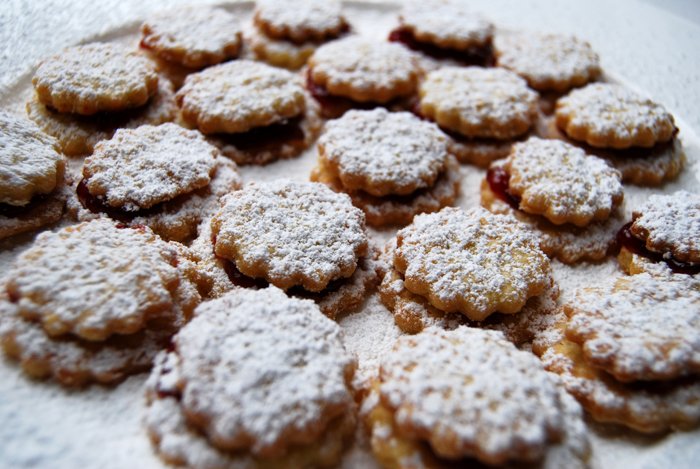
My mother started the tradition of these precious stacked Christmas cookies. They are little divas, very delicate, you have to be gentle with them as they are a bit fragile but they are worth all the effort - trust me! Apart from the fact that they look simply stunning, the buttery short crust of these cookies is one of the best I ever had. Just perfect, buttery but still light, flaky - they will melt in your mouth.
The dough isn't much work at all. It needs to sit for half an hour and then you can start cutting out your cookies, baking and assembling them, with redcurrant jam or jelly in between. Some sugar dusting on top and they are done. You should just handle them with care and appreciate that you have something very precious and delicate between your fingers.
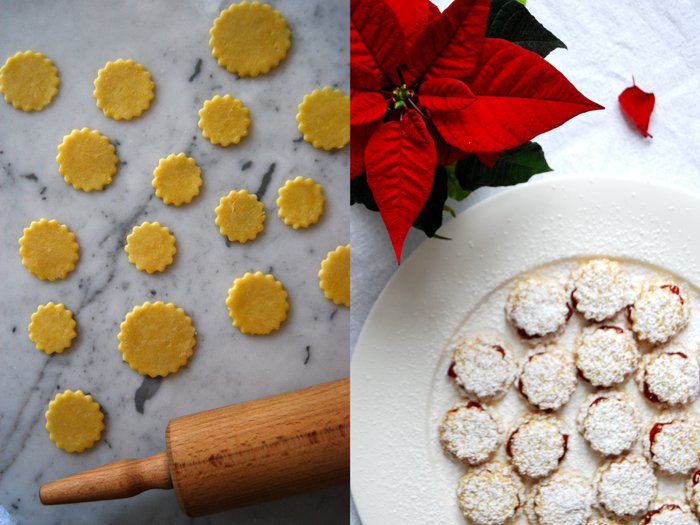
Linzer Cookies
For 60 sandwich cookies you need
plain flour 250g / 9 ounces
butter, cold 150g / 5 ounces
egg yolks 2
granulated sugar 2 tablespoons
a pinch of salt
cold water, 3 tablespoons
redcurrant jam or jelly
icing sugar, for dusting
You need round cookie cutters in 2 or 3 different sizes (mine are 3.5cm / 1 1/2" and 4.5cm / 1 3/4").
Combine the flour with the sugar and salt. Cut the butter with a knife into the flour until there are just little pieces of butter left. Continue with your fingers and quickly work the butter into the flour until combined. Add the egg yolks and the water, continue mixing with the hook of your mixer until you have a crumbly mixture. Form a disc, wrap in cling film and put in the freezer for 30 minutes.
Preheat the oven to 175°C / 350°F and prepare a baking sheet with parchment paper.
Roll the dough out thinly (about 2-3mm) between cling film and cut out your cookies with a floured cookie cutter. If you want to have 2 different sizes cut out an equal amount of cookies with each cookie cutter. Place your cookies on a baking sheet and bake them for 8 minutes or until golden but not dark. Let them cool for a minute or two. Place 1/4 teaspoon of jam on a bigger cookie and put a smaller one on top. Press a little bit but not too much as they might break. Let them cool completely and dust with icing sugar.
Enjoy their beauty and - when you're ready - pile them up carefully in a cookie box.


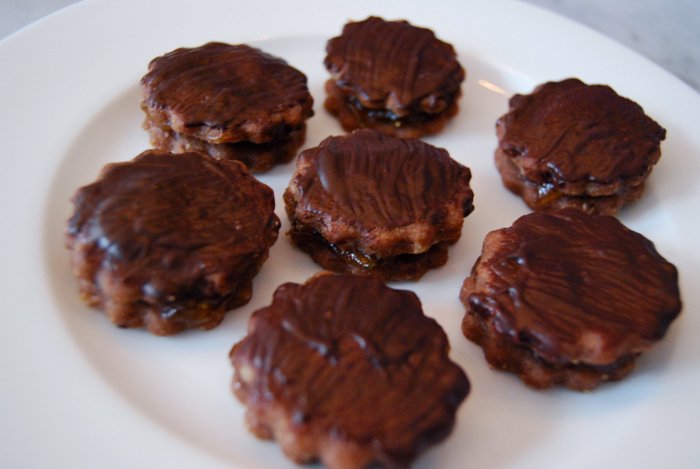
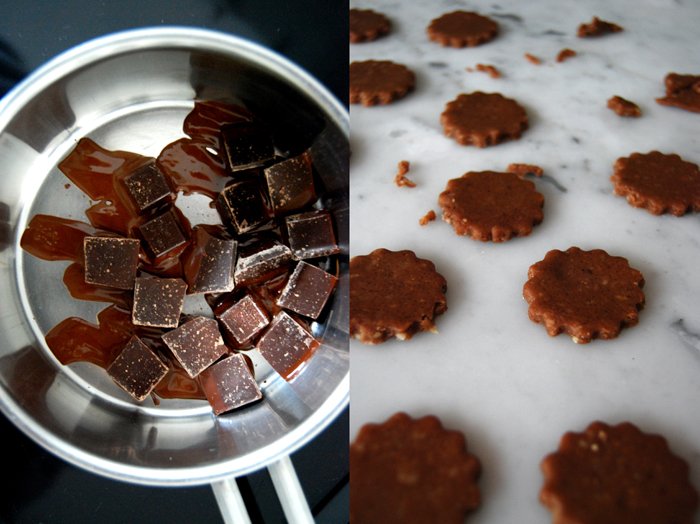
Dark Chocolate and sweet Apricot Cookies
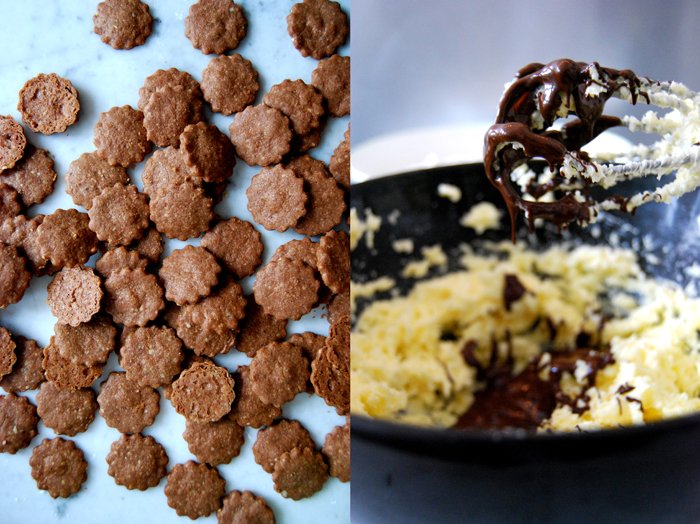
John Fahey's Christmas songs are playing in the background, the tree is lit up and my second Christmas cooking baking session can start. Happy Advent!
Today's cookies are a lovely combination of dark chocolate and sweet apricot jam. The texture is light and crumbly enriched with the juiciness of the jam. The dough is made with ground hazelnuts which adds a nice nuttiness and - like yesterday's Kipferl - they are so easy to prepare!
These cookies put me in a real time warp. I used to love them as a child and I gobbled up boxes of them. But as I tried out so many different recipes over the years I forgot about them. But now they are back in my cookie boxes!
Update, December 2023: Today, 10 years after I posted this recipe, a friend pointed out that these cookies taste like the famous Austrian Sachertorte. It’s true!
Chocolate Cookies with Apricot Jam
For 70 double cookies you need
plain flour 350g / 12 ounces
hazelnuts, ground, 100g / 3.5 ounces
sugar 100g / 3.5 ounces
butter, soft, 250g / 9 ounces
bittersweet chocolate, melted, 200g / 7 ounces (100g / 3.5 ounces for the dough and the rest for topping)
a pinch of salt
apricot jam for the filling
You need a round cookie cutter (about 3,5 cm / 1 1/2").
Melt half of the chocolate. Combine the flour with the ground hazelnuts and the salt. Mix the butter together with the sugar till fluffy, add the melted chocolate and mix again. Mix the butter mixture together with the flour mixture. Form a ball, wrap in cling film and put in the fridge for 60 - 90 minutes.
Preheat the oven to 160°C / 320°F, prepare a baking sheet with parchment paper and melt the rest of the chocolate.
Roll the dough out thinly (about 2-3mm) between cling film and cut out your cookies with a floured cookie cutter. Bake them for 7-9 minutes, they shouldn't get too dark. Let them cool.
Brush half of your cookies with the melted chocolate.
Cover each of the remaining cookies with 1/4 teaspoon of jam and place a chocolate topped cookie on top. Let the chocolate dry completely and then: fill your cookie boxes!


Vanilla Kipferl take over my kitchen
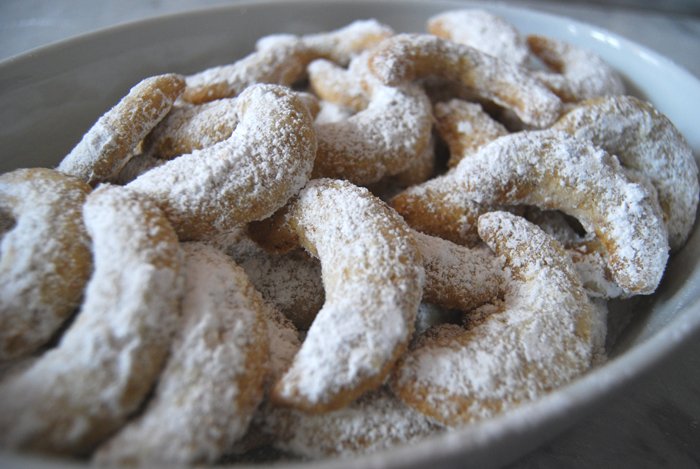
The kitchen smells amazing. As soon as the Vanilla Kipferl are out of the oven they spread their sweetest, buttery smell. These small, crescent shaped cookies are perfect for the Advent season. They taste and look absolutely wonderful and the vanilla icing sugar dusting on top fits to the weather perfectly - it just started snowing!
Kipferl traditionally come from the South of Germany and their pastry is light and crumbly. A Vanilla Kipferl is a very delicate cookie with a buttery taste and a hint of vanilla. Don't be deceived by their look, elegant as they may appear they are very easy to prepare. All you need is flour, butter, ground hazelnuts (or almonds) and sugar for the dough and icing sugar - enhanced with vanilla - for the dusting.
Update: Click here for more Christmas baking recipes!

Vanilla Kipferl
Makes about 60 kipferl
all-purpose flour 280g / 2 cups plus 2 tablespoons
ground hazelnuts or ground almonds 100g / 1 cup
granulated sugar 70g / 1/3 cup
fine sea salt 1/8 teaspoon
unsalted butter, cold, 200g / 3/4 cup plus 2 tablespoons
confectioners' sugar 100g / 1 cup
vanilla sugar 3 tablespoons (you can make your own vanilla sugar by mixing the scraped out seeds of 1/4 vanilla pod with 50g / 1/4 cup of granulated sugar)
Combine the flour, hazelnuts, granulated sugar and salt. Add the butter and use a knife to cut the butter into the flour until there are just small pieces left. Continue with your fingers and quickly rub the butter into the flour until combined then mix, using the dough hooks, with an electric mixer until crumbly. Form the dough into a 3 cm / 1 1/4" thick disc, wrap in plastic wrap and refrigerate for about 30 minutes or until relatively firm, or freeze for about 10 minutes.
Preheat the oven to 180°C / 350°F (preferably convection setting) and line 3 baking sheets with parchment paper.
Sift and mix the confectioners' sugar and vanilla sugar.
Take the dough out of the fridge and cut off a 2.5 cm / 1" thick slice, keep the remaining dough in the fridge. Cut the slice of dough into 1.25 cm / 1/2" thick pieces. Use your hands to quickly roll each piece of dough into a ball then shape it into a roughly 9 cm / 3 1/2" long kipferl (see the last picture). Continue shaping the remaining dough and arrange the kipferl generously spaced on the lined baking sheets.
Bake, 1 baking sheet at a time, for 11 to 12 minutes or until golden. Let the kipferl cool for 1-2 minutes. When they are too hot they might break but when they are completely cooled off the icing sugar won't stick so well.
Turn the warm kipferl gently in the vanilla confectioners' sugar mixture or sift the sugar over the kipferl. Once the kipferl are completely cool, store them in an airtight container.

