
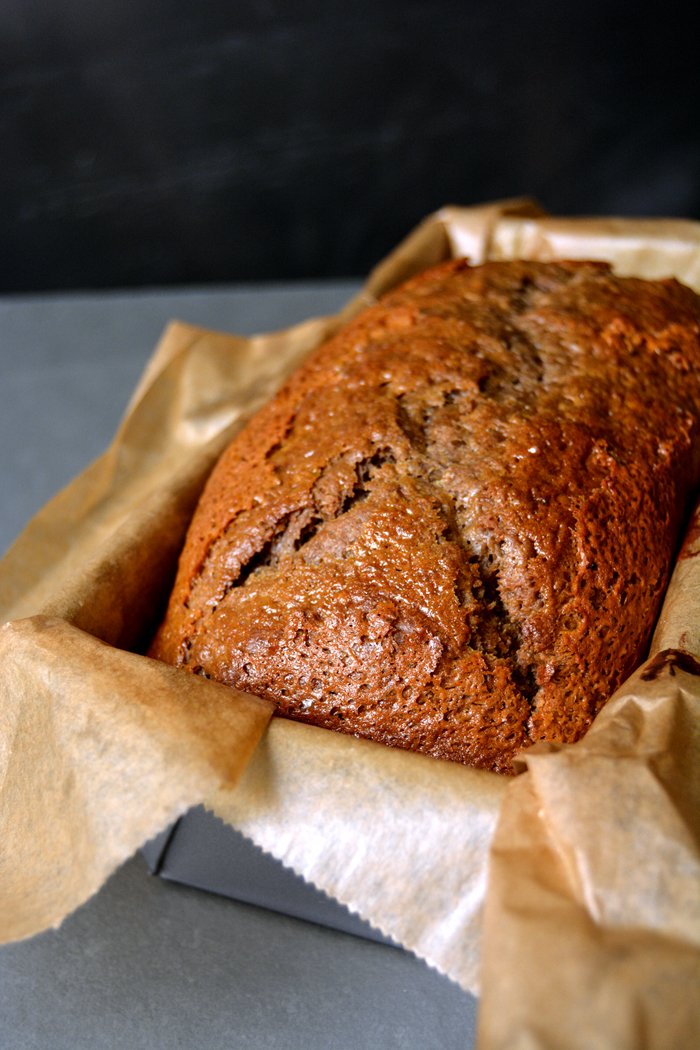
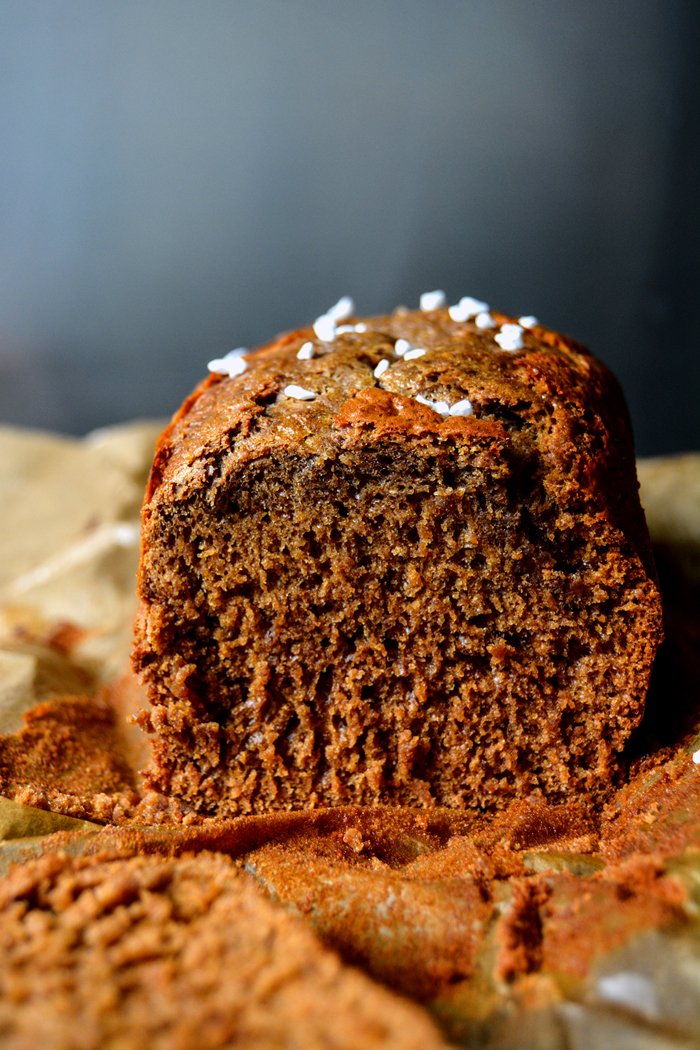
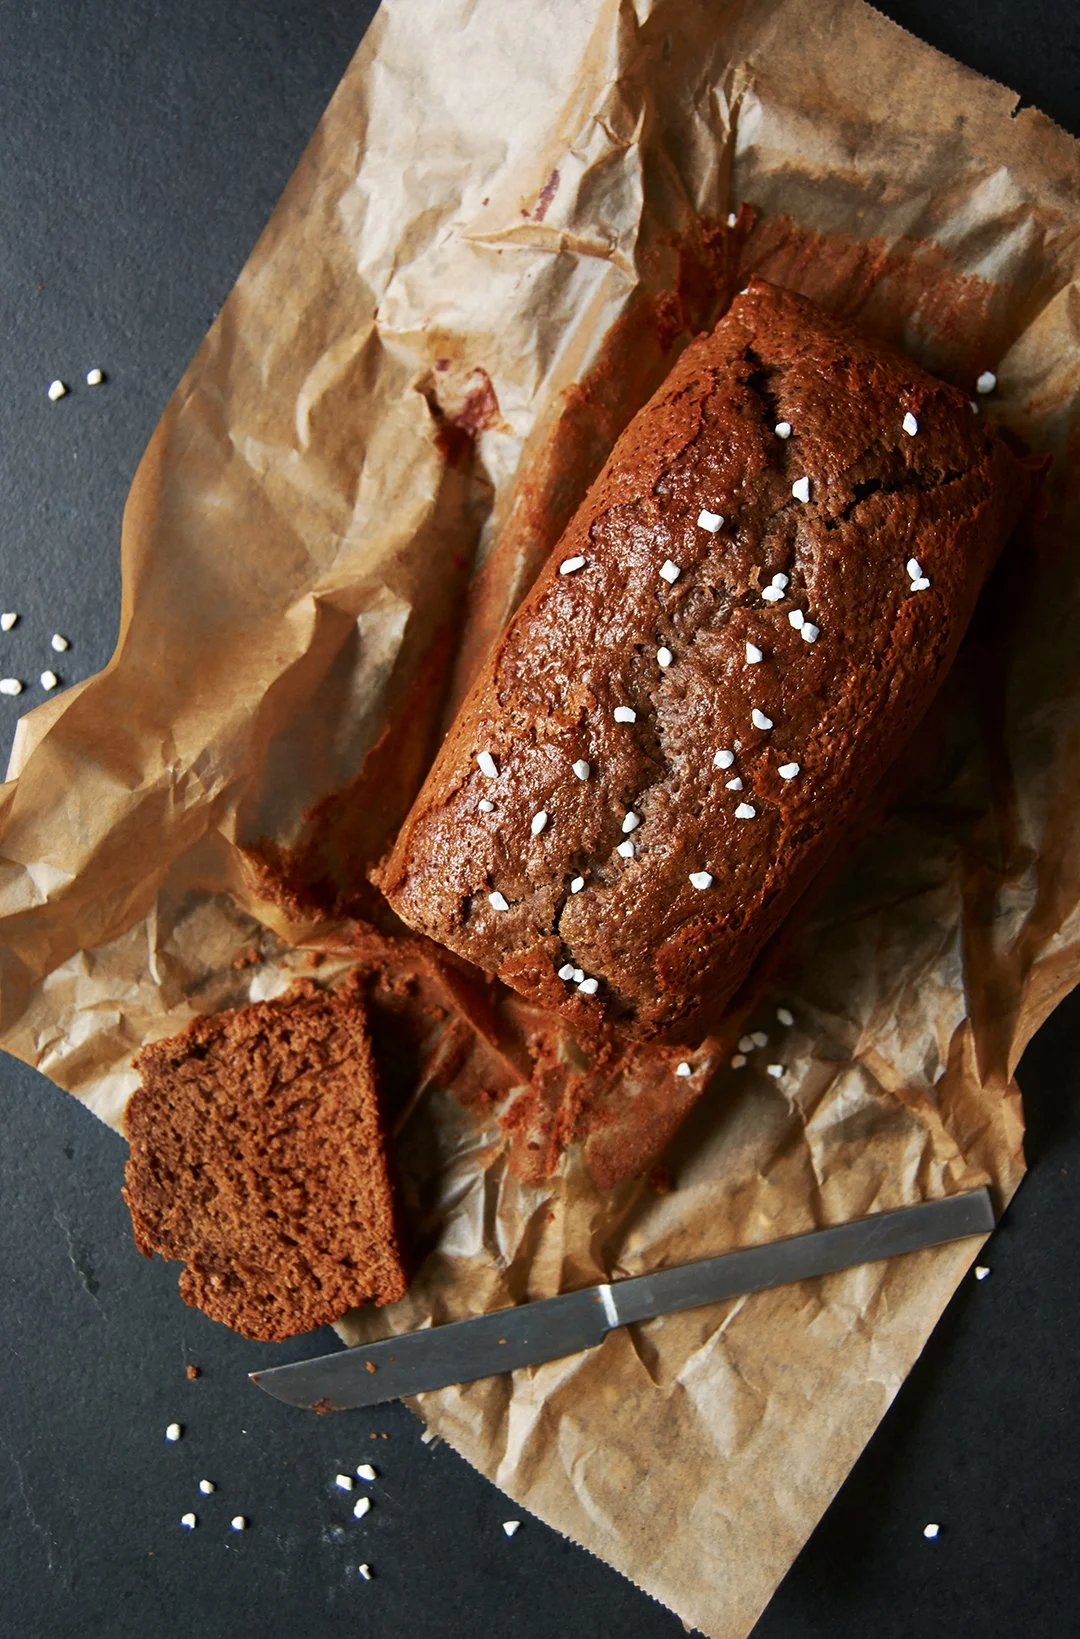
Dutch Honey Cake
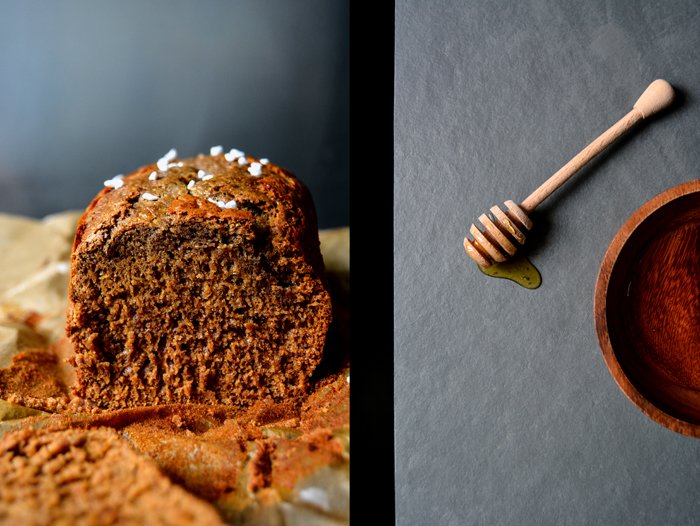
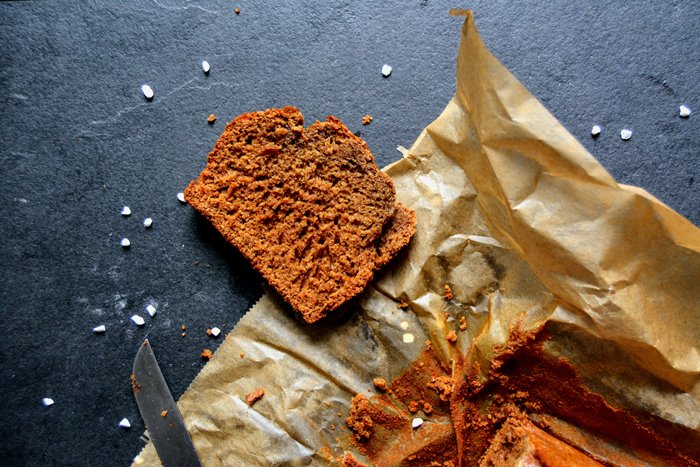
This cake was one of my childhood's culinary highlights. Whenever I visited the Netherlands I had to get a large loaf of this juiciest, spongiest and stickiest of all spice cakes. You can buy this sweet treat all over the country, from artisan bakeries or simple supermarkets, which I did most of the time. The long square tightly wrapped in foil is stuffed with the wintery aroma of honey, ginger, cloves, aniseed, nutmeg and cinnamon. I'll never forget the moments when I opened the package, sitting on a long and lonely beach, the sand in my shoes and the cold wind blowing against my face, my fingers touched the sticky golden cake to break it into chunks. Fantastic!
I never dug very deep into Dutch cuisine, although the country is quite close to my hometown. My appetite focused more on the culinary pleasures coming out of France and Italy, or England when it comes to pies. I'm a big fan of milky Gouda cheese from the flat meadows of the Netherlands but apart from my beloved honey cake I'm not too familiar with the country's cooking and baking traditions, I'd love to learn more about it.
To bake my first Dutch honey cake in my kitchen was only the start. I did some research and learned that the dough needs some strong black tea (or coffee), most of the sweetness - and the particular taste - comes from the honey and the spices, and a little sugar beet molasses is responsible for the cake's dark warm tone. It was much easier than I expected, taste and texture left no doubt that this is a real Dutch honey cake - baked in Berlin.

Dutch Honey Cake
Makes a 24 x 10cm / 9 1/2 x 4″ cake
plain flour 260g / 2 cups
a pinch of salt
baking powder 1 1/2 teaspoons
baking soda 1 teaspoon
butter 45g / 3 tablespoons
honey 170g / 6 ounces
sugar beet molasses 45g / 1 1/2 ounces
milk 120ml / 1/2 cup
organic eggs, lightly beaten, 2
strong black tea 60ml / 1/4 cup
Demerara sugar 55g / 2 ounces
ginger, freshly grated, 1 teaspoon
ground cinnamon 2 teaspoons
aniseed, ground in a mortar, 1/3 teaspoon
cloves, ground in a mortar, 1/2 teaspoon
nutmeg, freshly grated, 1/4 teaspoon
For the topping
pearl sugar (optional)
Set the oven to 160°C / 320°F. Lightly butter a 24 x 10cm / 9 1/2 x 4″ cake pan and line it with baking paper.
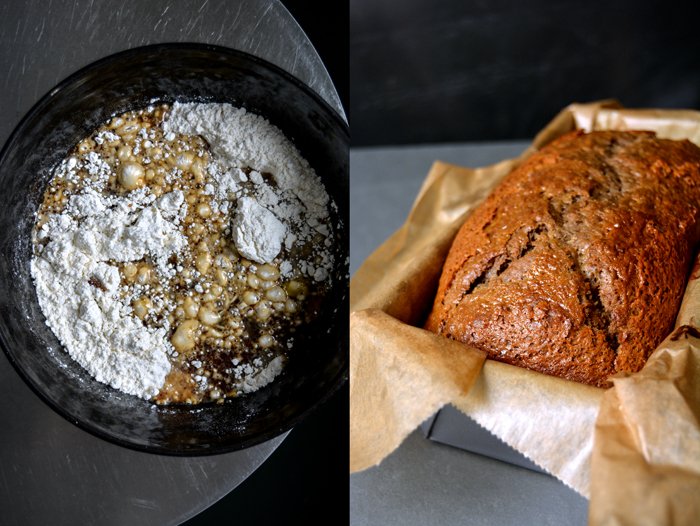
In a large bowl, combine the flour, salt, baking powder and soda.
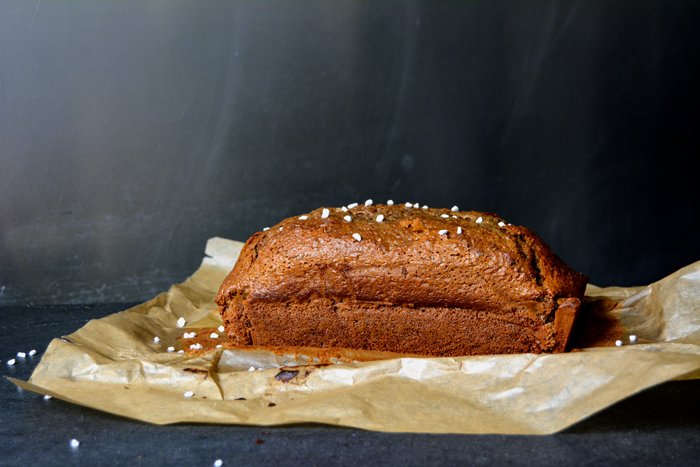
Melt the butter in a saucepan, let it cool for a few minutes and add the honey, molasses, milk, eggs, tea, sugar, ginger and spices to the warm pan. Whisk well, stir into the bowl with the dry mixture and mix with an electric mixer until well combined. The dough will be quite liquid. Scrape the dough into the lined cake pan and bake in the oven for about 45 minutes or until the cake is done. Check with a skewer, it should come out clean. Let the cake cool for about 10 minutes before you take it out of the pan.
Keep the cake wrapped in paper and cling film to keep it moist for 2-3 days.


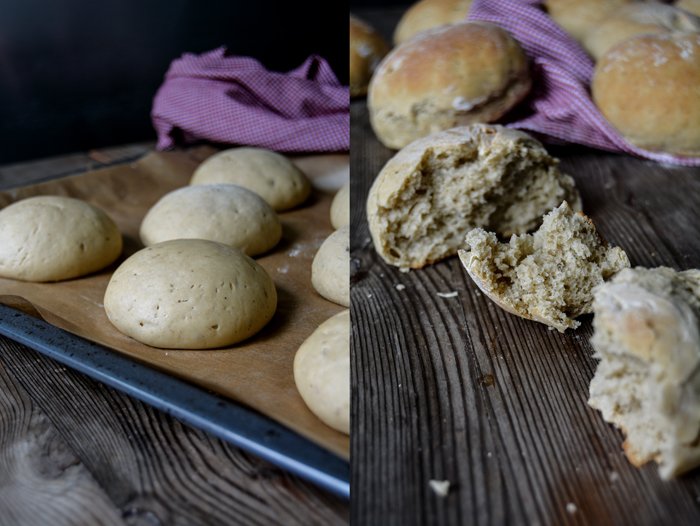
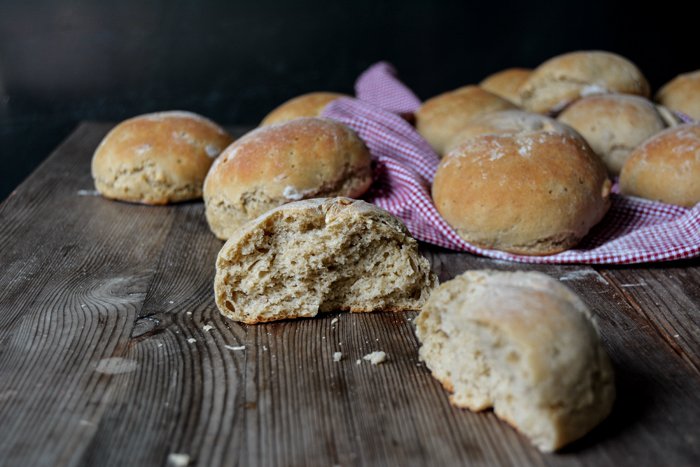
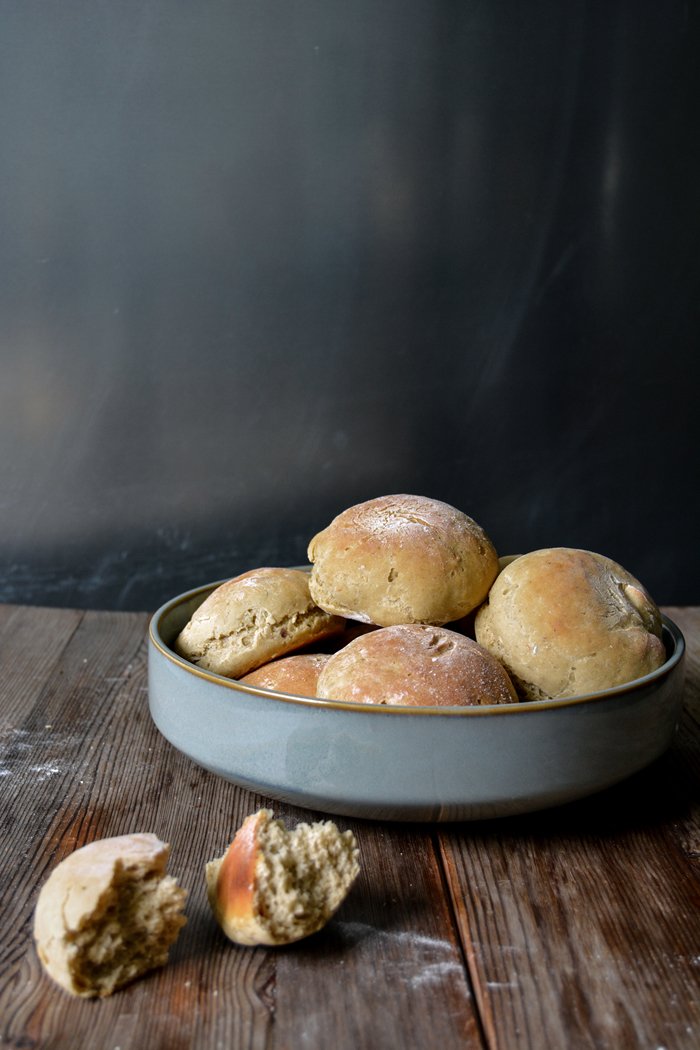
An Autumn Breakfast - Mushroom and Potato Buns with Thyme
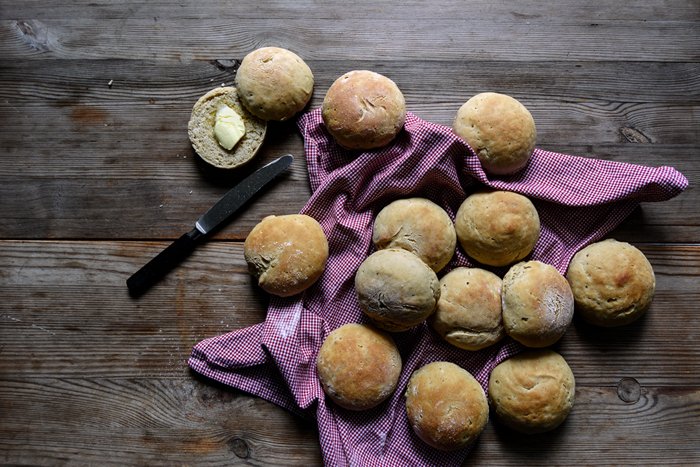
As soon as the sweet and earthy smell of my warm autumn buns reached my nose, I felt at peace again and forgave my gnocchi recipe for not performing as expected. A few days ago I mentioned that I had the genius idea to make mushroom gnocchi with chopped porcini and chanterelles stirred into the mixture. However it was a rather frustrating experience, no matter how much flour I added to the soft dough, it was too moist and the texture didn't change at all. It was impossible to form anything resembling gnocchi. After adding a full 1kg-package (2 1/4 pounds) of flour I gave up, it seemed hopeless and I was ready to chuck everything in the bin. Luckily my boyfriend suggested turning the dough into bread - a juicy loaf of potato bread, fluffy, light and juicy - simply satisfying. All of a sudden the recipe made sense, I mixed in a little more flour, some yeast and let it rise for an hour. This gave me enough time to calm down and think about how I'd like to shape my aromatic autumn creation. I went for buns, 24 to be precise, enough to eat mushroom potato buns for the next 2 weeks. It wouldn't have been a big deal, they taste fantastic, but I decided to freeze half the batch for cozy weekend breakfasts. Instead of going to the bakery on Sunday mornings I'll just switch on the oven and fill my kitchen with the aroma of thyme, porcini and chanterelles. 24 buns made of 1600g (3 1/2 pounds) flour can be a bit intimidating for a weekend baker so I scaled down the recipe by half.
The past few weeks have been so busy that I didn't even realize that it's been a month since we got back from our Mediterranean island. I miss it, of course, and I felt so happy when Molly from My Name Is Yeh asked me if I'd like to meet her in Malta. A short trip with friends took her to the archipelago and I would have given a lot to make it possible for us to finally meet after our cross-continental kitchen talk a few months ago. Unfortunately, I didn't manage, the final work on my book has kept me anchored to Berlin and my computer. But she went and enjoyed it so much that she wrote a sweet post about her 3-day trip and her new culinary discovery: Timpana, click here for her travel experiences!
I've kept one special bit of news for the end: Ever since I held Nigella Lawson's Domestic Goddess in my hands for the first time, I've been a great admirer of her work. So when she decided to share my vanilla profiteroles on her Instagram, it was a very, very happy day. Thank you Nigella! And here it is!


Mushroom and Potato Buns with Thyme
Keep in mind that the potato mixture for the dough has to cool in the fridge before mixing it in, you can prepare this step a day in advance.
Makes 12 buns
starchy potatoes, cut into cubes, 450g / 16 ounces
butter 30g / 2 tablespoons
organic egg yolks 2
plain flour, white spelt (type 630) or unbleached wheat, 810g / 6 1/4 cups
dry yeast 1 sachet (7g / 1/4 ounce)
salt 4 teaspoons
ground pepper
nutmeg, preferably freshly grated
fresh thyme leaves 1/2 tablespoon
mixed mushrooms, finely chopped, 100g / 3 1/2 ounces (half porcini, quarter chanterelles and quarter king oyster mushrooms)
Cook the potatoes in salted water until soft, about 15 minutes, drain well in a colander and press through a potato ricer. Mix immediately with the butter and egg yolks and let it cool down to room temperature before you put it in the fridge to cool completely. You can prepare the mixture a day in advance.
Scrape the cool potato mixture into a large bowl.
Combine the flour, yeast, salt and a generous amount of ground black pepper and nutmeg. Add the dry flour mixture, the thyme and mushrooms to the bowl with the potatoes. Mix with the hooks of an electric mixer for about 7-10 minutes until well combined. The dough will be soft and damp, if it's too sticky, add more flour. Cover the bowl with a tea towel and let it rise in a warm oven (35°C / 95°F) for 60 minutes (top/ bottom heat and not fan-assisted!).
Punch the dough down, take it out of the bowl and knead for half a minute. Divide it in 12 portions, dust your hands with flour, put a portion of dough on the palm of your hand and roll with the other hand, holding it like a dome. Turn the dough for about 1o seconds on the palm of your hand until its top is round and firm, this builds up surface tension and prevents the buns from becoming flat. Continue with the remaining dough and lay the buns on a baking sheet lined with baking paper. Cover them with a tea towel and let them rise for about 15 minutes in a warm place.
Set the oven to 220°C / 430°F (top/ bottom heat).
Bake the buns for about 11 minutes or until golden brown, knock on the bottom of a bun, it should sound hollow.


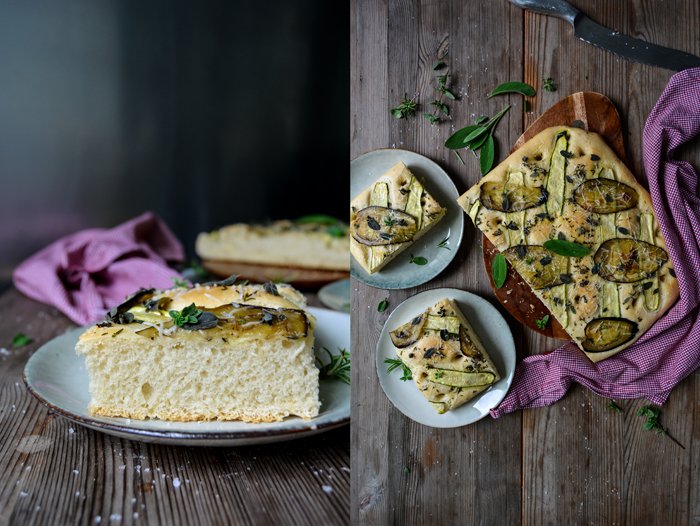
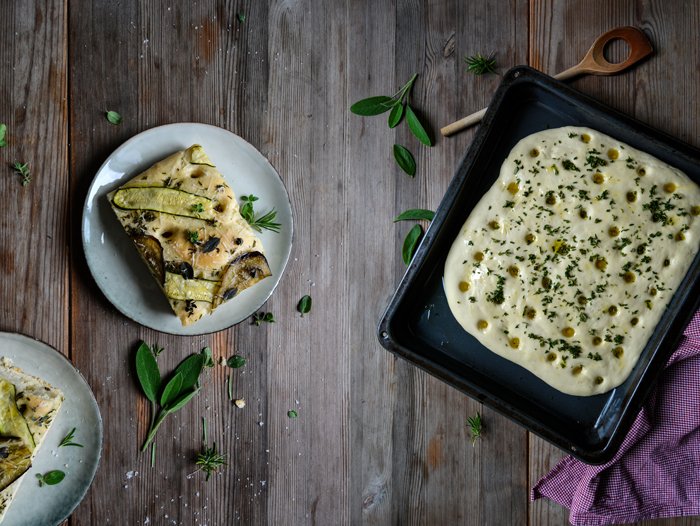
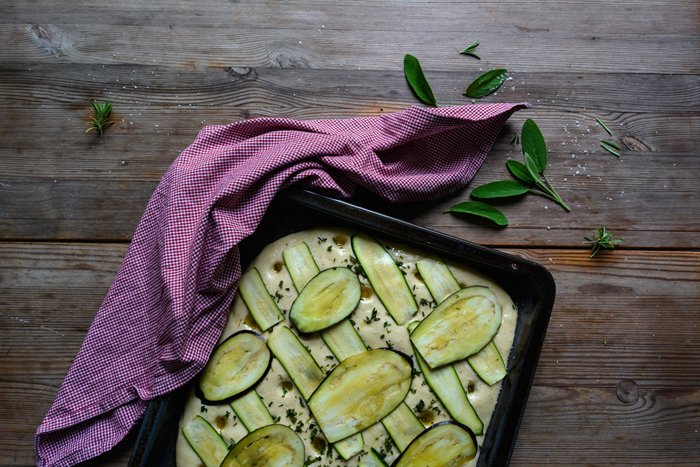
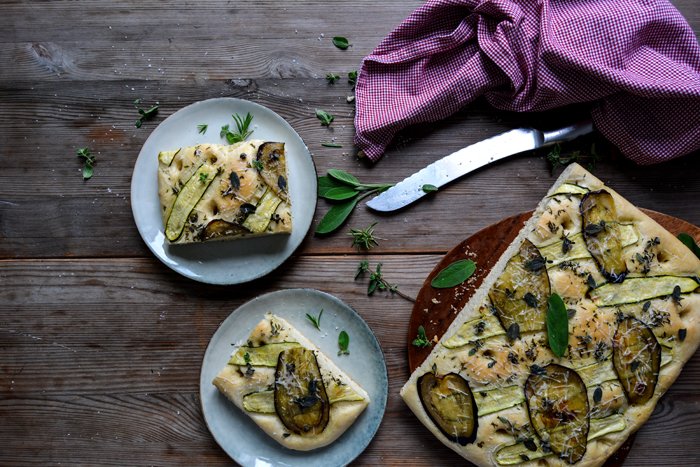
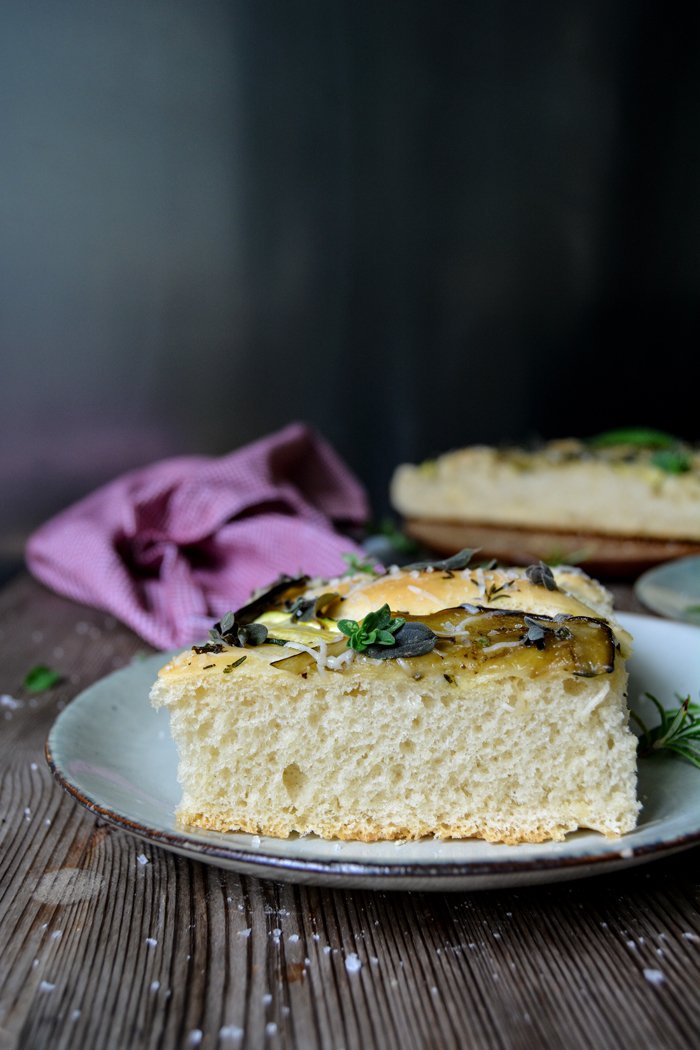
Herb Focaccia with Zucchini, Aubergine and Parmesan
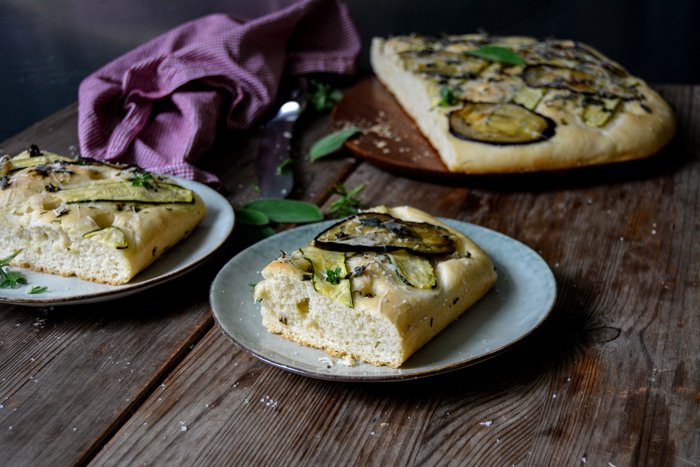
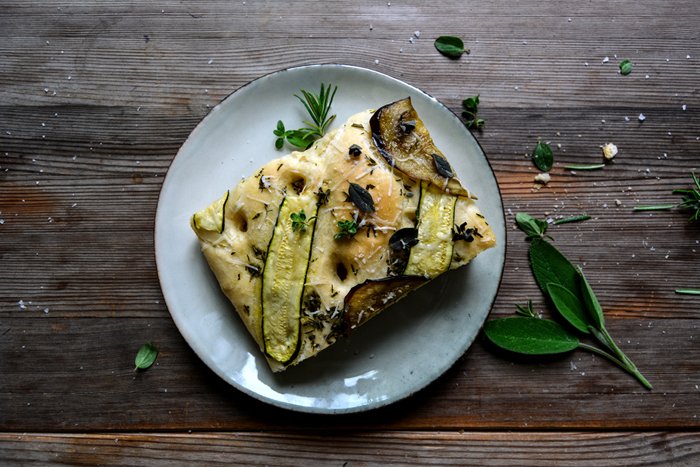
This is one of my most beloved summer scenes: juicy focaccia topped with fragrant herbs on the table next to an aromatic selection of cheese and a chilled bottle of rosé wine waiting to be opened. Sometimes it impresses me how easy it can be to create a little holiday even in my own home. Although I have to admit that warm temperatures and a clear blue evening sky definitely help to put my mind in the right mood, scrumptious food is even more efficient.
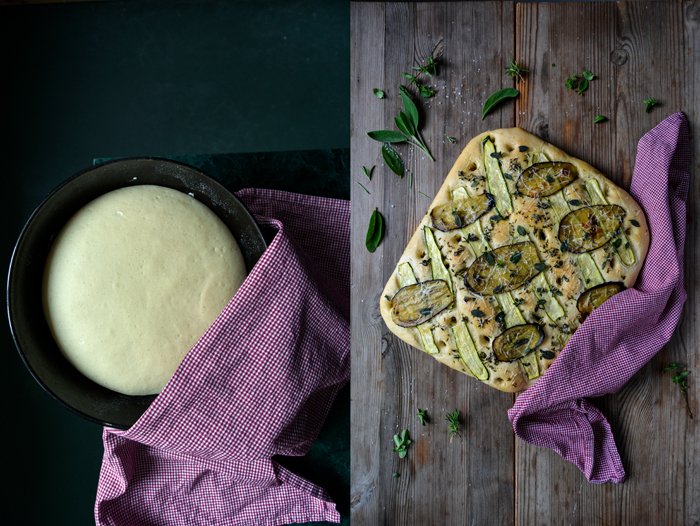
I used my reliable focaccia recipe to make the soft Italian bread, it's so oily that my fingers feel deliciously smooth and sticky after each bite. Last year I fell in love with a topping of dark grapes and rosemary, in 2015 I'm falling for an almost pizza-like creation. I picked a selection of rosemary, thyme and sage right from the front row of my window sill garden, chopped them finely and spread the green crumbles over the puffy, risen yeast dough. Thin slices of zucchini and aubergine came next to form a pretty grid pattern and add their summery fruitiness. To finish it off, I sprinkled my golden focaccia with fresh oregano and Parmesan. It's such a teaser, when I opened the door to take out the baking sheet, the warm smell of yeast, herbs and cheese caressed my nose. At this point, I definitely felt like I was somewhere in the south of Italy.
Herb Focaccia with Zucchini, Aubergine and Parmesan
For a 25 x 32cm / 10 x 12 1/2″ focaccia you need
plain flour 500g / 17 1/2oz
dry yeast 1 sachet (7g / 1/4 ounce)
salt 1 teaspoon
sugar 1 heaping teaspoon
water, lukewarm, 260ml / 1 cup and 2 tablespoons
olive oil 120ml / 1/2 cup (half for the dough and half for the topping)
fresh herbs (rosemary, thyme, sage), finely chopped, 2 generous tablespoons
small zucchini, very thinly sliced (best with a vegetable/ mandoline slicer), 1
medium aubergine, very thinly sliced, 1/2
flaky sea salt, for the topping
Parmesan, grated, 3 heaping tablespoons
fresh oregano, the leaves of a small handful of sprigs (about 2 heaping tablespoons)
In a large bowl, combine the flour, yeast, salt and sugar. Add the water and half the olive oil (60ml / 1/4 cup) and mix with the hooks of an electric mixer for a few minutes until smooth and well combined. Continue kneading with your hands for a few minutes until you have an elastic dough ball. Put the dough back into the bowl and cover with a tea towel. Let the dough rise in a 35°C / 95°F warm oven (top / bottom heat, no fan) for 45-60 minutes.
Take the dough out, punch it down and knead for 1 minute. Spread the dough on an oiled baking sheet with your hands until it measures roughly 25 x 32cm / 10 x 12 1/2″. Cover with a tea towel and let it rise for 20 minutes in a warm place.
Set the oven to 220°C / 430°F (top / bottom heat).
Punch about 6 x 7 holes into the surface of the dough, you can use the round bottom of a wooden spoon or your finger. Pour half of the remaining olive oil (30ml / 1/8 cup) over the dough and into the holes. Use the remaining 30ml / 1/8 cup of oil to thinly coat the sliced vegetables on both sides with your hand. Sprinkle the focaccia with the chopped herbs and lay the oiled vegetables in a cross pattern on top (start with the zucchini and continue with the aubergine). Season with sea salt and bake for 20 minutes or until golden and light brown on top. When it's done, sprinkle with Parmesan and oregano and leave in the hot oven for 1 minute.
Enjoy warm or cold at a summery table full of fruits, cheese and wine!


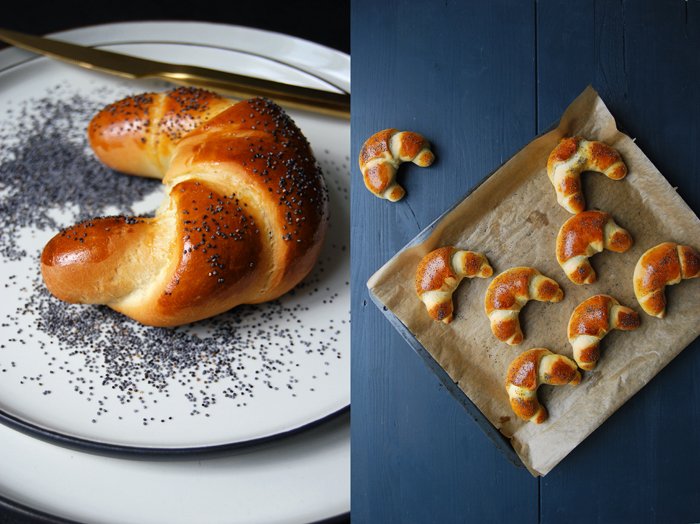
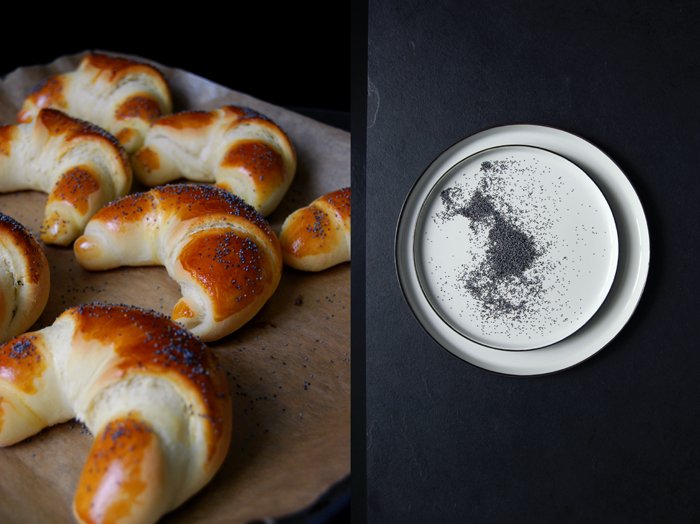
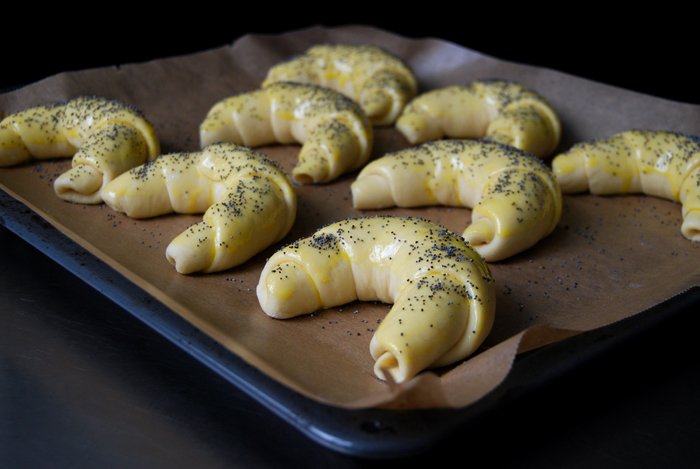
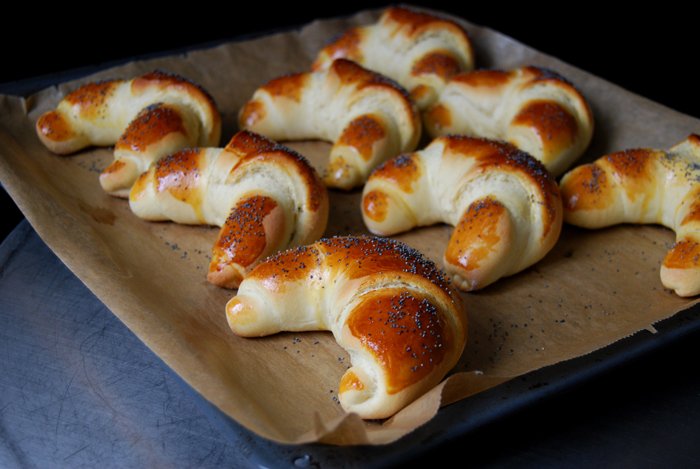
Crescent Milk Rolls with Poppy Seeds for Easter Breakfast
One of my earliest Easter memories is searching for Easter eggs with my sister in the garden of the house we had just moved into. There was no fence around the lawn, the green grass sprinkled with red tulips opened up to a dense forest, my childhood playground. We were young and so excited, the kind of overwhelming excitement we tend to neglect as we get older. On that sunny April day many years ago, we forgot about everything around us as we found our Easter presents hidden behind a group of old oak trees: 80's roller skates in flashing red and white, it was better than Christmas!
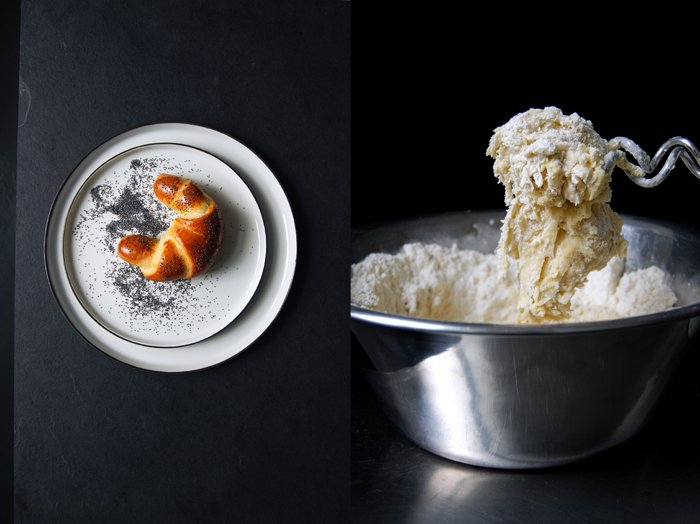
I still love these special feasts, not for the presents but for these pure moments of bliss, when we take a break from our normal routine, slow down the pace and relax a little, or reflect on the memories filling our book of life. To me, memories are as precious as the moment itself and I wouldn't have started a food blog if they weren't inseparably connected with dishes, meals and recipes, at least most of the time. Easter Sunday is perfect for a long breakfast, preferably outside in the sunshine, which, unfortunately, isn't really an option in Berlin at the moment. We're still in the hands of snow, hail and rain! But snuggled into a blanket at our cosy wooden table feels just as nice, especially if there are crescent milk rolls, Milchhörnchen in German, involved. I love these yeast rolls warm, fresh out of the oven, when the soft inside smells almost buttery-sweet. The thin crust is sprinkled with crunchy poppy seeds which adds a slightly nutty nuance, to me they are best with a little butter and maybe, some homemade strawberry jam, but that's not even necessary. Happy Easter!

Crescent Milk Rolls with Poppy Seeds
For 10 rolls you need
plain flour 500g / 1 pound
granulated sugar 3 tablespoons
dry yeast 1 sachet (7g / 1/4 ounce)
salt 1 teaspoon
milk, lukewarm, 220ml / 7 1/2 ounces
butter, melted, 40g / 1 1/2 ounces
organic egg 1 plus 1 egg yolk, beaten, for the glaze
poppy seeds, for the topping
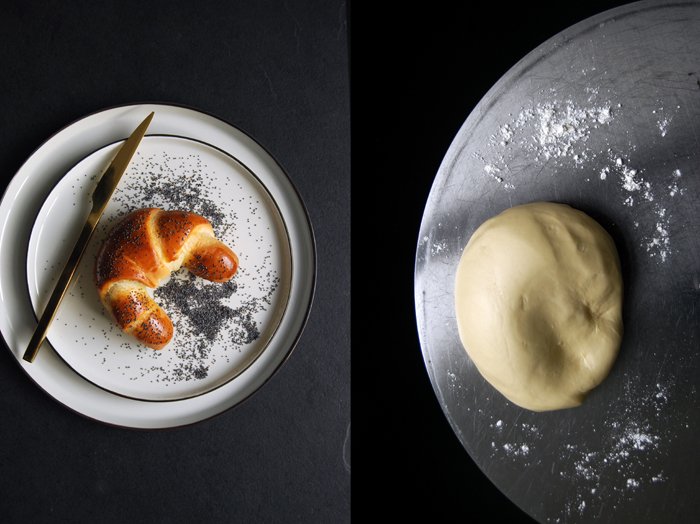
In a large bowl, combine the flour, sugar, yeast and salt. Whisk the milk, melted butter and egg in another bowl, the mixture should be lukewarm. Add to the dry flour-sugar mixture and mix with the dough hooks of your mixer for a few minutes until the dough is well combined and elastic. Continue kneading with your hands for about 5 minutes until you have a soft and silky dough ball. Put the dough back into the bowl, cover with a tea towel and let it rise in the warm oven (35°C / 95°F) for 70 minutes (top/ bottom heat and not fan-assisted!).
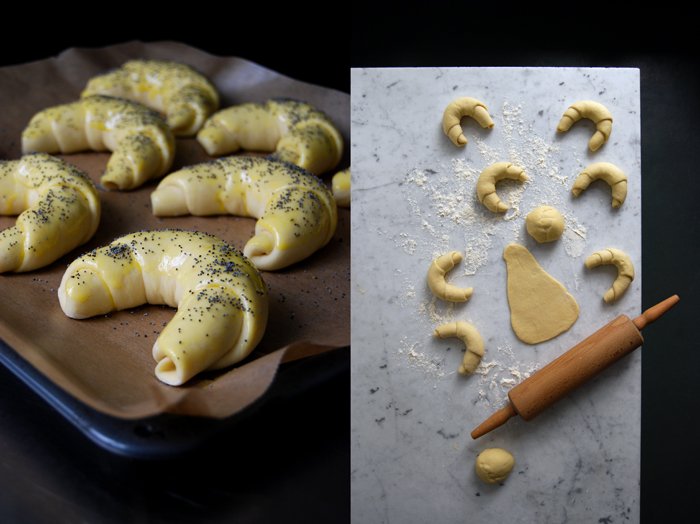
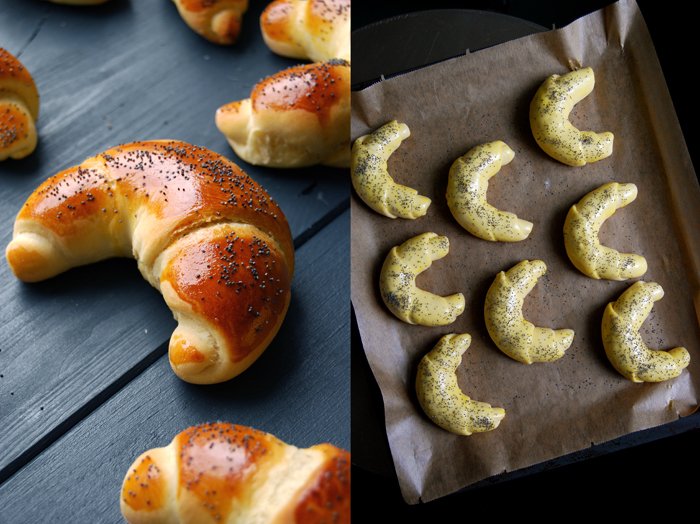
Take the bowl out of the oven, punch the dough down and knead for another 30 seconds. Divide the dough into 10 portions (each about 80g / 3 ounces). Roll each of them to a smooth ball in your hands before you roll it out on the kitchen top with a rolling pin. Give it the shape of a 20cm / 8" long triangle, roll it up towards the tip and bend the roll into a crescent. Continue with the remaining dough and place the rolls on a baking sheet lined with parchment paper. Cover with a tea towel and let them rise in a warm place for another 20 minutes.
Set the oven to 220°C / 430°F (top-bottom heat).
Brush the top of the milk rolls with the beaten egg yolk and sprinkle with poppy seeds (you can use more than you can see in the pictures). Bake in the warm oven for about 10-12 minutes or until golden on top. They are best on the first day!


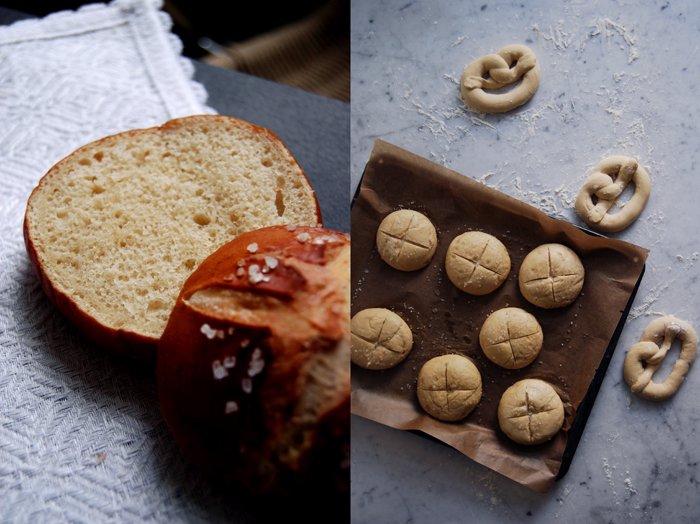
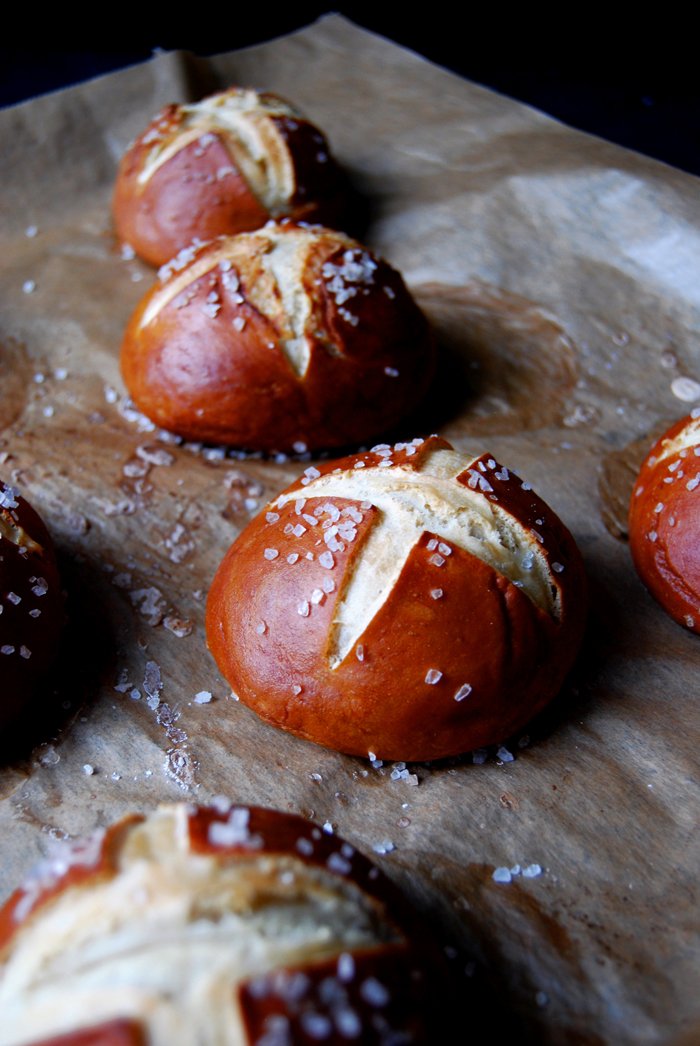
How to make your own Pretzel Buns

When I made my Bavarian sandwich with pretzel buns and Obatzda camembert spread last week I completely underestimated how many people would actually be interested in a recipe for the buns rather than the spread (which is absolutely delicious nonetheless!). I bought the pretty Laugenbrötchen (their German name) which I used for the recipe from my favourite pretzel bakery in my area which, in my opinion, can compete with the products from their origin in the south of Germany. However, there is an ongoing discussion about the pretzel's (and the bun's) quality produced here in Berlin, and if you ask anyone from the Bavarian or Swabian region, they will all agree that it's impossible to find acceptable results anywhere in this city. I disagree! I lived in the South, I still regularly enjoy some of the best pretzel buns from my step father's Swabian hometown Stuttgart, an unchallenged stronghold of pretzels, so I consider myself an experienced critic. The buns you saw last week on the photos were soft and spongy inside, they taste slightly buttery, wrapped in a thin brown crust with coarse sea salt sprinkles. That's all I can ask for!
Motivated by the last sandwich, excited and a bit nervous, I made a brave decision a few days ago, I wanted to make my own pretzel buns! I started some research, learnt about lye, washing and baking soda solutions for the crust, the right yeast dough mixture and the final shaping of the buns and here are my conclusions:
The dough has to be made with a bit of butter for the rich taste, it has to rise twice and once the buns are shaped with the right technique (which I describe in the recipe), they have to cook in boiling water mixed with baking soda for one minute before baking, basically like bagels. The soda solution provides a high ph-value, not as high and strong as lye solution which is often used in professional bakeries, but it's safer and creates a similar browning effect.
When I pulled a piece off my first warm pretzel bun freshly out of my own oven, I was impressed, the texture was right, the crust perfect and the taste was fantastic. I also made a few pretzels which were nice and juicy and not dry (which I don't like at all), but here I still have to improve. The look wasn't right, I know this is not so relevant and, usually, not important for me at all as long as it pleases my taste buds, but we're talking about pretzels! The top part with the knot wasn't slim enough. They looked quite puffed up and out of shape, but they tasted amazing with some butter spread on them so I forgot about that completely. I prefer buns anyway!


Pretzel Buns
For 10 pretzel buns you need
plain flour, white spelt (type 630) or wheat, 500g / 1 pound
dry yeast 1 sachet (7g / 1/4 ounce)
salt 2 teaspoons
water, lukewarm, 300ml / 10 ounces
butter, melted and cooled, 40g / 1.5 ounces
baking soda 3 tablespoons, for the solution, to boil the buns before baking
coarse sea salt, for the topping
In a large bowl, combine the flour, yeast and salt. Mix the water with the melted butter (the mixture should be lukewarm) and add to the dry flour-mixture. Mix with the dough hooks of the mixer for a few minutes, it shouldn't be too sticky, add more flour if necessary. Continue kneading and punching with your hands for a few minutes until you have an elastic dough ball. Put the dough back into the bowl, cover with a tea towel and let it rise in the warm oven (35°C / 95°F) for 60 minutes (top/ bottom heat and not fan-assisted!).
Punch the dough down, take it out and knead for 1 minute. Divide it in 10 portions, each about 80g / 2 3/4 ounces. Dust your hands with flour, put a portion of dough on the palm of your hand and roll with the other hand, holding it like a dome. Turn the dough for about 1o seconds on the flat hand until its top is round and firm. This process builds up surface tension and prevents the buns from becoming flat. Continue with the remaining dough. If you make pretzels, roll each portion into a 50cm / 20" long sausage shape, the ends should be thinner than the rest, and twist to a pretzel shape. Cover the buns/ pretzels with a tea towel and let them rise for 20 minutes in a warm place.
Set your oven to 220°C / 425°F top/ bottom heat and line a baking sheet with parchment paper.
In a large pot, bring 1l / 4 1/4 cups of water and the baking soda to the boil, watch it as it will start bubbling. The pot should be wide enough for 2 buns to fit in, they don't need to be completely covered by the water.
Using a slotted ladle, gently slip two buns into the boiling water and cook for 1 minute (not longer !). Mind that they don't stick to the bottom of the pot and turn them after 30 seconds. Take them out after 1 minute and transfer them to the lined baking sheet. Mind to work quickly, if they sit for too long after cooking them in the baking soda-water mixture the surface won’t be shiny after baking. (You can also bake them in batches of 6 and 4 buns.) Score a cross on the tops of the buns, sprinkle with coarse sea salt, and continue cooking the remaining buns. Bake for 16 minutes or until golden brown, the pretzels need just 12 minutes.
If you want to freeze the baked buns / pretzels, don't sprinkle them with salt.


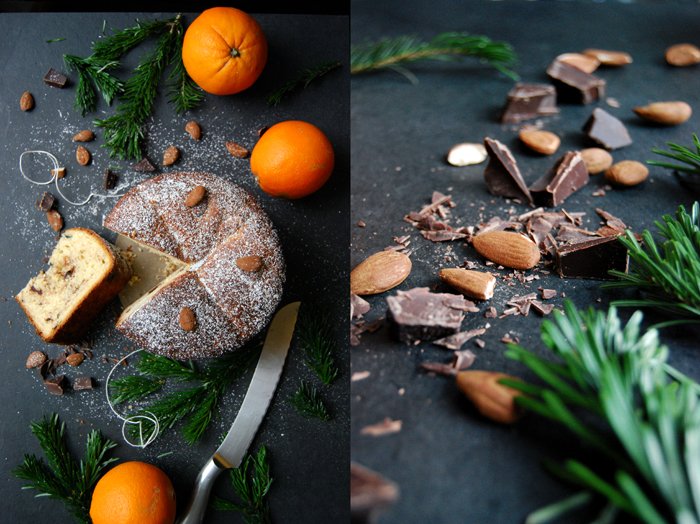
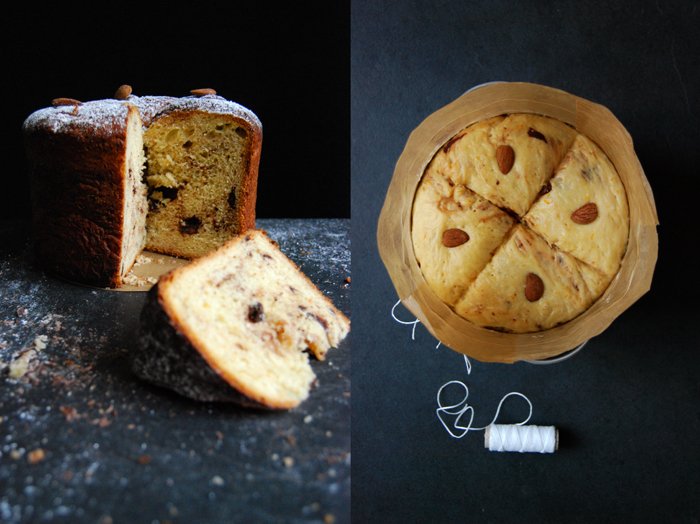
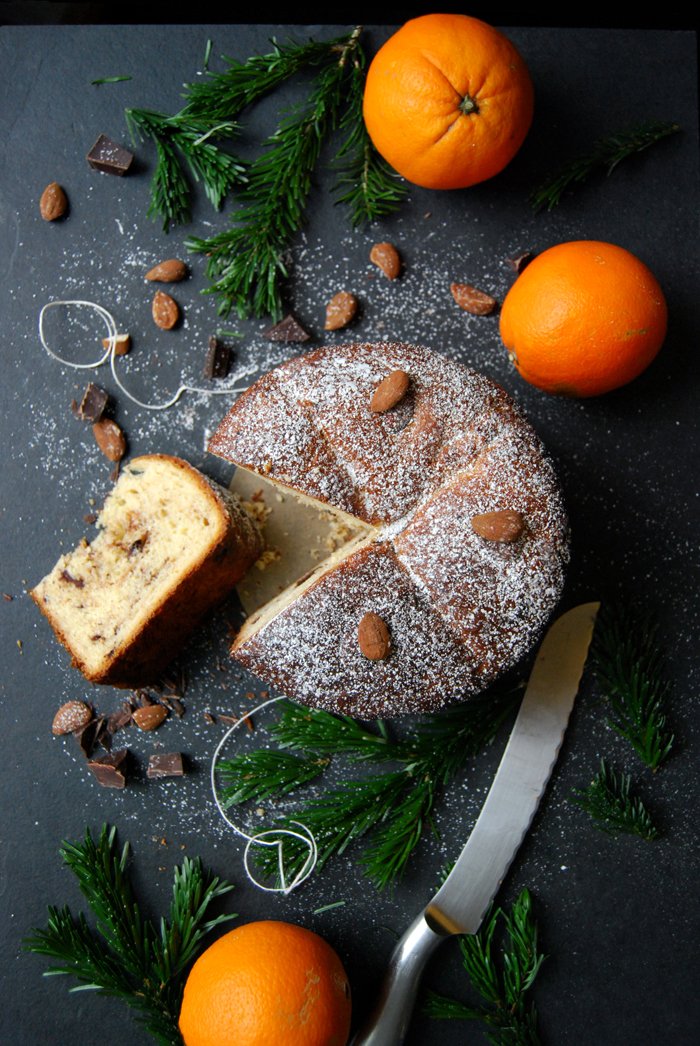
A Christmas Chocolate Panettone
We always had at least one huge panettone under our Christmas tree and I used to be more fascinated by the packaging than the actual bread. I love the Italian way of dramatically packing everything in glossy boxes with bright bows in candy colours. My style is usually so minimal that at Christmas time, I enjoy indulging in a little kitsch and opulence - too much is just right at this time of year. Although I used to enjoy the wrapping so much, the content of the boxes couldn't always keep up with my expectations. The panettone was often too sweet, too dry or so light and airy that it felt (and tasted) artificial.
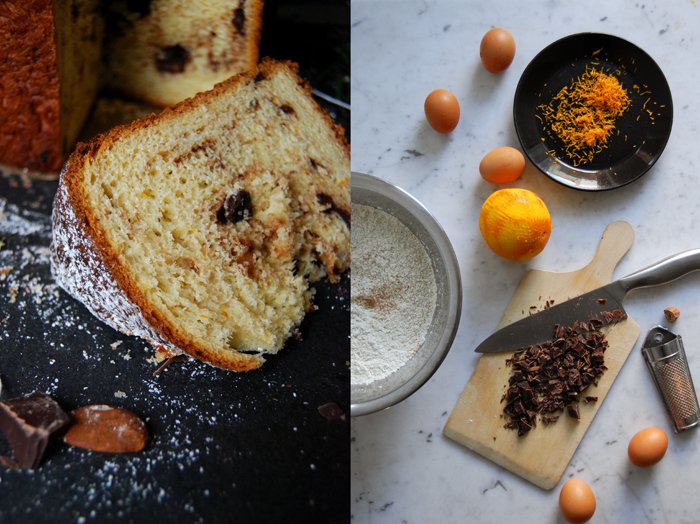
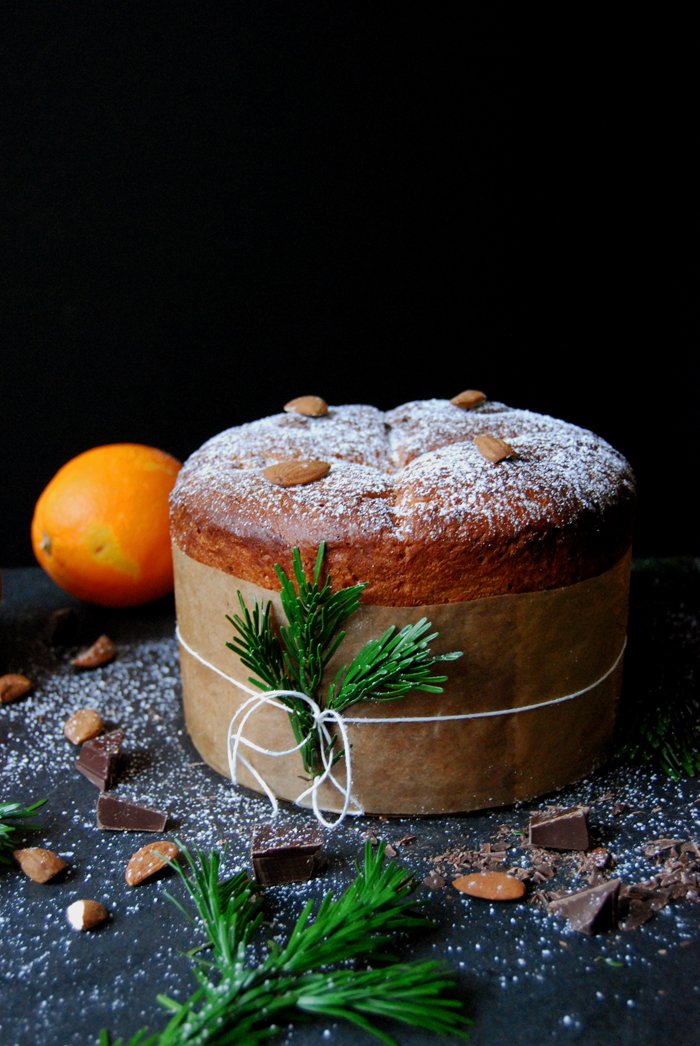
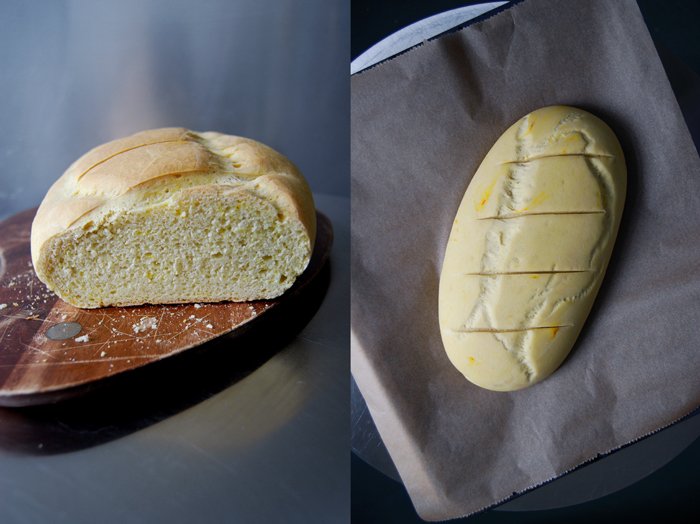
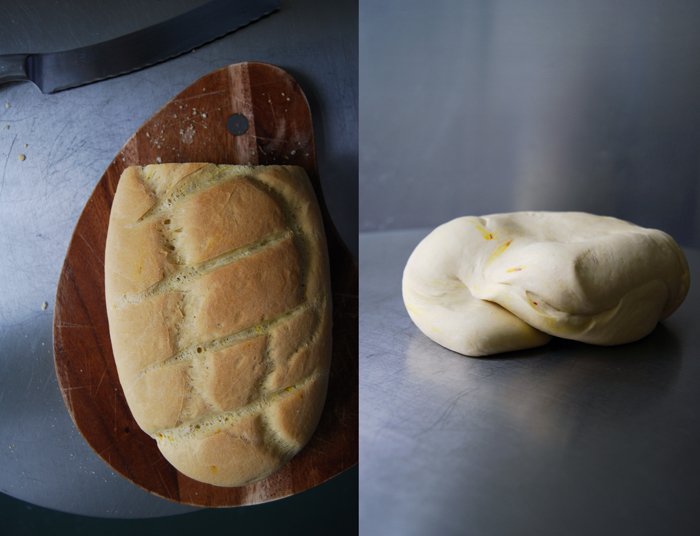
When I decided to bake my own panettone this week, for the first time in my life, I got more and more intimidated the more I read about it. Often it's described as a moody and difficult bread and some bakers had to bake hundreds of loaves before they found the right formula. I didn't have that much time, I'm too impatient, so I thought that a good panettone resembles a French brioche in some ways, the richness and colour, the flowery taste, the subtle sweetness. The Italian bread is just not as soft on the outside and a bit more airy and fluffy inside. So what makes a good brioche? Lots of egg yolks and butter! That was my starting point. Although the most popular panettone feature raisins and candied peel, I went for lots of bittersweet chocolate chunks and orange zest and that was a good choice. When the bread was in the oven, a friend came over spontaneously and said "It smells like Italy, like real panettone!" That relaxed me a bit, at least I had the right smell in the house.
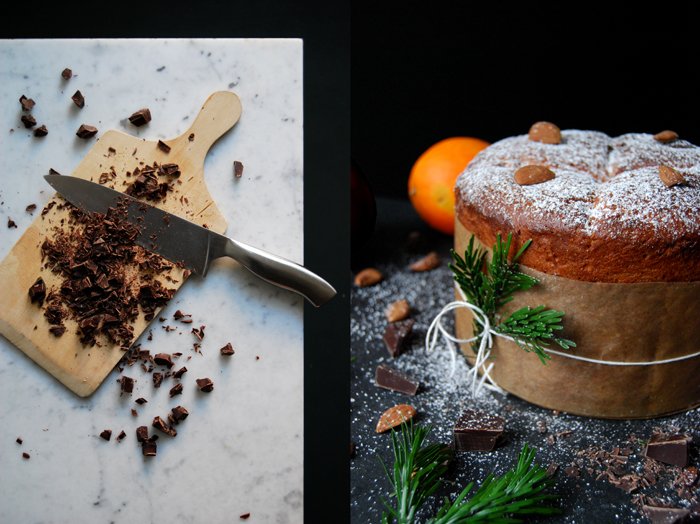
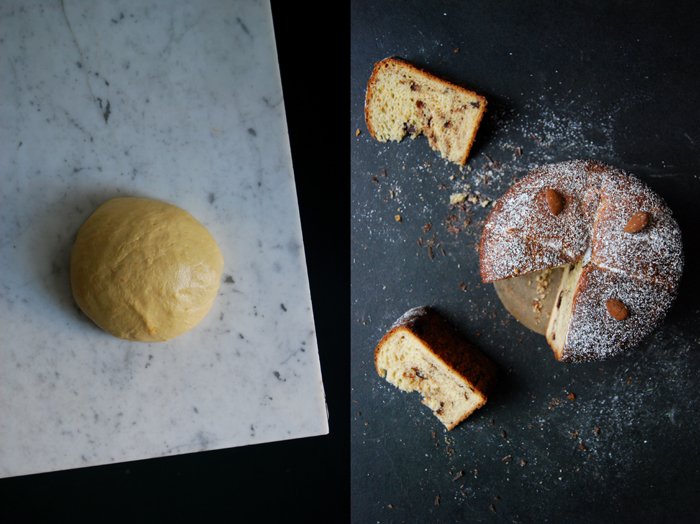
The preparation of the panettone dough takes some time, it has to rise twice, 90 minutes for the first time and 60 minutes when it's already in the form. I made it with dry yeast and let it rise in the warm oven at 35°C / 95°F. I follow this technique with all of my yeast based doughs and it works wonders. It just rises much quicker. You could also use your heater but I find that the oven works best. I didn't buy a special panettone form, I just used a normal cooking pot lined with buttered parchment paper which I let come up high enough for the bread to bake in the shape of a tall cylinder. The baking paper went up 20cm ( 8") which was a bit too high, I could have cut it shorter for the dough to rise above the rim like a mushroom, next time... A panettone is quite dark on the outside but it's important that it doesn't burn. At one point the top has to be covered with aluminum foil and the temperature changes, from 200°C (390°F) to 180°C (355°F) and then to 160°C (320°F) for the last 10 minutes. I took the bread out of the oven after 40 minutes to check if it was done and gently knocked on the bottom (it's quite fiddly to do as it's very hot and fragile), but it needed some more time on a lower temperature setting for the centre to bake through.
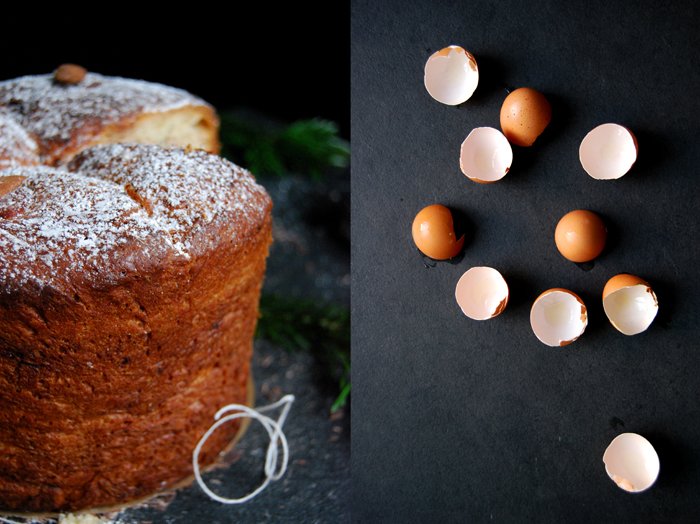
When you bake bread for the first time you can just follow and trust your nose, your ears and fingers. When you knock on the bottom it's always exciting, you don't know if it worked out, and in the case of this bread, it made me quite nervous. I had to wait until the next day to cut and taste it as I didn't want the chocolate to still be liquid. So the next morning, I solemnly cut the first slices of my first Christmas panettone, the centre was baked through but soft, so baking time and temperature were right - I felt relieved. The bread was fluffy but rich and it tasted like Mediterranean Christmas, this was all I had hoped for. The flowery aroma of the orange merges beautifully with the bittersweet chocolate. I spread a bit of butter on top and enjoyed my work in peace. Happy Advent!

Chocolate Panettone
For 1 panettone (18cm / 7") you need
plain flour 500g / 1 pound (I used white spelt flour type 630)
dry yeast 2 sachets (each 7g / 1/4 ounce)
granulated sugar 100g / 3.5 ounces
salt 1/2 teaspoon
a pinch of nutmeg
zest of 1 orange (about 1 1/2 tablespoons)
organic egg yolks 5
butter, melted, 170g / 6 ounces
milk 220ml / 1 cup
bittersweet chocolate, roughly chopped, 100g / 3.5 ounces
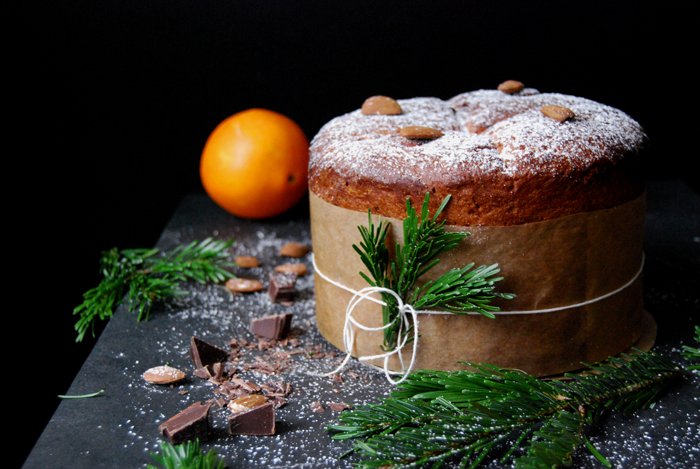
almonds 4, for the topping
heavy cream 4 teaspoons, to brush the top
icing sugar, for the topping
Mix the melted butter with the milk and egg yolks, the mixture should be lukewarm.
In a large bowl, combine the dry ingredients (flour, yeast, sugar, salt and nutmeg) and orange zest. Add the milk/ butter/ egg mixture and mix with the dough hooks for about 5 minutes or until well combined. Knead with your hands for about 1 minute, it should be soft and glossy. Put the dough back into the bowl, cover with a tea towel and let it rise in a 35°C / 95°F warm oven ( top / bottom heat, no fan!) for about 90 minutes or until doubled in size. While the dough is rising, put the chocolate in a plastic container and keep it in the freezer.
Butter the inside of an 18cm / 7" cooking pot (about 10cm / 4" high). Cut a 15cm / 6" wide strip of parchment paper, long enough to be wrapped around the inside of the pot with both ends overlapping generously. Butter the parchment paper on one side. Line the sides of the pot with the parchment paper (the butter side should be facing inwards). Push the overlapping ends of parchment paper together.
Punch the dough down and take it out of the bowl, give it a quick knead and mix in the cold chocolate with your hands. Form a ball and put it into the prepared pot. Carefully cover it with a light tea towel (on top of the parchment paper) and let the dough rise in the warm oven for another 60 minutes or until doubled in size.
Take the pot out and set the oven to 200°C / 390°F, fan-assisted oven (210°C / 410°F top/ bottom heat).
Brush the top of the dough with the cream and cut a cross into the surface with a sharp kitchen knife. Decorate with the almonds. Bake the panettone for 10 minutes and turn the temperature down to 180°C / 355°F (190°C / 375°F top/ bottom heat). Bake for 20 minutes, cover the top with a piece of aluminum foil if the top gets too dark, and bake for another 10 minutes. Turn the heat down to 160°C / 320°F (170°C / 340°F top/ bottom heat) and bake for another 10 minutes. If you use top / bottom heat bake for another 5-10 minutes. Carefully take the pot out of the oven (it will be very hot!) and let the panettone cool in the pot for at least 30 minutes or until it's stabile enough to cool on a wire rack. When it's completely cool, dust with icing sugar.

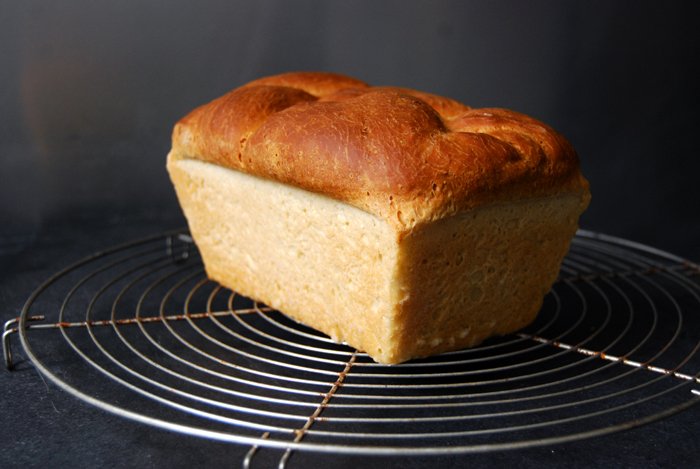
Pancarrè - a perfect Italian loaf of white spelt bread
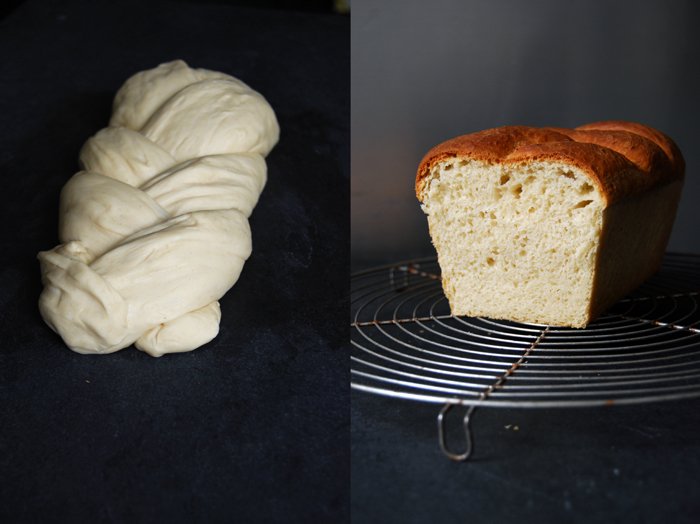
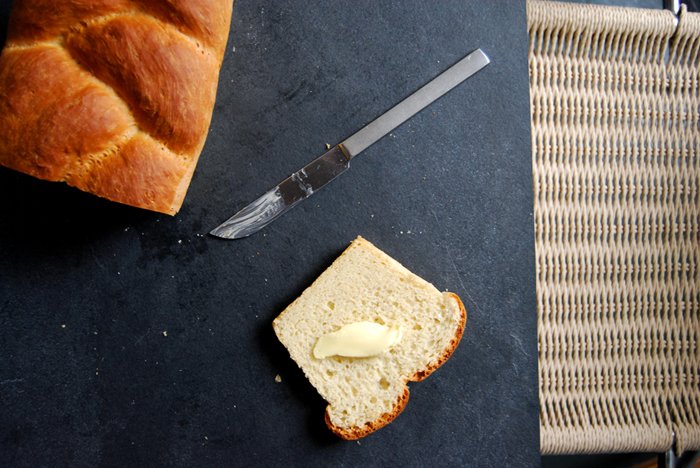
The Italian pancarrè, or pane in cassetta, is the perfect white loaf of bread. It's soft and spongy inside wrapped in a thin but crunchy crust. It's the kind of bread that tastes even better, if not heavenly, when you put slices in the toaster the next morning. In Germany, we also call this kind of bread Toast or Toastbrot and I had a rather funny discussion about this topic with Phia and Josh when we met in their kitchen. They found this name quite confusing as for them, and the rest of the English speaking world, toast only becomes toast when it's put in a toaster. So we came to the conclusion that a toasted slice of bread, to be correct, would be the equivalent to a toasted Toast in Germany.
No matter what you call it, first you have to bake it. I like to use organic white spelt flour (type 630) for this recipe which I often prefer for my cakes, cookies and pies as well. Spelt grain has better nutrition values than wheat and I find it much easier on the body. My Italian bread's dough is made with butter and milk which makes it rich and slightly sweet in taste. To allow it to rise to its fullest, I learned to divide the dough into three parts which I braid into a plait. I once made the bread without this technique and it wasn't as airy as I was used to. After this experience, I never messed with it again!
Although I've praised this breads toasting qualities, I can just recommend that you start with a warm, thick slice and some salted butter melted on top. The smell and taste is seductive! Then you can continue as you wish, with marmelade - great for tea time - cheese or Italian mortadella. After I had this pancarrè on my table, I always find it hard to go back to the various loaves of bread I buy from the bakeries. Nothing beats home baked bread!
Pancarrè
For 1 loaf of bread in a 20 x 10 cm / 8 x 4" loaf tin you need
plain flour (white spelt or wheat) 400g / 14 ounces
dry yeast 1 package (for 500g / 1 pound of flour)
granulated sugar 1 tablespoon
salt 1 teaspoon
milk, lukewarm, 150ml / 5 ounces
water, lukewarm, 100ml / 3.5 ounces
unsalted butter, melted, 60g / 2 ounces
Mix the melted butter with the milk and water, the mixture should be lukewarm.
In a large bowl, combine the flour, yeast, sugar and salt. Add the milk / butter mixture and mix with your dough hooks for about 5 minutes until you have an elastic dough ball. Cover the bowl with a tea towel and let the dough rise in a 35°C / 95°F warm oven ( top / bottom heat, no fan!) for about 45 minutes.
Butter your loaf tin and dust it lightly with flour.
Take the bowl out of the oven. Punch the dough down, divide it into three parts and form thick sausage shaped rolls. Braid them into a thick plait a bit longer than your tin. Fold down the ends and put the plait into the tin. Cover with a tea towel and let it rise for another 30 minutes in a warm place.
Set the oven to 200°C / 390°F (top / bottom heat).
Bake the bread for about 40 minutes or until golden on top. If you’re not sure if it’s done, turn the bread around and knock on its underside, it should sound hollow. Let it cool for a couple minutes before you enjoy the first slice.


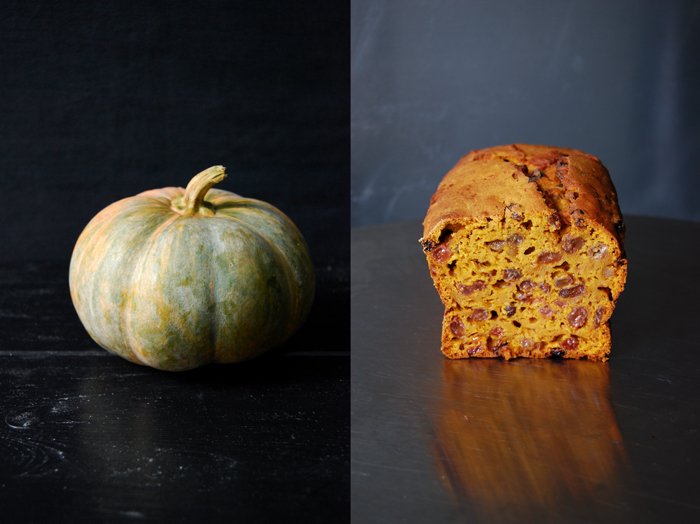
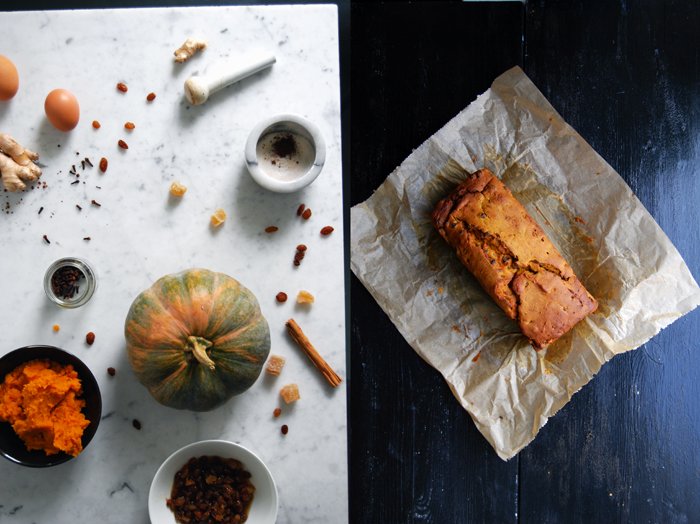
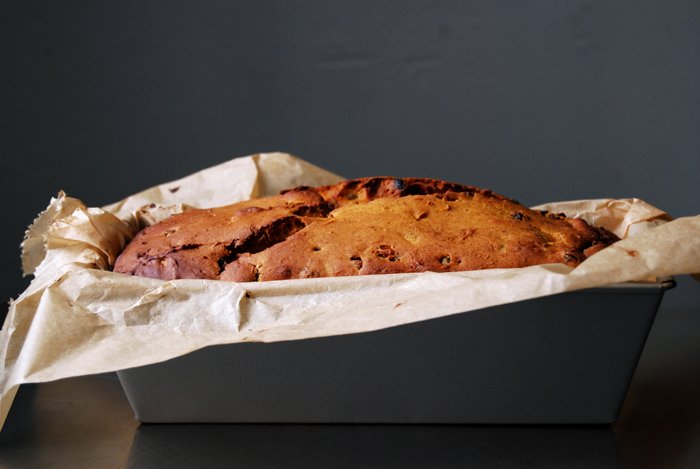
Pumpkin and Ginger Brack - an Irish Tea Cake
When we moved to England a few years ago to live in Whitby in North Yorkshire, it didn't take me too long to fall in love with the locals, the food, the little harbour and its long pier right next to the endless beach. It's a dreamy village, cut off the world - I have a weak spot for these places! I felt great from day one and when I discovered the famous local bakery (it must have been the day after my arrival) with its beautiful name, Botham's written in big letters over the shop on Skinner street I found my second home! You can send me to any village or town in the world and I will find the best bakery or confectionery within 10 minutes, I find my way intuitively and it has never let me down. Through the eyes of a bakery you learn so much about a place and its people. The bread, cookies and cakes, the local delicacies, the whole presentation but also the service tells you many secrets and gives you an insight into a new world. That's one of the many reasons why it's so important to keep up this tradition and support those small local businesses!
At Botham's, I discovered thin Shah tea biscuits, eccles cakes, English muffins, Sally Lunn loaves, millionaire's shortbread, flapjacks, Maids of Honour and fruit breads. I tried so many different kinds of loaves of this famous English tea time cake, that I lost track at one point. I love the simplicity of this sweet and cakey bread paired with the richness of dried fruits soaked in tea mixed with ginger, spices, citrus zest or nuts. Botham's Stem Ginger Brack was my favourite, an Irish fruit cake made without any fat but with lots of raisins, sultanas, stem ginger and orange zest. It's so juicy and it tastes divine with butter spread on top (the fat had to come in at one point!).
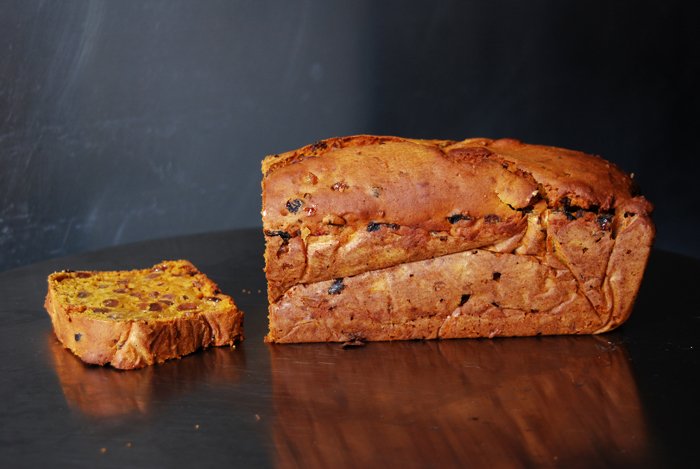
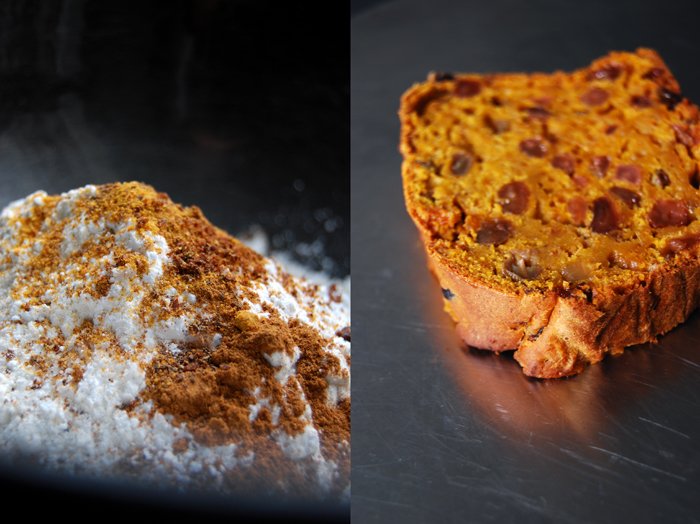
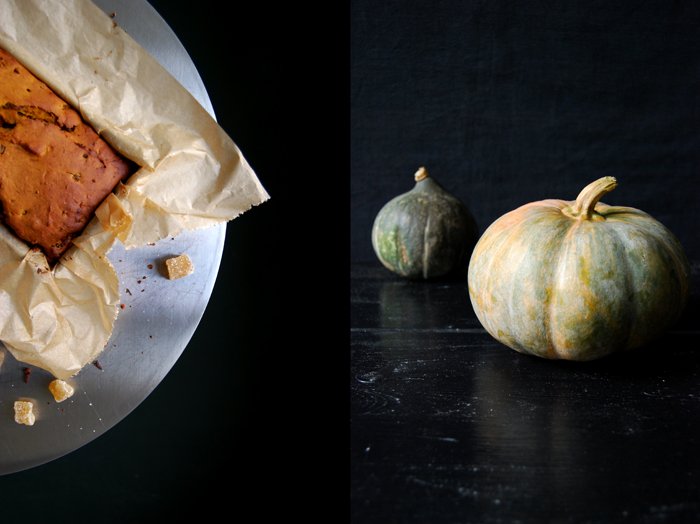
Years later, back in my own kitchen, I started to bake my own bracks. The first loaf was inspired by the one I got to love in Whitby but then I got a bit more experimental. Here's one made with puréed pumpkin in addition to the tea soaked raisins, grated fresh ginger and stem ginger. I also added a nice spice composition of cinnamon, nutmeg, allspice and cloves. The result is aromatic and moist, but still structured. The pumpkin makes the loaf more juicy and smooth than the one I bake without the puréed vegetable. It would be a perfect Halloween cake although it's still a month ahead. In Ireland, bracks are traditionally made for this festive season, but at Botham's (and in my oven) you can find them all year round!
This recipe has been featured on Food52 Halfway To Dinner!
Pumpkin and Ginger Brack
You need to prepare 2 steps in advance for this cake:
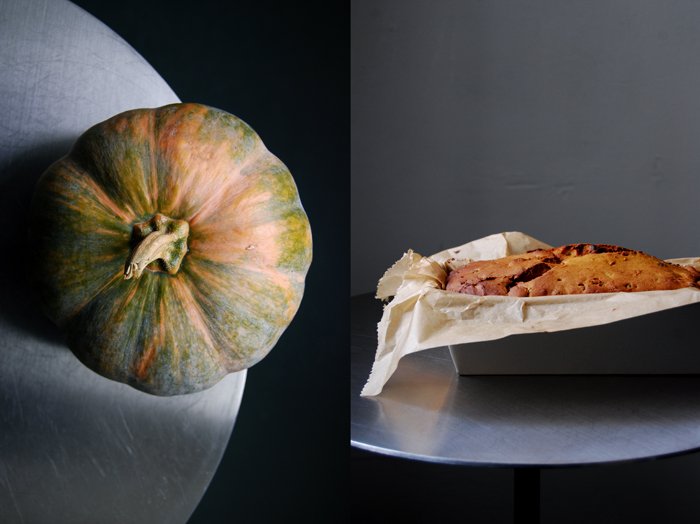
1. If you don't buy canned pumpkin purée, the pumpkin has to cook in the oven for 30 minutes before you can turn it into a purée.
2. The dried fruits have to soak in tea overnight.
For a 24.5 x 10cm / 10 x 4″ loaf pan you need
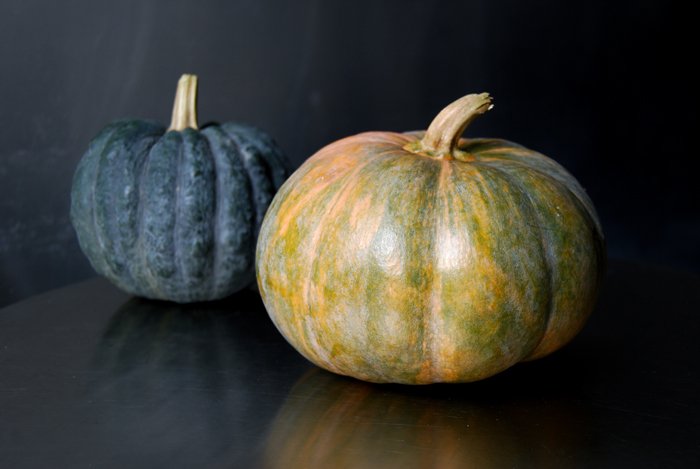
pumpkin purée 400g / 14 ounces or pumpkin (squash), without the fibres and seeds, cut into cubes, 500g / 17.5 ounces (Hokkaido with skin or peeled butternut or Musquée de Provence pumpkin)
strong black English tea 150ml / 5 ounces
raisins and/ or sultanas 250g / 9 ounces
stem ginger, finely chopped, 60g / 2 ounces
fresh ginger, grated, a 3.5cm / 1.5" piece
Demerara sugar 140g / 5 ounces
organic eggs, beaten, 2
plain flour 220g / 8 ounces
baking powder 2 teaspoons
a pinch of salt
ground cinnamon 1 teaspoon
ground nutmeg or mace 1/4 teaspoon
ground allspice 1/8 teaspoon
ground cloves 1/8 teaspoon
For the pumpkin purée
Set the oven to 200°C / 390°F (fan assisted oven).
Put the pumpkin into a baking dish. Cover the bottom of the dish with about 100ml / 3.5 ounces of water. Wet a piece of parchment paper under water, scrunch it a little and cover the pumpkin in the baking dish, tucking the sides in. Cook for 30 minutes in the oven or until the pumpkin is soft. Purée the pumpkin in a blender or with a stick mixer and set aside (you could keep it in the fridge for a day).
For the brack
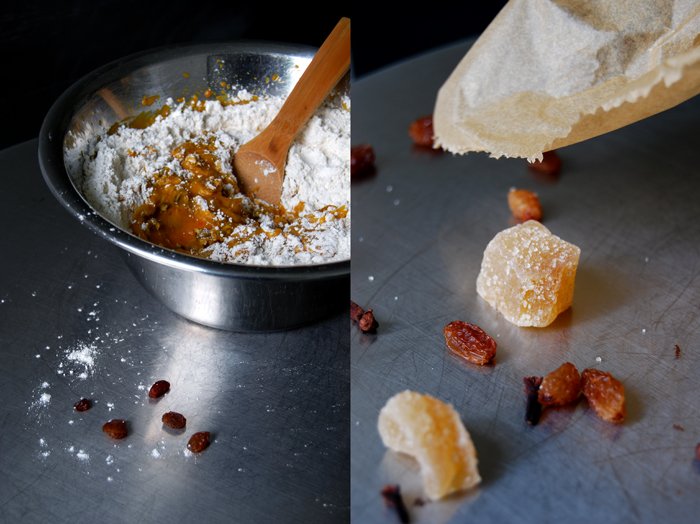
In a large bowl, mix the tea, raisins, stem ginger, grated ginger and sugar and soak overnight.
Set the oven to 175°C / 350°F (fan assisted oven).
Combine the flour, baking powder, salt and dry spices.
Mix the eggs into the raisin tea mixture with an electric mixer, add 400g (14 ounces) of pumpkin purée and mix until well combined. With a wooden spoon, stir in the flour spice mixture until combined and fill into the loaf pan lined with parchment paper. Bake the brack for 50 minutes, turn the temperature down to 160°C / 320°F and bake for another 30-35 minutes or until the cake is golden brown on top. Check with a skewer, it won't come out clean, there will be a few moist pieces but there shouldn't be any liquid dough left on it. Take the cake out of the pan after 10 minutes and let it cool for at least 10 minutes before you cut off your first slice. The cake is best after 1-3 days, wrapped in parchment paper after it cools down completely. The outside will be soft by then.

Buttery Weekend Brioche
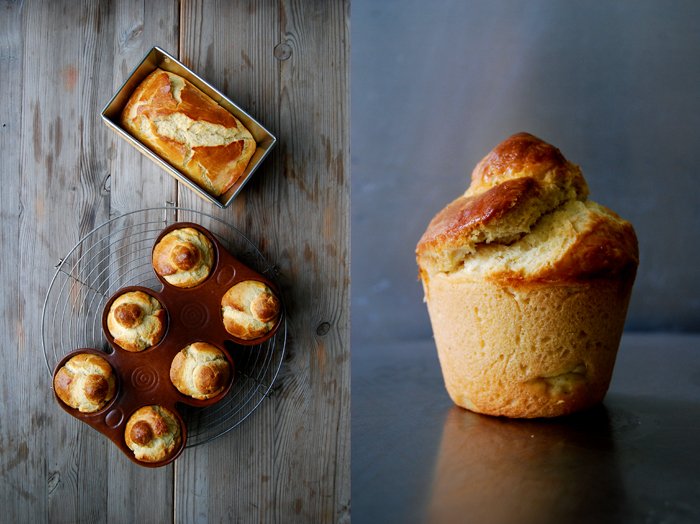
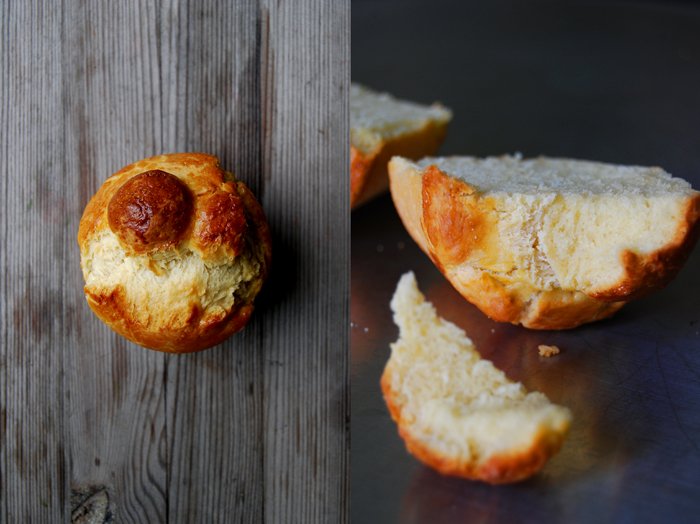
Lots of butter, lots of eggs - that’s the secret to a great brioche! I enjoy this sweet golden bread fresh and warm out of the oven on the first day, and toasted, for breakfast, lunch or as sweet and savory sandwiches on the second day. Therefore, when I make brioche, I bake a big batch of them!
The dough has to rise three times, but that shouldn't put you off. If you time it well and let it rise overnight the second time, you can be rewarded with the best French breakfast treat ever - apart from croissants maybe but their preparation put me off! I never managed to move myself to give them a try but one day their time will come even in my kitchen. Back to the brioche, this recipe makes a wonderful buttery, light pastry, rich but tender. I like to break them in pieces and spread even more butter on top and some of my homemade strawberry or Tyrolean plum jam, a hot latte macchiato on the side and I'm happy!
I always bake one loaf and a few little round brioches. The bread stays fresh for days wrapped in parchment paper and it's great for teatime, sliced, toasted and - again - with some butter melted on top. It also makes a delicious dessert, in a trifle, bread pudding or thick fresh slices topped with warm berry compote and some whipped cream!
Brioche
For 2 loaves you need
plain flour 700g / 1.5 pounds
dry yeast 1 package (for 500g / 1 pound of flour)
salt 1 1/2 teaspoons
granulated sugar 60g / 2 ounces
organic eggs, mixed with a fork, 5 plus 1 egg mixed with a pinch of salt for the glaze
milk, lukewarm, 50ml / 2 ounces
butter, soft, 250g / 9 ounces
Melt 50g / 2 ounces of the butter, let it cool and mix with the milk.
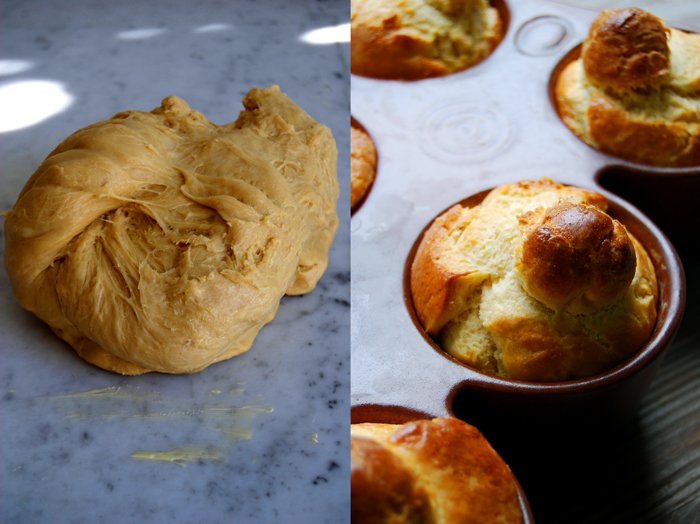
In a large bowl, combine the flour, yeast, salt and sugar. Add the lukewarm milk butter mixture and eggs and mix with your dough hooks for 5 minutes until well combined. Continue kneading with your hands for about 5 minutes until you have an elastic dough ball. Add the remaining soft butter cut into little pieces and mix until all the butter is worked into the dough and you have a soft, shiny but sticky ball. This will take about 5 minutes.
Put the dough back into the bowl and cover with a tea towel. Let the dough rise in a 35°C / 95°F warm oven ( top / bottom heat, no fan!) for 1 hour.
Take the dough out, knead for 1 minute and put it in a clean large bowl. Close well with a lid or cling film and keep in the fridge overnight to rise slowly a second time.
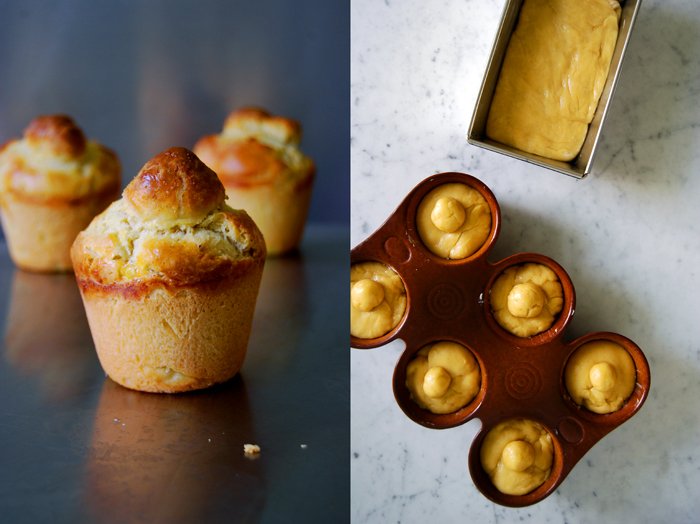
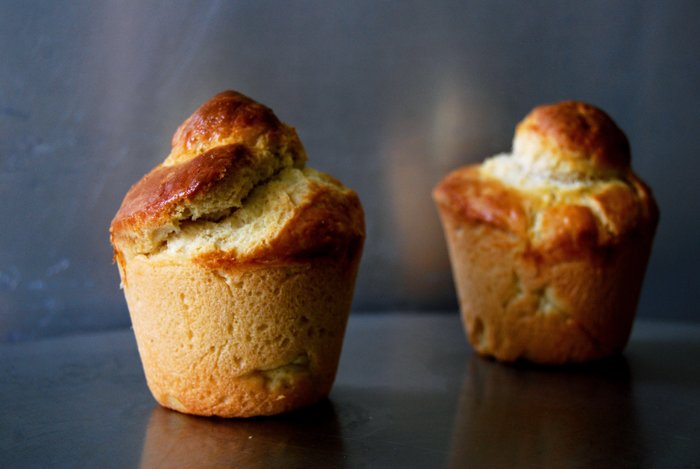
Take the dough out the next morning and let it sit for 10 minutes before you knead it for 1 minute and divide it into 2 portions (or more depending on the tins you use to bake the brioche). Butter the tins generously and push in the dough, the tins should be filled 1/2 to 2/3, not more. If you bake a round brioche you can shape little (or big) balls and place them on top. Form a little hole with your finger in the middle and gently push the ball in to prevent it from falling off. Cover with a towel and let it rise in a warm place for about 45 minutes.
Set the oven to 175°C / 350°F (top/ bottom heat).
Brush the brioche with the egg mixed with salt and bake for 35 minutes or until golden brown on top, depending on the tins' shape and size the baking time can be shorter or longer. If you’re not sure if it’s done turn the brioche around and knock on its underside, it should sound hollow. Enjoy warm.


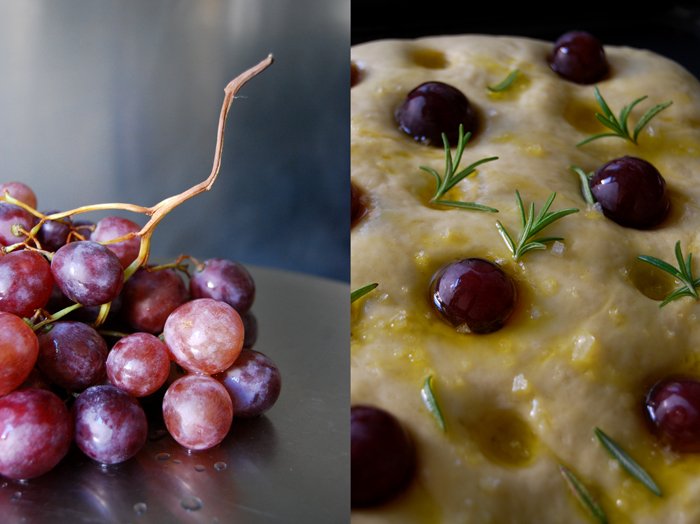
Focaccia with Grapes, Rosemary and Gozitan Sea Salt

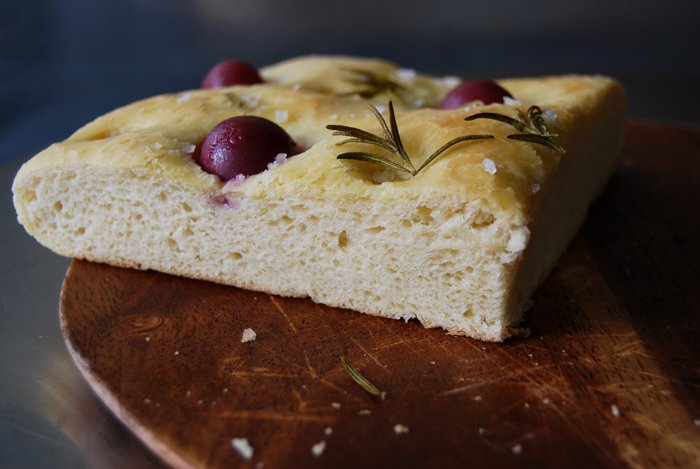
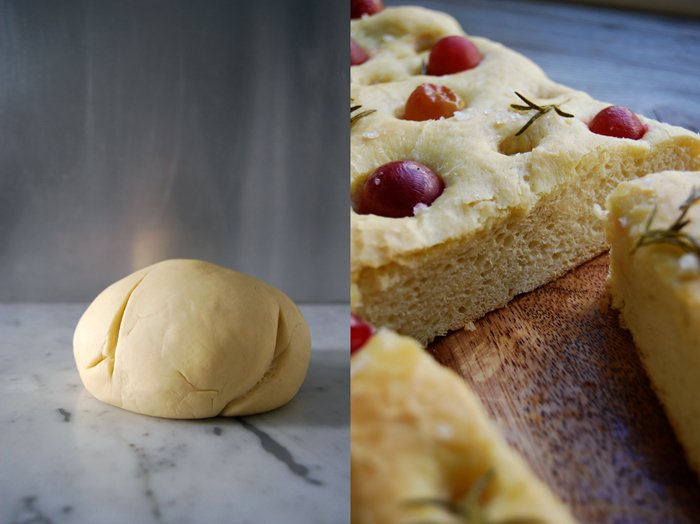
This is the best focaccia I ever made! One reason might be the excessive use of very good olive oil. Sometimes there's just no way around, if you spare on oil you spare on taste and texture, it's just that simple. The second reason is the unbelievably delicious combination of baked ripe dark grapes and rosemary! The fruits add a soft sweetness and juiciness to the bread which is better than any other flavouring I ever tasted in combination with this Italian classic.
So, the air in my kitchen was filled with the addictive smell of freshly baked bread mixed with the woody aroma of rosemary. I sat in front of the oven like a hungry cat and I couldn't wait for the focaccia to be done, it was so tempting! I took the photos as quickly as possible as the aromas teased my nose even more after I cut the first piece off the thick and flat loaf. Then, finally, when I took the first bite, I just enjoyed the spongy softness, the oily crust which was almost flaky, the grapes which released their juices and this heavenly taste topped with roast rosemary sprigs and my Gozitan salt from the Cini family!
More focaccia inspiration:
Focaccia with Grapes, Rosemary and Gozitan Sea Salt
For a 25 x 32cm / 10 x 12.5" focaccia you need
plain flour 500g / 17 1/2 ounces
dry yeast 1 sachet (7g / 1/4 ounce)
salt 1 teaspoon
granulated sugar 1 heaped teaspoon
water, lukewarm, 260ml / 9 ounces
olive oil 110ml / 3 3/4 ounces (60ml / 2 ounces for the dough and 50ml / 1 3/4 ounces for the topping)
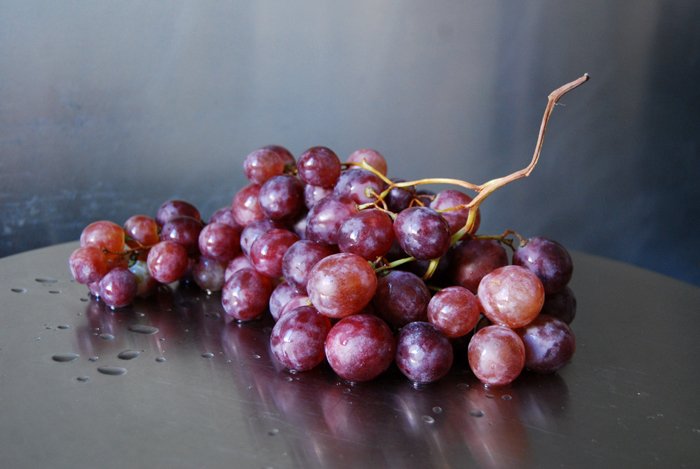
red grapes around 25
fresh rosemary needles, a small handful
flaky sea salt for the topping
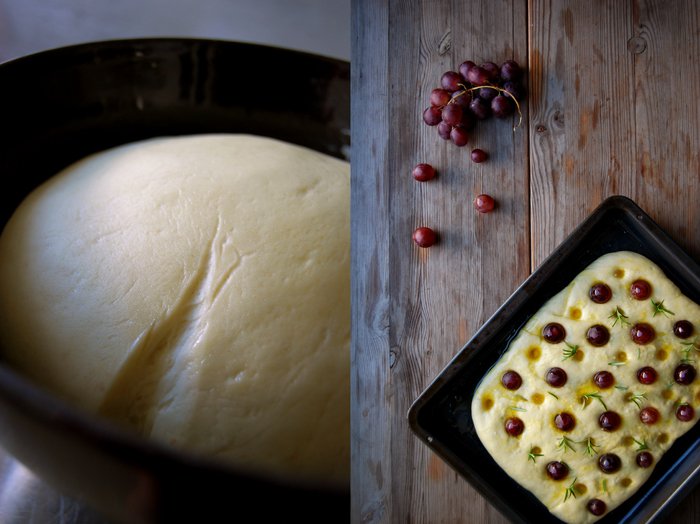
In a large bowl, combine the flour, yeast, salt and sugar. Add the water and 60ml / 2 ounces of olive oil and mix with your dough hooks for 5 minutes until well combined. Continue kneading with your hands for around 5 minutes until you have an elastic dough ball. Put the dough back into the bowl and cover with a tea towel. Let the dough rise in a 35°C / 95°F warm ( top / bottom heat, no fan!) oven for 40 minutes.
Take the dough out, punch it down and knead for 1 minute. Roll out the dough until it measures around 25 x 32cm / 10 x 12.5" and put it carefully on an oiled baking sheet. Cover with a tea towel and let it rise for 20 minutes in a warm place.
Set the oven to 220°C / 430°F.
Punch about 6 x 7 holes into the dough with the round bottom of a wooden spoon and put a grape into every second hole. Pour the remaining 50ml / 1 3/4 ounces of olive oil over the dough and into the holes. Sprinkle with rosemary and sea salt and bake for 20 minutes or until golden on top.


Sicilian Sfincione with Tapenade
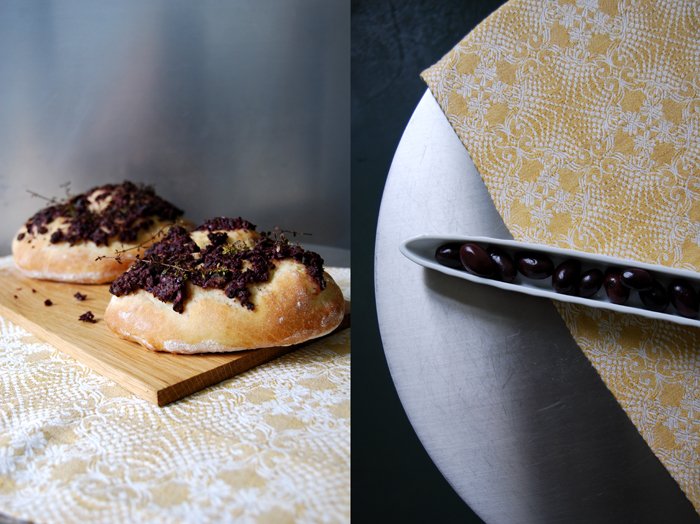
Forget thin and crisp, this pizza is thick and juicy! The Sicilian Sfincione is more like a focaccia, the dough is made with eggs and milk which gives it a bit of a sweet bread feeling. Its origin dates back to the late Baroque when the aristocratic Sicilian families liked to employ French chefs, the "Monzu" coming from the French Monsieur, some of them became famous Sicilian chefs. Here's the beauty of culinary exchange between two cultures, they influence each other, they don't confine each other but merge and evolve! If only cultural exchange was always so easy and well received!
In the beginning of the 18th century, these chefs started to influence Sicilian cuisine and left quite a few marks in the kitchen, also in the making of pizza. Eggs and milk, sometimes even butter, found their way into this famous dish and created completely different textures and tastes, like the popular Sfincione.
As there is already a French touch involved I thought I might as well continue working with it in the topping. I went for a rich Provençal tapenade made of lots of black olives, capers, anchovies, olive oil, brandy and lemon juice topped with thyme sprigs. It was great! This pizza is perfect for a picnic, as a starter or with a salad on the side. I love pizza, so much that I bake it every Sunday and this Sicilian variation is definitely a summer favourite!
Sfincione with Tapenade
For 4 Sfincione (15cm / 6") you need
For the dough
plain flour 500g / 1 pound
dry yeast 1 package (for 500g / 1 pound of flour)
salt 1/2 teaspoon
organic egg 1milk, lukewarm, 250ml / 8.5 ounces
Combine the flour with the yeast and salt, add the lukewarm milk and egg and mix with your dough hooks for a few minutes. Continue kneading and punching with your hands until you have an elastic dough ball and put it back in the bowl. Cover with a tea towel and let it rise in a 35°C / 95°F warm ( top / bottom heat, no fan!) oven for 45 minutes.
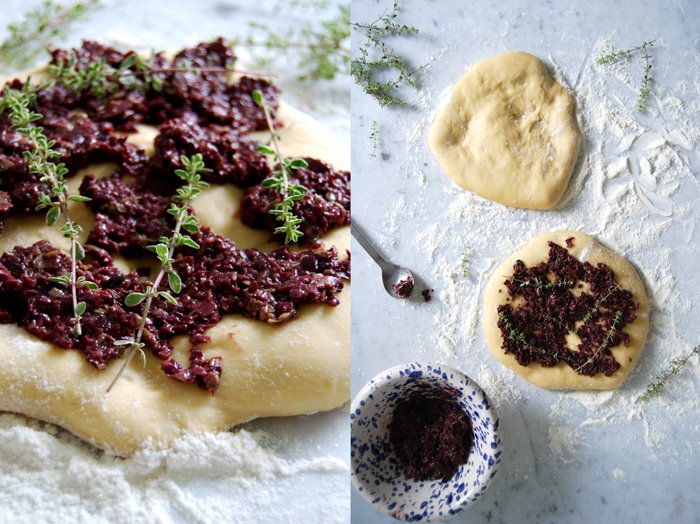
Divide the dough into 4, stretch into thick 15cm / 6" disks on a floured surface and cover with a kitchen towel. Let them rise while you continue the preparation for the tapenade.
For the tapenade
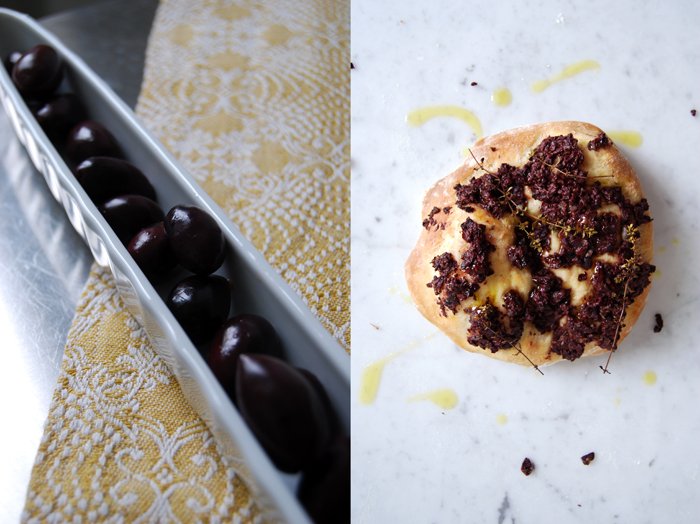
black olives 200g / 7 ounces
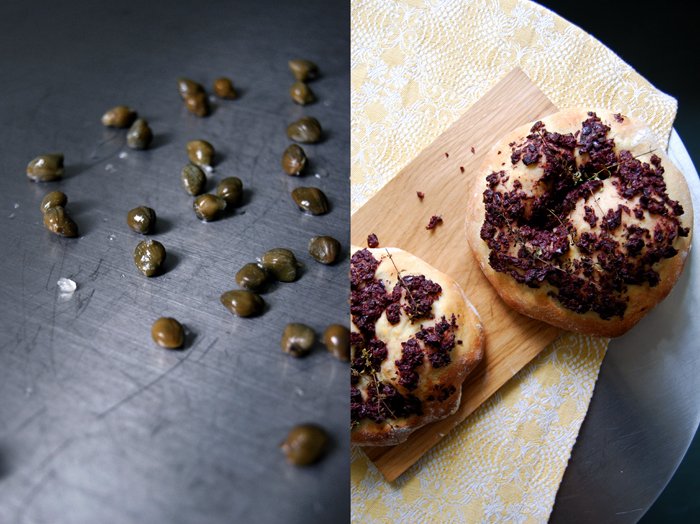
capers 40
anchovy, rinsed and dried, 2 fillets
olive oil 2 tablespoons plus more for sprinkling
brandy (or cognac) 2 tablespoons
freshly squeezed lemon juice 2 tablespoons
mustard 1 teaspoon
pepper
thyme 16 small sprigs for topping
Mix the ingredients for the tapenade in a blender and season with pepper to taste.
The Sfincione
Set the oven to 250°C / 480°F, my oven has a special pizza setting but you can use top / bottom heat as well. Line a baking sheet with parchment paper.
Spread a quarter of the tapenade on each pizza, put 4 thyme sprigs on top of each and bake for 6 minutes or until golden brown. Sprinkle with olive oil immediately and serve warm or cold.

Saffron Bread
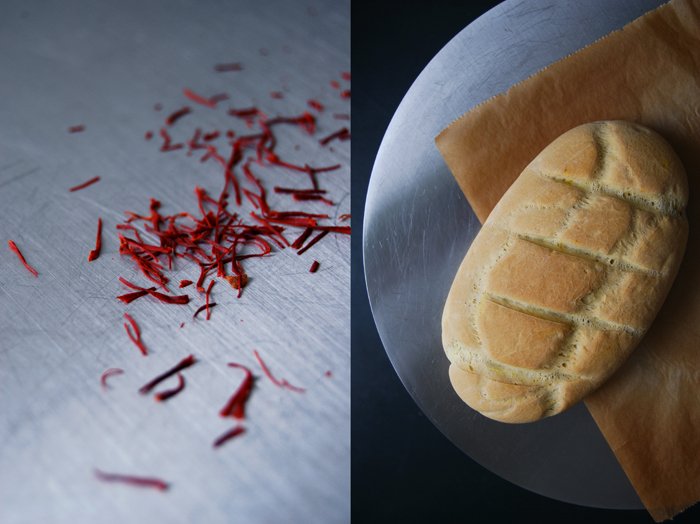
Here's the saffron bread I promised!
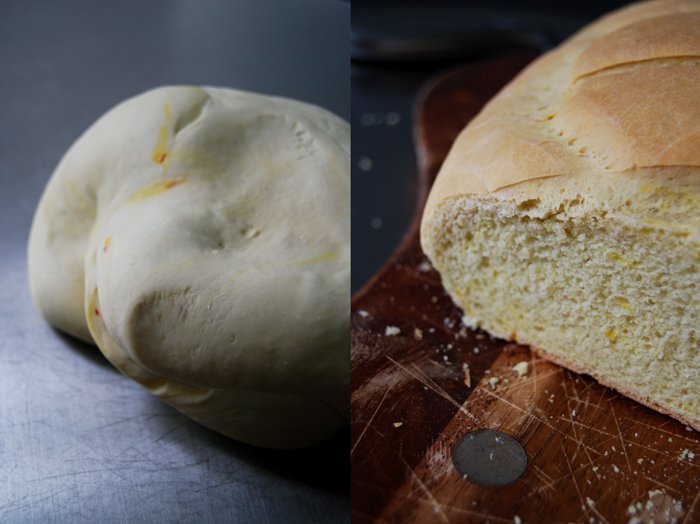
Let's start with the texture, it's juicy but light, a quality I love of all of my bread recipes, be it my Zucchini Bread, the Olive Loaf or my Potato Bread, but this one has a special aroma. It's made with one of the most precious and expensive spices, dried saffron threads. Only a very small part of the saffron crocus' flower is used for the production of this red spice, the three crimson stigmas growing at the end of the carpel. Lots of flowers, 150 - 200, are necessary to produce 1 gram of this treasure! Luckily, its aroma is so intense that a tiny amount is enough to refine other ingredients with its flavour.
For my bread made of a bit more than a pound of flour I used a pinch of saffron threads (around 1/5 teaspoon) to spread their unique taste. At first I was a bit worried that it wouldn't be strong enough for yesterday's sandwich, the Greek feta dip mixed with harissa and cayenne pepper had quite an impact of different flavours. To my surprise, the hot spiciness and the saffron complemented each other perfectly! It was a Greek reunion as antique mythology tells that the Greek God Zeus used to sleep on a bed covered in saffron.
Saffron Bread
For 1 big loaf of bread you need
plain flour 550g / 19 ounces
yeast 1 package (for 500g / 1 pound of flour)
salt 1 1/2 teaspoons
water, lukewarm, 230ml / 8 ounces
olive oil 4 tablespoons
a pinch of saffron threads (around 1/5 teaspoon)
Mix the saffron with 3 teaspoons of the water.
In a large bowl, combine the dry ingredients, add the olive oil, saffron liquid and the rest of the water and mix with your dough hooks for 5 minutes until well combined. Continue kneading with your hands for around 5 minutes until you have an elastic dough ball. Put the dough back into the bowl and cover with a tea towel. Let the dough rise in a 35°C / 95°F warm ( top / bottom heat, no fan!) oven for 60 minutes.
Take the dough out, punch it down and knead for 1 minute. Form 1 long loaf and put on a baking sheet lined with parchment paper. Cover with a tea towel and let it rise for 25 minutes in a warm place.
Set the oven to 225°C / 440°F.
Cut 4 diagonal slashes into the bread and bake for 20 minutes or until cooked through. If you’re not sure if it’s done turn the bread around and knock on its underside, it should sound hollow. Let it cool for a couple minutes on a wire rack covered with a tea towel to soften the crust a bit.


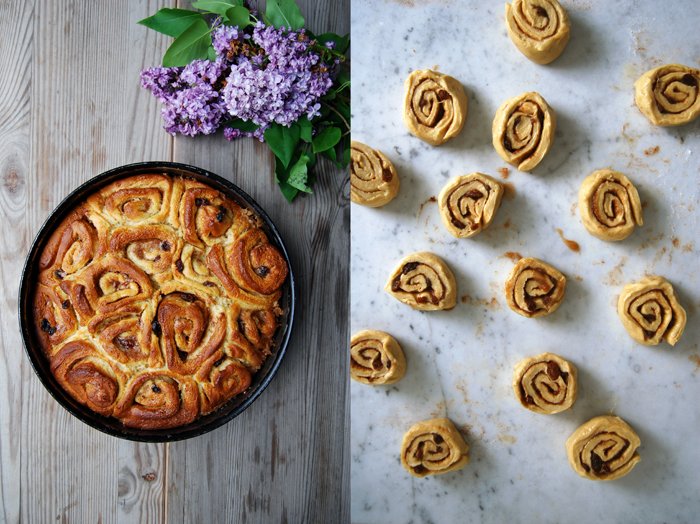
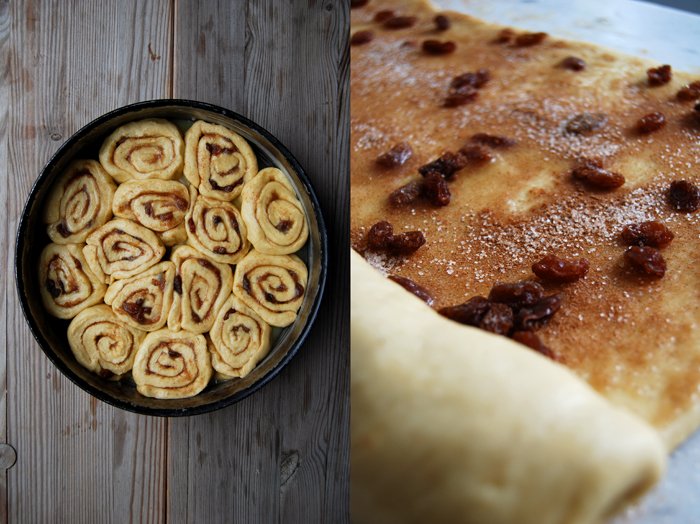
Sticky German Cinnamon Schnecken with Raisins and Maple Syrup

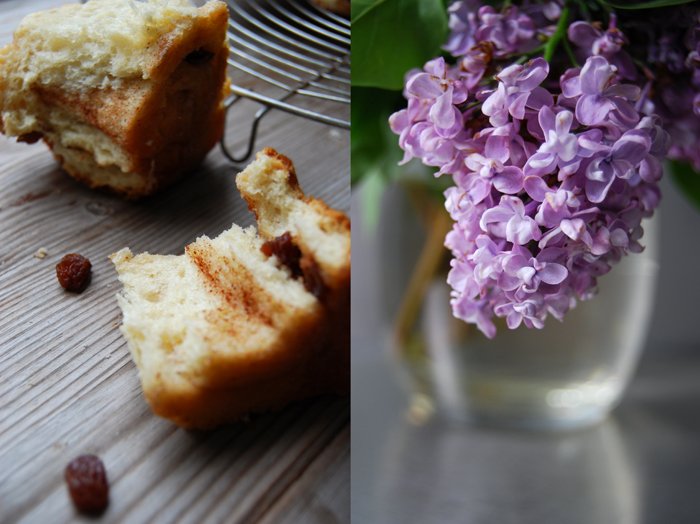
Sunday morning, the cosy smell of espresso bubbling in my espresso maker and fresh, warm buns on the table, there's no better weekend treat! This week, my breakfast buns are German schnecken, sticky pastry snails, filled with cinnamon and raisins, sweet, juicy and buttery. The top is crisp but when you pull the buns apart you can feel their soft inside, it's puffy, infused with cinnamon, slightly soaked with a thick syrup made of butter, sugar and a splash of maple syrup. They taste divine, I love them!
I had planned to bake cardamom buns for days but a package of raisins changed my mind in the last second and brought the cinnamon in. I like this combination so much that I forget about other spices sometimes, but next time it'll be cardamom again!
Cinnamon Schnecken
For 14 Schnecken you need
plain flour 600g / 21 ounces
granulated sugar 75g / 3 ounces
dry yeast 1 package (for 500g / 1 pound of flour)
salt 1 teaspoon
ground cinnamon 1 leveled teaspoon
butter, melted, 100g / 3.5 ounces
milk, lukewarm, 225ml / 7.5 ounces
organic eggs 2
For the syrup
water 50ml / 2 ounces
granulated sugar 120g / 4.5 ounces
maple syrup 1 tablespoon
butter 50g / 2 ounces
For the filling
raisins 60g / 2 ounces
granulated sugar 30g / 1 ounce
ground cinnamon 1 tablespoon
Combine the dry ingredients. Mix the hot melted butter with the cold milk and the 2 eggs, this way the liquid mixture will have the right lukewarm temperature (check with a finger). Mix the dry and the liquid mixture with your dough hooks for 5 minutes until well combined. Continue kneading with your hands for around 5 minutes until you have an elastic dough ball. Put the dough back into the bowl and cover with a tea towel. Let the dough rise in a 35°C / 95°F warm oven for 70 minutes. Make sure that your oven is set to top/ bottom heat and not to fan.
Bring all the ingredients for the syrup to a boil and cook on a medium heat for 3 minutes. Mix the raisins, sugar and cinnamon for the filling.
Take the dough out, punch it down and knead for 1 minute. Roll it out on a working surface (roughly 36 x 32cm / 14 x 12.5"), spread with the syrup and sprinkle with the sugared raisins. Roll it up tightly, cut into 14 schnecken and put into a buttered springform pan (around 26cm /10″), arrange them in a circle. Cover with a tea towel and let them rise for 20 minutes in a warm place.
Set your oven to 175°C / 350°F (fan-assisted oven).
Bake for 30 minutes or until golden brown. Let them cool for a few minutes before you take them out of the pan.

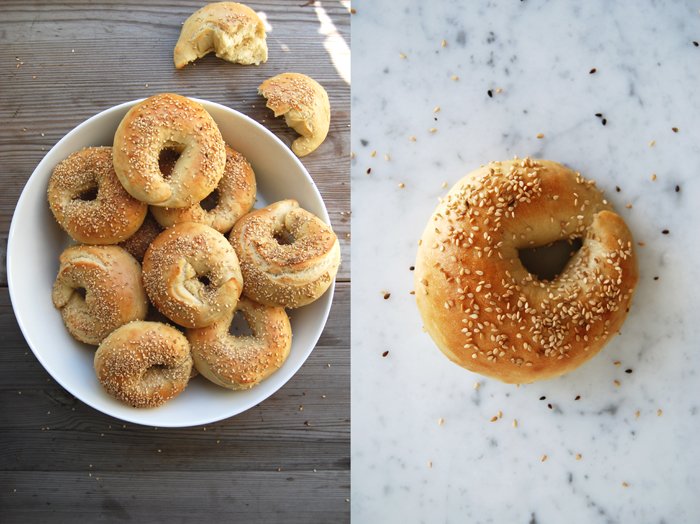
Sesame Seed Weekend Bagels

My Sandwich Wednesdays became a tradition shortly after I started eat in my kitchen more than 5 months ago. Usually I choose the bread according to the toppings when I share one of my sandwich recipes but sometimes it's the other way around. The first sandwich post on the 4th December started with a homemade bagel, a defrosted one as I like to bake them in big batches and fill my freezer with them. It's so convenient to have them on hand, I just have to warm them up in the hot oven for a few minutes. The crust becomes a little bit more crunchy but the inside stays soft and as soon as I cut the warm bagels in half the sweet smell of homemade bread fills the air in my kitchen. That's what happened on a cold day in early December, when I smelt the bagel I felt like butter fried leek, sweet tomatoes, hot red chili peppers and smooth cream cheese, the first eat in my kitchen sandwich was born!
Here's the recipe I promised to share! One batch gives me 12 well sized bagels. Most of the time I use organic white spelt flour (type 630) which I prefer to use for my baking in general, for sweet and savory. It's similar to wheat, the results don't differ in taste or texture but it's better for the body as it has much higher nutrition values. My extensive baking demands lots of flour therefore I prefer to go for good ingredients. Another nice side effect is that ever since I changed over to spelt flour a few years ago I lost 2 pounds! When I run out of spelt, I still use wheat without changing the recipes, also for the bagels and they look, feel and taste the same, delicious!
Sesame Seed Bagels
For 12 bagels you need
plain flour, wheat or white spelt type 630, 700g / 1.5 pounds
dry yeast 1 package (for 500g / 1 pound of flour)
water, lukewarm, 380ml / 13 ounces
granulated sugar 2 tablespoons
salt 1 1/2 scant tablespoons
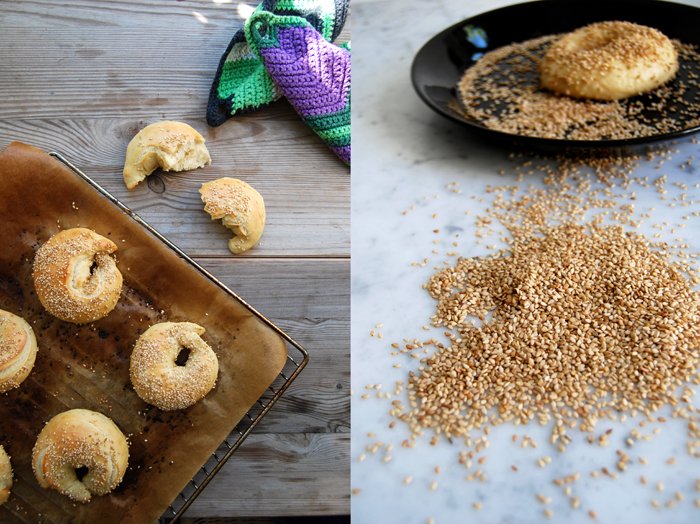
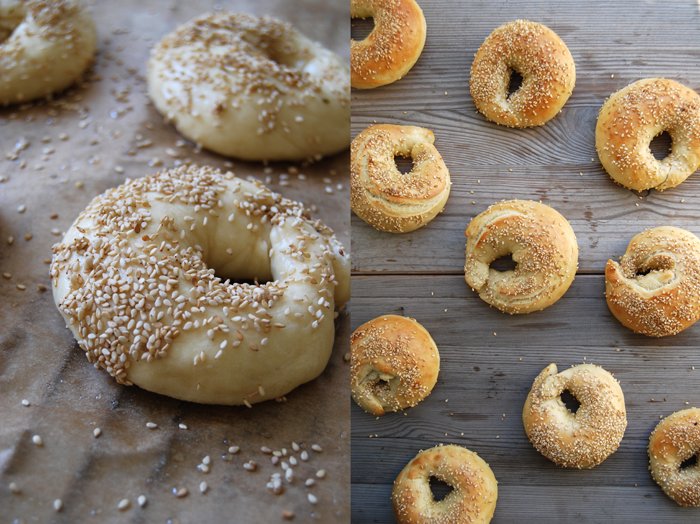
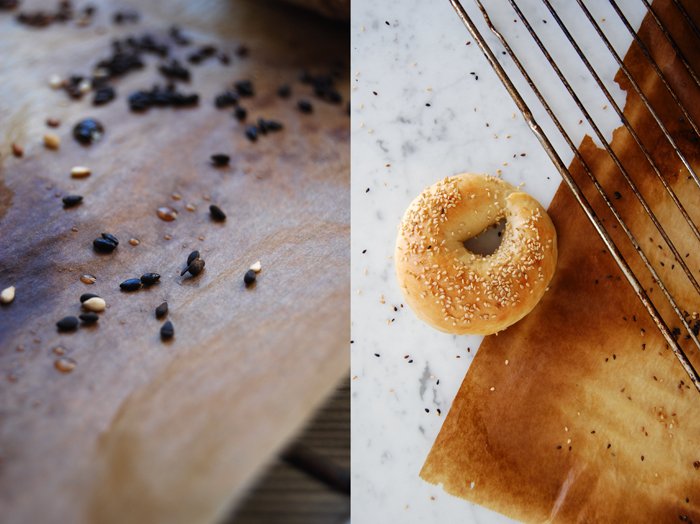
sesame seeds, for sprinkling
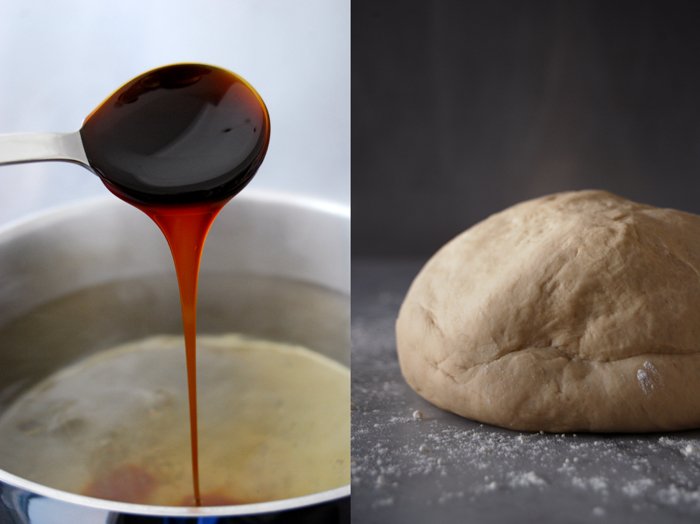
sugar cane syrup or molasses 1 heaping tablespoon, for poaching the bagels
In a large bowl, combine the flour with the yeast, sugar and salt, add the lukewarm water (you might not need all of it). Mix with your dough hooks for a few minutes. The dough shouldn’t be moist and sticky at all, more on the dry side. Continue kneading and punching with your hands until you have an elastic and soft dough ball. Grease the bowl lightly with vegetable oil and put the dough back in. Cover with a tea towel and let it rise in the warm oven (35°C / 95°F) for 60 minutes. This works really well but make sure that your oven is set to top/ bottom heat and not to fan.
Take the dough out, punch it down and knead for 1 minute. Divide the dough in half and each portion in 6 for 12 bagels. Roll each piece into a round ball between your hands and shape into a thick rope. Connect the ends to a ring, sealing and pinching well. Place on two baking sheets lined with parchment paper and greased with vegetable oil, cover with a tea towel and let the bagels rise for 30 minutes in a warm place.
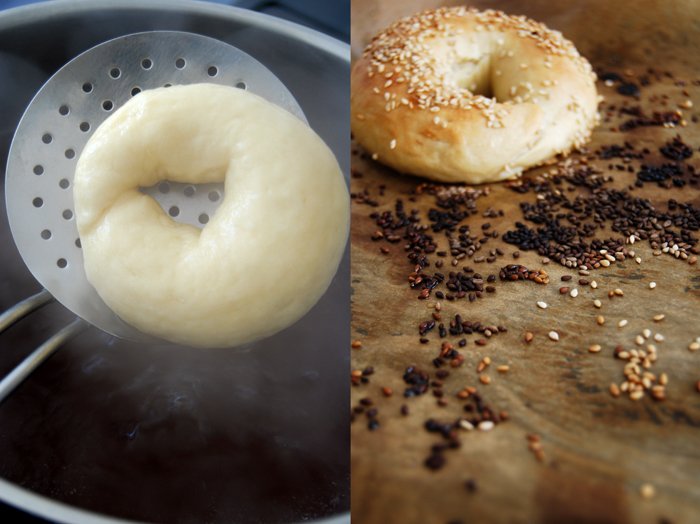
Set your oven to 260°C / 500°F top/ bottom heat. Fill a large pot with water and bring to a boil.
Add the syrup to the boiling water and poach the bagels for around 30 seconds on each side turning them with a spatula or a slotted ladle. I boil 3 bagels at a time, they should swim freely. Put them back on the baking sheets, sprinkle generously with sesame seeds and bake for 8 minutes until golden brown.


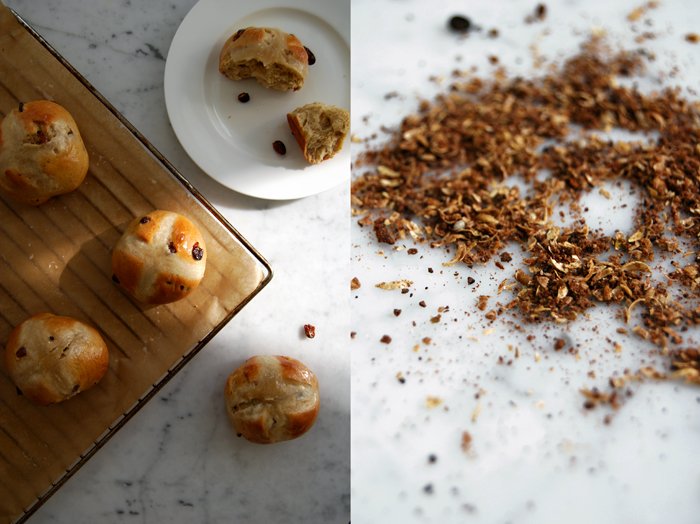
Spiced Hot Cross Buns with Orange Zest

My first Hot Cross Bun baking experience lies way back in the past and it wasn't very successful - one morning I managed to destroy two doughs in a row. The water I used was a bit too warm and knocked out the yeast. I was so desperate that I even baked the buns from the second batch of dough but it was hopeless. I could have used the buns as cannon balls, they were as hard as a rock and impossible to eat. I needed a few years to recover from this experience but now I'm totally at peace with them again.
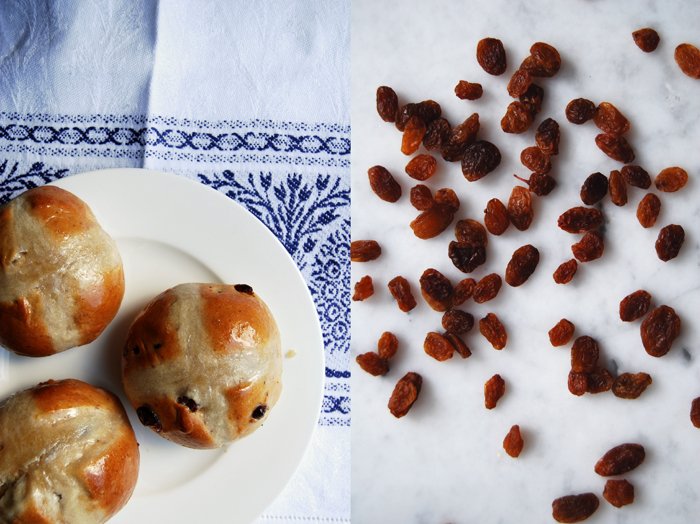
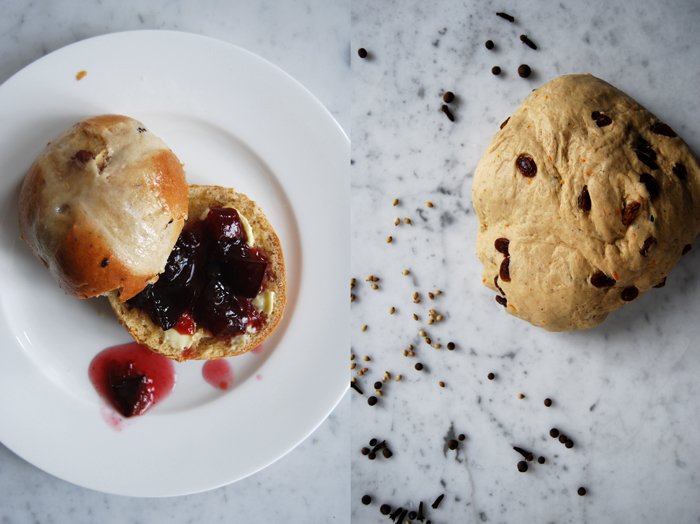
Hot Cross Buns are traditional Easter buns but to me they are a great treat for a big weekend breakfast or brunch all year round. They are made with lots of aromatic spices such as cinnamon, coriander, allspice, nutmeg, ginger and cloves and I also add lots of orange zest and raisins. Spices ground in a mortar unfold their entire range of aromas, I find them stronger and without the artificial touch which industrial mixtures tend to have. These buns are complex in their taste and the texture is nice and fluffy. I love to tear them with my fingers when they are freshly out of the oven and spread some butter on them, or my homemade plum jam with lots of cinnamon. I even ate one bun with liver paté, both sweet and aromatic, they make a perfect match.
Traditionally, Hot Cross Buns were eaten during Lent, always marked with a cross standing for the Crucifixion. Besides the religious connections there are further meanings passed on, sharing a bun with someone else is supposed to ensure friendships and each bite should bring good health.
Hot Cross Buns
For 10 buns you need
For the dough
plain flour 500g / 1 pound
dry yeast, 1 package (for 500g / 1 pound of flour)
sugar 60g / 2 ounces
salt 1 teaspoon
ground cinnamon 2 1/2 teaspoons
2 1/2 heaping teaspoons of ground mixed spice, or a spice mixture made of:
coriander, ground in a mortar, 1/2 teaspoon
allspice, ground in a mortar, 7
cloves, ground in a mortar, 5
nutmeg, grated, 1/4 teaspoon
fresh ginger, grated, 1 teaspoon
zest of 1 orange
butter, melted, 60g / 2 ounces
milk, lukewarm, 190ml
organic egg 1
raisins, soaked in warm water for 4 minutes, 100g / 3.5 ounces
For the cross paste
plain flour 4 tablespoons
milk 3-4 tablespoons
vegetable oil 2 teaspoons
For the glaze
milk 5 tablespoons
icing sugar 5 tablespoons
For the dough, combine the dry ingredients (including spices and orange zest). Mix the hot melted butter with the cold milk and the egg, this way the liquid mixture will have the right lukewarm temperature (check with a finger). Mix the dry and the liquid mixture with your dough hooks for 5 minutes until well combined. Continue kneading with your hands for a few minutes until you have an elastic dough ball. Mix the raisins into the dough and put it back into the bowl, cover with a tea towel. Let the dough rise in a 35°C / 95°F warm oven for 70 minutes. This works really well but make sure that your oven is set to top/ bottom heat and not to fan.
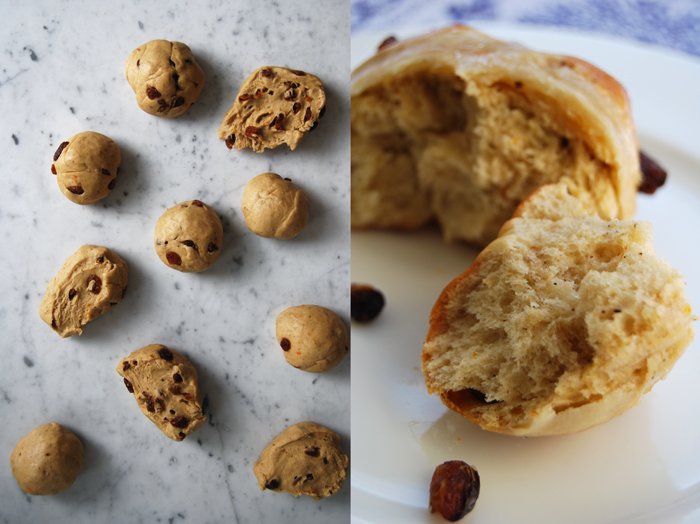
Take the dough out, punch it down and knead for 1 minute. Divide into 10 pieces and roll into balls. Put them on a baking sheet lined with parchment paper and let them rise for 30 minutes, covered with a tea towel, in a warm place.
Set your oven to 200°C / 390°F.
For the cross paste, mix the flour, milk and oil with a spoon. For the glaze, cook the icing sugar together with the milk in a sauce pan for 5 minutes on medium heat until bubbly and syrupy.
Cut a cross into the surface of each bun, wet your fingers and form slim rolls with the cross paste mixture. Lay the rolls into the crossed slits on top of each bun, wet your fingers in between. Bake the buns for 12 minutes or until golden brown. Glaze with the sweet syrup immediately. If the glaze is too thick, add a little water before you brush the tops of the buns.


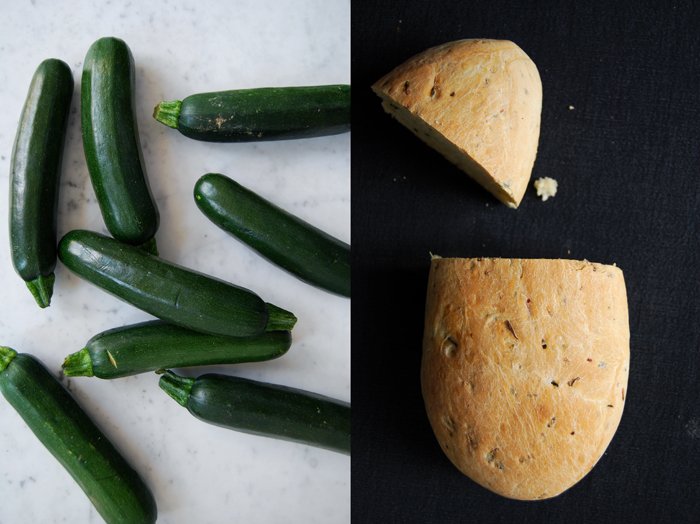
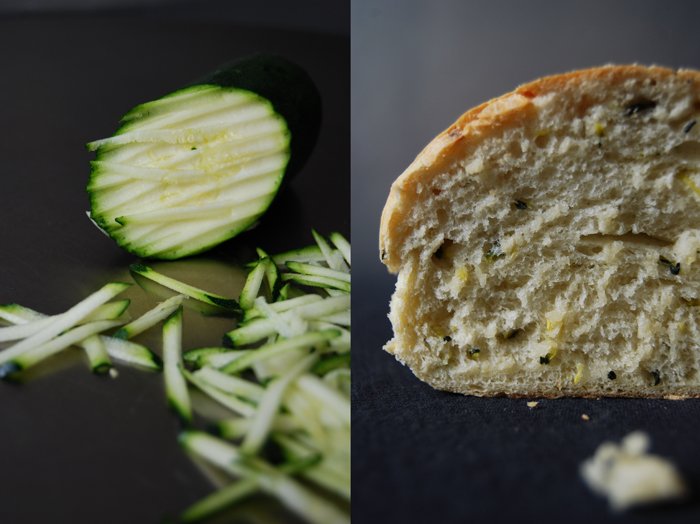
Savory Zucchini Bread
I've wanted to learn how to bake sourdough bread for years, the only problem is that I bake and love so many of my yeast bread recipes that, so far I've never approached this adventure. Dry or fresh yeast allows me to make a fresh and warm bread within a couple hours where as sourdough demands days of preparation. Most of the time, my baking isn't really planned far ahead, my mood decides what I will put in the oven. With the right ingredients a yeast bread is wonderfully juicy and spongy but I have to admit that it never creates a crust comparable to the more time-consuming alternative which also has the advantage that you can keep it for days. This is impossible with yeast bread, but to be honest that has never been an issue as all the fresh bread coming out of my kitchen doesn't survive for more than a day or two!
I know that one day sooner or later I will give the sourdough a try, but till then there is still a lot of bread to bake. One option, which is as juicy as my olive bread, is a loaf made with grated zucchini (courgette) which makes the texture so soft and spongy that it doesn't need more than some olive oil or butter spread on top. I served it with ramp (yes, again) butter when we had some friends over and I liked that a lot as well, it made it a bit garlicky.
It's really quick to bake, it only needs 20 minutes in the oven!
Savory Zuchini Bread
For 2 loaves of bread you need
plain flour 500g / 1 pound
dry yeast 1 package (for 500g / 1 pound of flour)
salt 1 heaping teaspoon plus 1/2 teaspoon for the zucchini
zucchini, grated 200g / 7 ounces
water, lukewarm, 225ml
olive oil for brushing
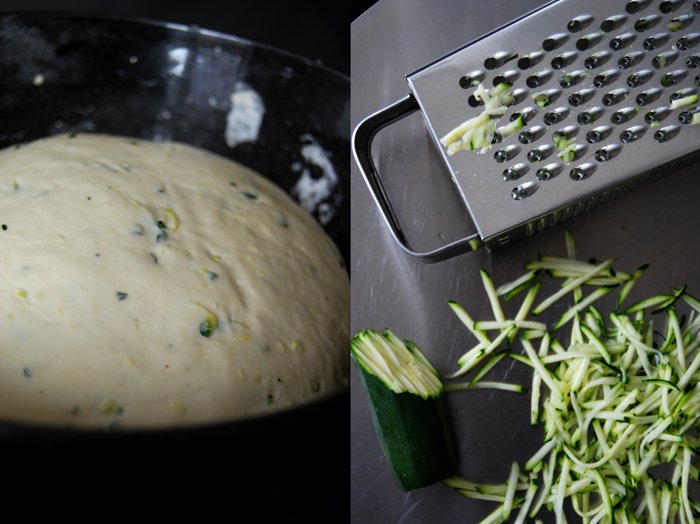
Put the grated zucchini in a sieve over a bowl, add 1/2 teaspoon of salt and mix with your fingers. Set aside for 15 minutes, rinse under cold water for a few seconds and squeeze the water out with your hands. Spread the zucchini on a tea towel and push another towel on top to dry. Scrape off the towel and set aside.
Combine the dry ingredients, add the zucchini and water and mix with your dough hooks for 5 minutes until well combined. Continue kneading with your hands for a few minutes until you have an elastic dough ball. Put the dough back into the bowl and cover with a tea towel. Let the dough rise in a 35°C / 95°F warm oven for 45 minutes. This works really well but make sure that your oven is set to top/ bottom heat and not to fan.
Take the dough out, punch it down and knead for 1 minute. Form 2 long loaves and put on a baking sheet lined with parchment paper. Cover with a tea towel and let them rise for 30 minutes in the warm oven.
Set your oven to 220°C / 430°F.
Brush the loaves with a thin layer of olive oil and bake for 18 minutes or until cooked through. If you’re not sure if it’s done turn the bread around and knock on its underside, it should sound hollow. Let it cool for a couple minutes before you enjoy the first slice of your freshly baked bread.


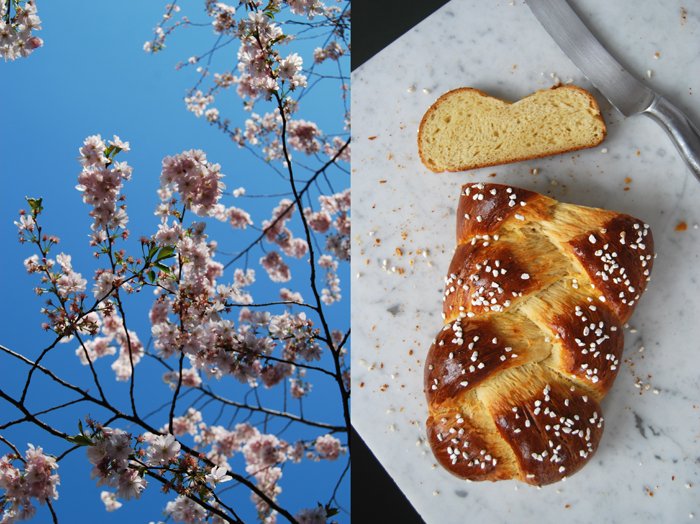
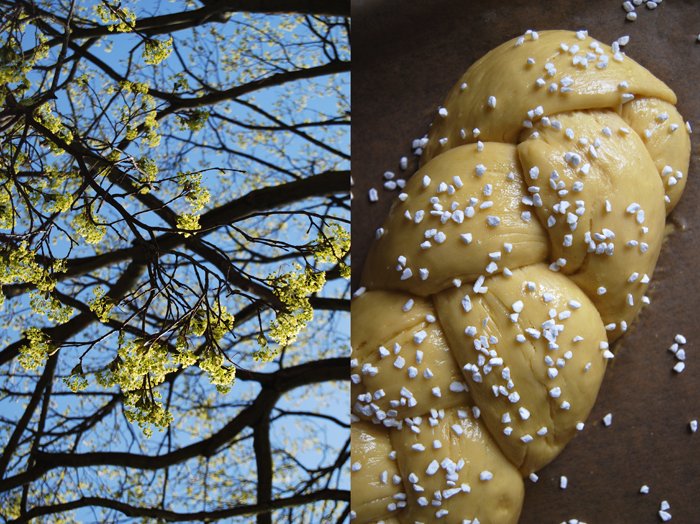
Challah - Sweet and Fluffy Braided Yeast Bread
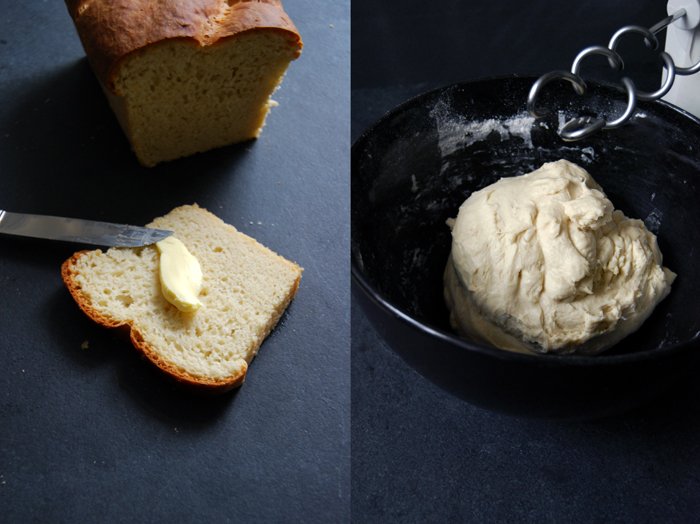
As passionate as I am about my dinner, I feel the same about breakfast which is quite late in my case. I always start the day with a cup of green tea with freshly squeezed lemon as I don't like to eat early in the morning but then after a couple hours my body needs some energy which I gladly deliver. Bread, fresh vegetables and fruit, my coffee of course, and some cheese. To me, it's all about bread, dark or white, buns, croissant, during the week it's a dense spelt loaf from my bakery most of the time but then on the weekend I love to bake my own bread. It's the most relaxing and delicious way to end the week!
Where I grew up, I used to buy a brioche like loaf of bread, fluffy and sweet, a bit dark on the outside, sometimes made with raisons, it's called Stuten or Blatz. It's baked square shaped and best when cut into thick slices, spread with butter or, one of my favourites, with liver pâté. I never managed to bake a Stuten as good as the one I bought from my hometown's bakery which unfortunately doesn't even exist anymore. I'm still working on it!
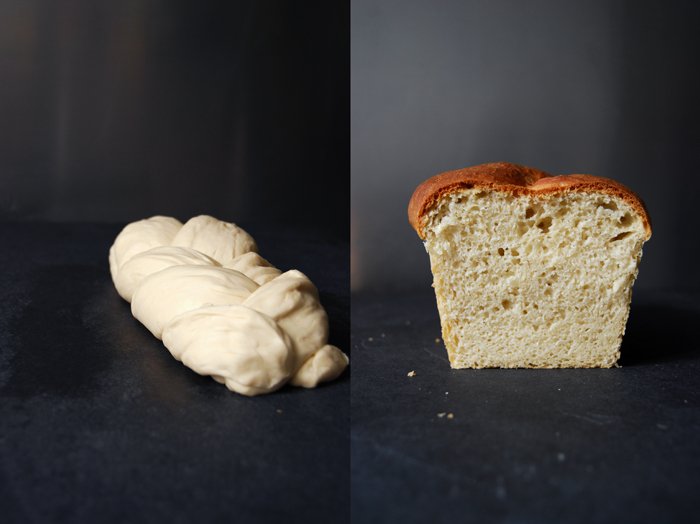
For now, I enjoy a similar bread, in a different shape and made with a slightly different dough. The wonderful Challah! The braided yeast bread is just as sweet and fluffy, I eat it either with butter or liver pâté, or with one of my homemade jams, like the blood orange or tangerine marmalade.
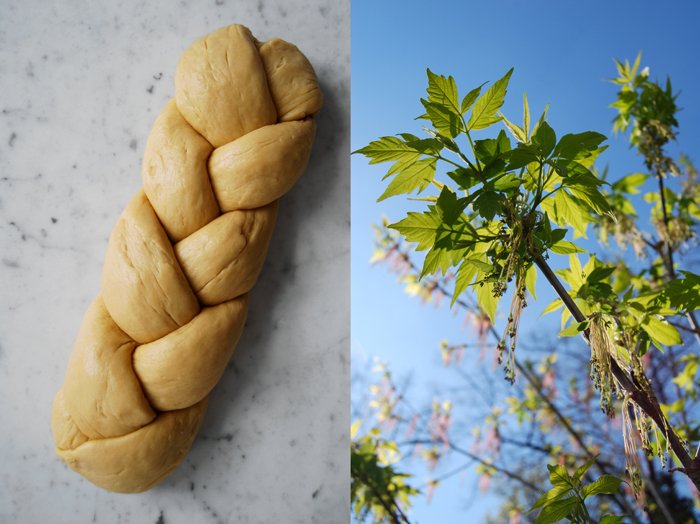
The trees and flowers around have been bursting in the past days, I had to catch these moments and share it as I enjoy this beauty as much as a fresh and warm loaf out of my oven!
Sweet and Braided Yeast Bread
For one braided loaf of bread you need
plain flour 500g / 1 pound
dry yeast 1 sachet (7g / 1/4 ounce)
granulated sugar 60g / 2 ounces
salt 1/2 teaspoon
butter, melted, 100g / 3.5 ounces
milk, lukewarm, 150ml
organic eggs 2
pearl sugar, for sprinkling
organic egg yolk 1, for the glaze
milk 1 tablespoon, for the glaze
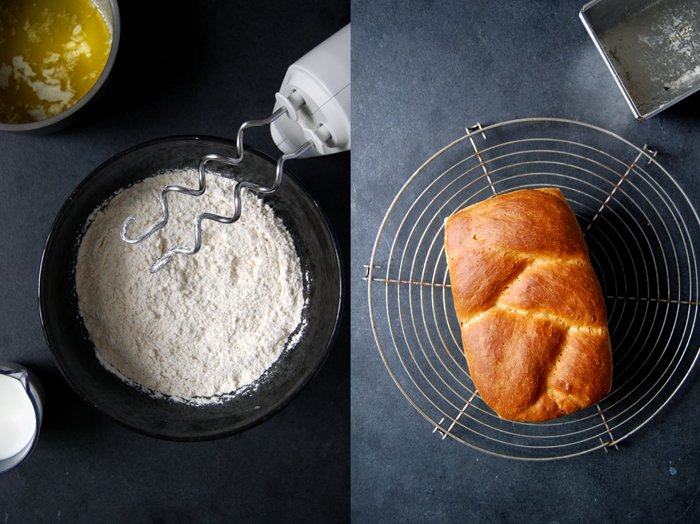
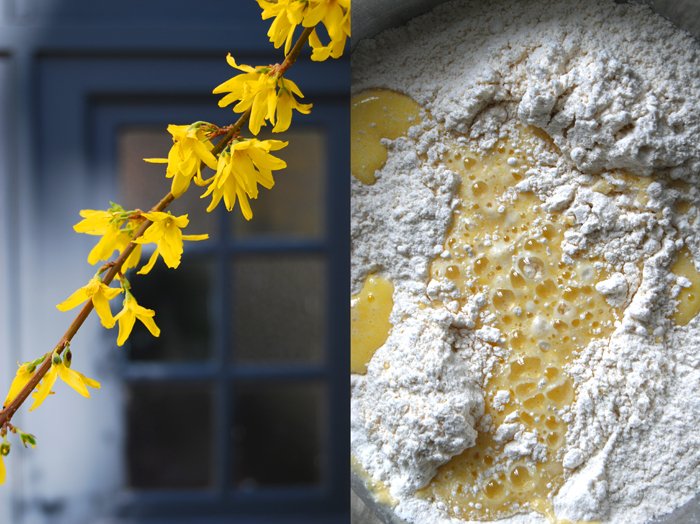
Combine the dry ingredients. Mix the hot melted butter with the cold milk and the 2 eggs, this way the liquid mixture will have the right lukewarm temperature (check with your finger). Mix the dry and the liquid mixture with your dough hooks for 5 minutes until well combined. Continue kneading with your hands for a few minutes until you have an elastic dough ball. Put the dough back into the bowl and cover with a tea towel. Let the dough rise in a 35°C / 95°F warm oven for 70 minutes (I tried it for 60 minutes but the last 10 minutes make a big change). This works really well but make sure that your oven is set to top/ bottom heat and not to fan.
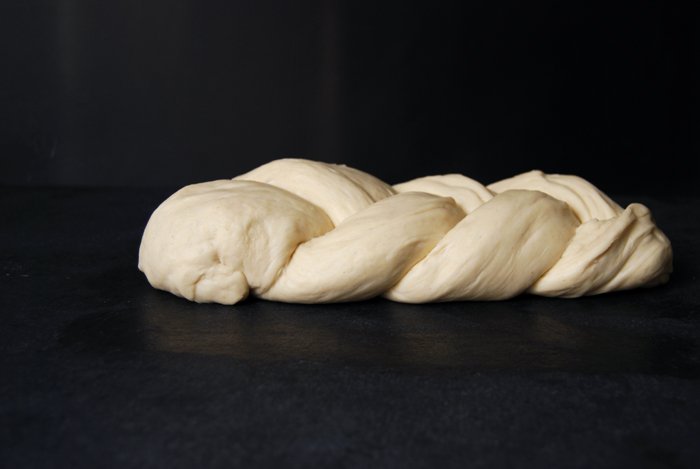
Take the dough out, punch it down and knead for 1 minute. Divide it into 3 pieces and roll them into long sausage shapes. Lay the ends of the rolls on top of each and start to braid them tightly. Bend both ends under the loaf and put on a baking sheet lined with parchment paper. Let it rise for 30 minutes, covered with a tea towel, in the warm oven.
Set your oven to 200°C / 390°F (top / bottom heat).
Whisk the egg yolk and milk for the glaze, brush the bread, sprinkle with pearl sugar and bake in the oven for 10 minutes before you turn it down to 180°C / 355°F and bake for another 15 minutes until golden brown.


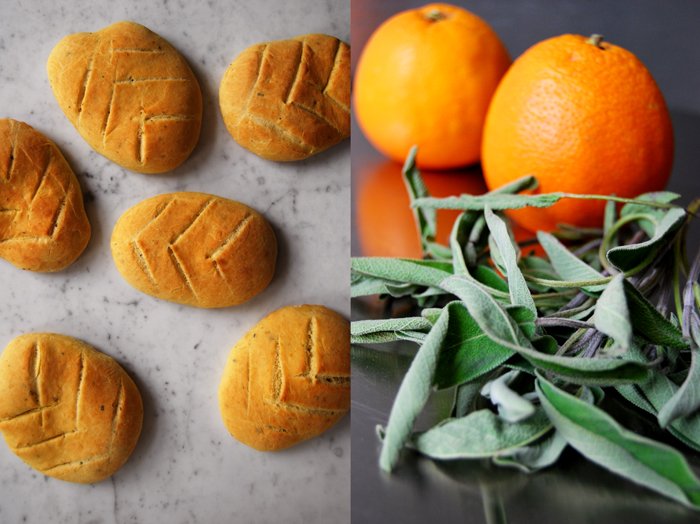
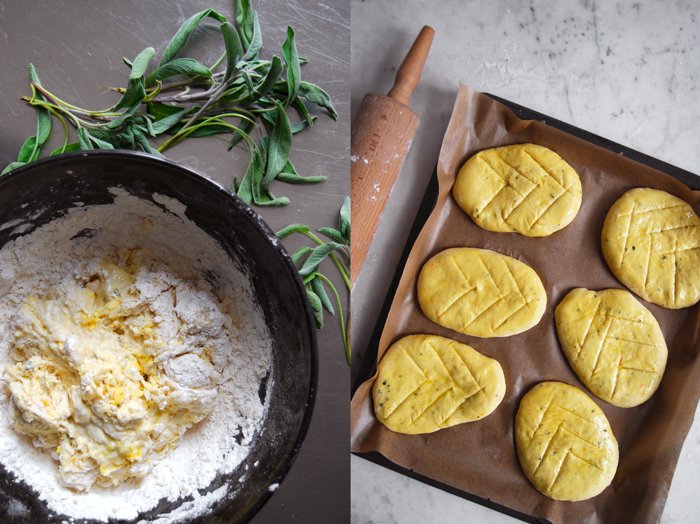
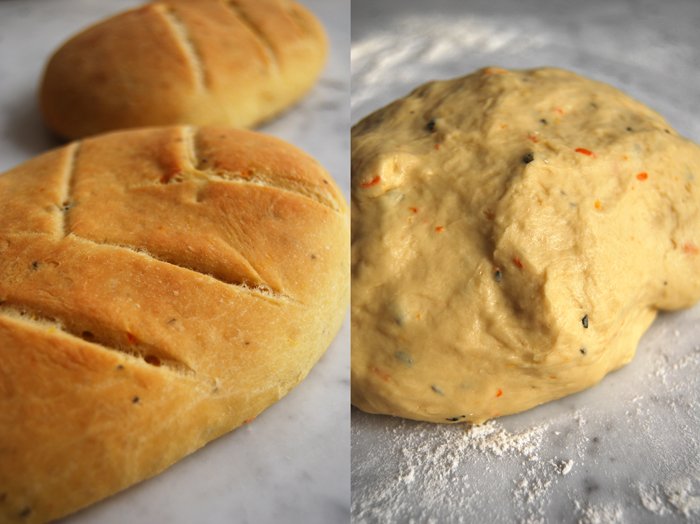
Fougasse Bread with Orange, Sage and Olive Oil
It's time to bake bread again! I use a recipe which involves sage and my beloved blood oranges, they'll be out of season soon, so I'm using every possible occasion that allows me to cook or bake with my sweet citrus fruits. I mix generous amounts of their zest and juice into the dough and the result is impressive!
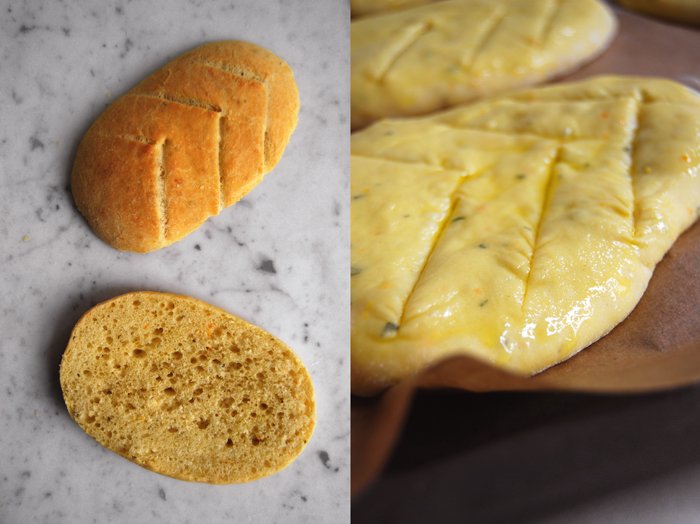
My bread is a light and aromatic Fougasse, a French flatbread very popular in Provence where it's often made with olives, herbs and cheese. It's similar to the Italian Focaccia but with a leaf pattern of cuts in the dough. In some recipes, the cut goes all the way through creating holes in the bread while it's baking which makes the bread harder. I prefer to leave mine juicy with shallow cuts on the surface. Besides the orange and sage I add good olive oil in and on the bread. I use the wonderful extra virgin olive oil from the Molise region which I got from Marilena. Its strong and fruity taste is just what my Mediterranean flatbread needs!
I already have a great idea for a sandwich I can make with this bread for tomorrow's Sandwich Wednesday!
Fougasse with Orange, Sage and Olive Oil
For 6 flatbreads you need
plain flour 400g / 14 ounces (I use spelt flour type 630 but you can use any other plain flour)
dry yeast 1 package (for 500g / 1 pound flour)
salt 1 teaspoon
fresh sage, chopped, 8-10 leaves
zest of 1 medium sized orange
freshly squeezed blood orange or orange juice 100ml
water, lukewarm, 100ml
olive oil 5 tablespoons plus more for brushing the bread
organic egg 1
Combine the flour, yeast, salt, orange zest and sage in a large bowl. Add the water, orange juice and egg and mix with your dough hooks for 5 minutes. On a floured surface, continue kneading with your hands for a few minutes until you have an elastic dough ball. Put the dough back into the bowl and cover with a tea towel. Let the dough rise in a 35°C / 95°F warm oven for 45 minutes. This works really well but make sure that your oven is set to top/ bottom heat and not to fan.
Take the dough out and punch it down. Divide it into 6 pieces and roll them out into egg shaped discs (on a floured working surface, around 1 1/2 cm / 1/2″ thick). Put them on a baking sheet lined with parchment paper, cover with a tea towel and let them rise for 20 minutes.
Set your oven to 210°C / 410°F.
Brush the flatbread with olive oil and cut a pattern of 6-8 diagonal slashes into the dough to make a leaf pattern. Bake the flatbread on the lowest level for 12-15 minutes or until golden brown. Take them out and let them cool for 2 minutes.
I cut the warm flatbread in half and drizzled some more olive oil over it, it merged perfectly with the orange and sage aromas!

French Toast with Maple Syrup for a cosy breakfast in bed
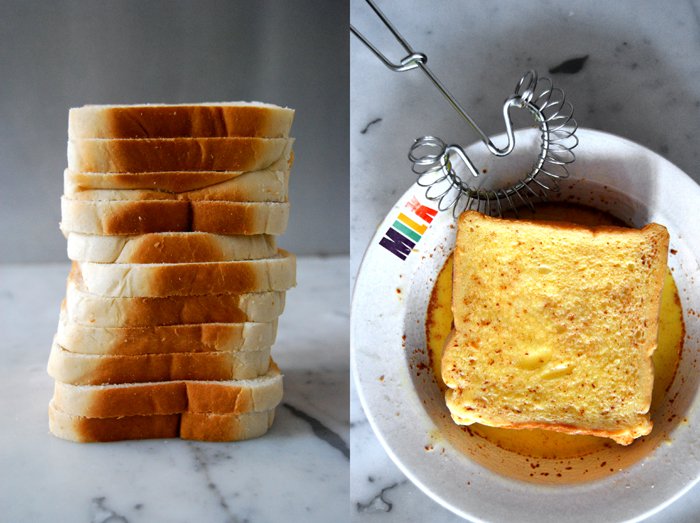
French toast is the perfect breakfast for a cosy day in bed, with books and magazines, daydreaming and chatting, with nothing important on my mind and no decisions to be made. While pancakes are an equally satisfying morning treat, they take a bit more time so I gladly make my french toast on a day like this. It requires just a few minutes out of bed for preparation before I can snuggle back into the cushions with a plate full of sweet cinnamon toast covered in maple syrup.
I like my french toast soft and juicy on the inside, soaked in lots of cinnamony milk with eggs, and with a buttery crust on the outside. For 4 slices of white bread I mix 2 large eggs with 1/3 to 1/2 cup of milk (depending on the size of the eggs), the mixture should be quite liquid. I whisk in a pinch of salt and 1/8 teaspoon of ground cinnamon, then I let the bread soak in this mixture, turning it once or twice, repeating with the other slices until most of the liquid is absorbed. Now they just need to fry in 3 tablespoons of butter in a large pan on medium heat until golden brown before you can sprinkle them with more cinnamon and pour over some maple syrup.

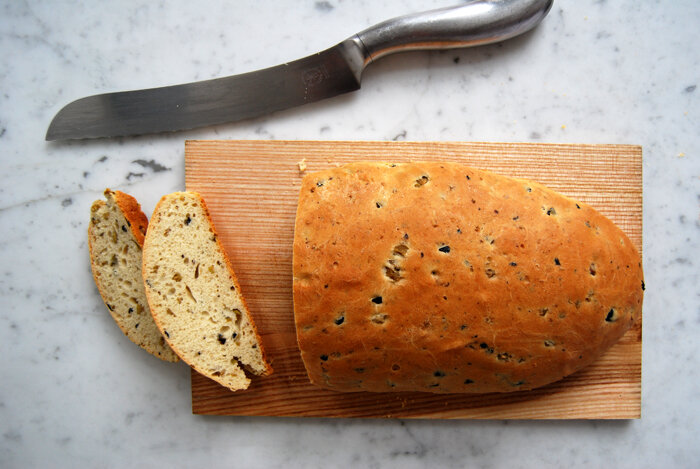
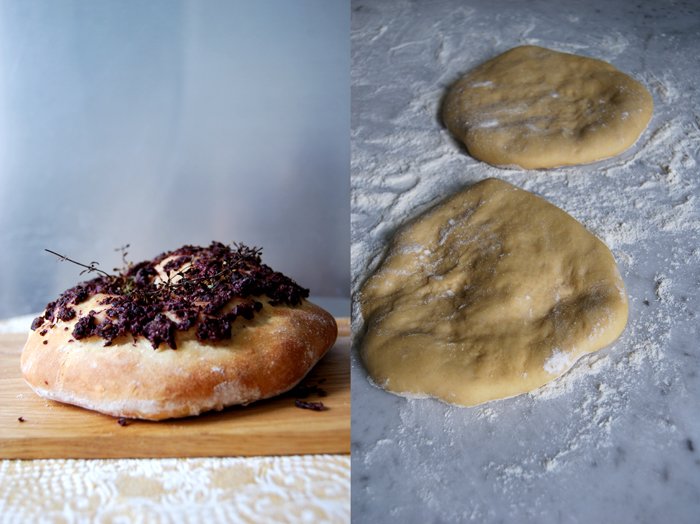
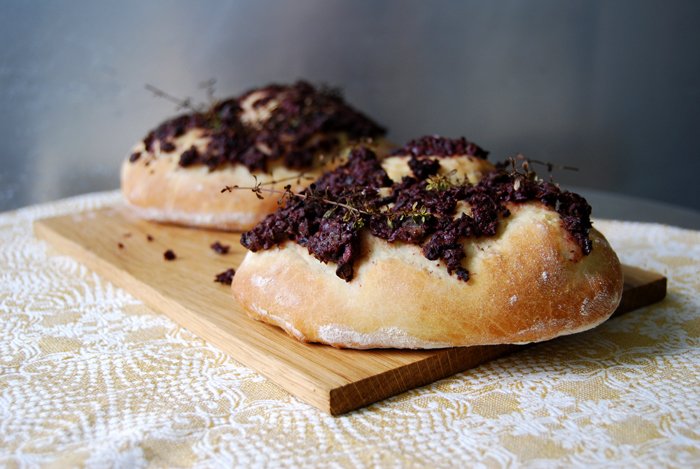
Luscious Bread with Black and Green Olives

Baking bread is a very relaxing and satisfying ritual. You mix the dough and watch it rise slowly, then you shape it and bake it in the hot oven where it doubles in size again. It's such a simple yet wonderful food, one of my favourites! Nothing beats a slice of fresh warm bread spread with butter or sprinkled with olive oil. So many people from different cultures celebrate this ritual, with similar recipes even though they live on opposite sides of the world. It's one of our traditions that connects us and shows how much we have in common.
I have a good friend who lives in Sydney and whenever he comes to Berlin we all meet at our's together with a few of our friends. Sometimes it's a big dinner, sometimes we just have some wine and snacks. The only problem is that he never tells me in advance, it's a very spontaneous thing, he's just here at one point. Followed by another 10 - 15 people. This calls for some improvisation tricks in the kitchen, we just have to eat what my fridge offers!
Around two years ago he called to announce his arrival and I was lucky to have a few pumpkins in my kitchen, so a soup for 10 was quickly thrown together. For whatever reason I had lots of black olives as well. I like to have more than enough good bread on my table when it's a long night so I decided to bake 2 loaves of olive bread with lots of olives and olive oil, juicy enough to nibble on after finishing the soup. The texture is light but you taste and feel the olives and the olive oil, it makes the bread really smooth. Everybody loved it and couldn't stop eating it. This was a feast to me, it always is, sitting together with friends at my long wooden table, talking, laughing and enjoying some red wine and nice bread.
Tomorrow it's my Sandwich Wednesday again and I will make a special sandwich with this bread which is very popular in the Middle East!
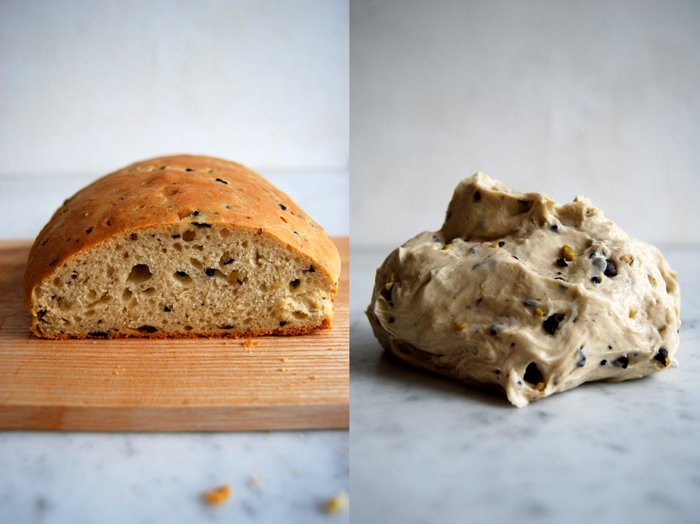
A Juicy Bread with Black and Green Olives
For 1 loaf of bread you need
plain flour 250g / 9 ounces (I use spelt flour type 630 but you can use any other plain flour)
dry yeast 1 tablespoon
salt 1/2 teaspoon
a pinch of sugar
water, lukewarm, 70ml
milk, lukewarm, 70ml
butter 1 tablespoon
olive oil 2 tablespoons
black and green olives, chopped, 60g / 2 ounces
Combine the dry ingredients and add the water, milk, butter and olive oil. Mix with your dough hooks till everything is combined. Add the olives and continue mixing for a few minutes. Continue kneading and punching with your hands until you have an elastic dough ball, it will be a little sticky but that's fine. Put the dough back into the bowl and cover with a tea towel.
Option1:When I prepare the dough the day before I bake it, I put the bowl with the dough in the fridge (covered with cling film) and let it rise overnight. You will have to take it out of the fridge 30-60 minutes before you can continue with the next steps.
Option 2:In case I want to bake my bread the same day, I let the dough rise in a 35°C / 95°F warm oven for 45 minutes. This works really well but make sure that your oven is set to top / bottom heat and not to fan.
When the dough has doubled in size, take it out, punch it down and knead with your hands for 2 minutes. Form the dough in a long loaf shape and put it on an oiled baking sheet. Cover with a tea towel and let it rise for another 25 - 35 minutes in a warm place.
Set your oven to 200°C / 390°F top / bottom heat.
Bake the bread for 30 minutes or until cooked through. If you're not sure if it's done turn the bread around and knock on its underside, it should sound hollow. Let it cool for 5 - 10 minutes, cut a thick slice off it and drizzle some olive oil on top, just a bit, and sprinkle with salt.
