Chocolate Spice Christmas Cookies with Candied Lemon Peel
I used to have a huge spice box in my kitchen that didn't look very pretty and also wasn't particularly practical. For whatever reason, I decided in my early kitchen years to store all my spice filled glass jars and tiny metal tins in this box and that's where I kept them for two decades. This beaten and buckled box still exists, I just use it for potatoes at the moment (even a box has to stay flexible in life). I used to arrange my spices in two layers of jars, so when I needed juniper berries from the bottom, I would always have to empty the whole thing. Rather impractical.
Around two years ago, I renovated my kitchen, I changed the sink and cupboards on one side of the room. When everything was set up, I had a skype call with my Maltese mama Jenny to proudly present my work to her. Not that she's particularly experienced in kitchen renovation, it's rather the opposite, she still works in her gorgeous sea-blue kitchen gem from the 60s. I don't remember why, but we started discussing the spice-situation in my kitchen. There's a slim cupboard with two sliding drawers next to my sink, so when we had our video chat, we both looked at this drawer and decided that it should become my spice cupboard. I arranged everything that same day and since then I'm more than happy to have such a luxurious overview of my spice collection.
The spices I use the most, right at the front when you open the door, are Maltese fennel and coriander seeds, the whole range of peppercorns in black, green, white, and pink, cinnamon, and cardamom. Jars of cumin, cloves, aniseed, allspice, juniper berries, and mustard seeds are right behind. Then there's the hot section, with cayenne and urfa chilli, plus sumac and a few spice mixtures. I love this cupboard, it's a bit chaotic, and it's still a colourful collection of various jars and containers, but it smells beautiful.
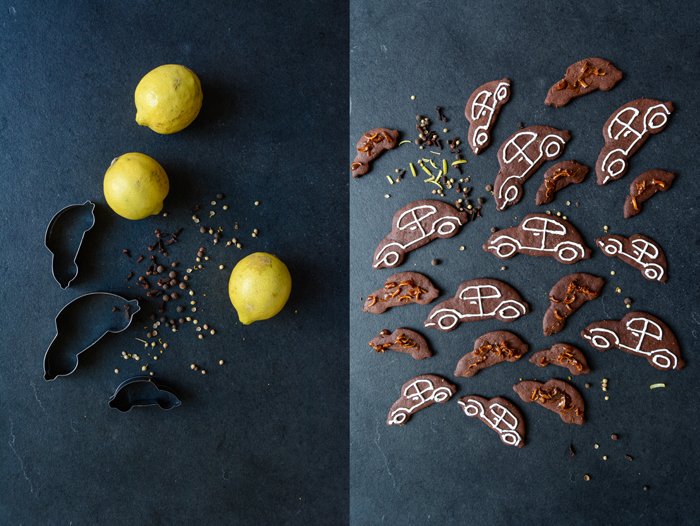
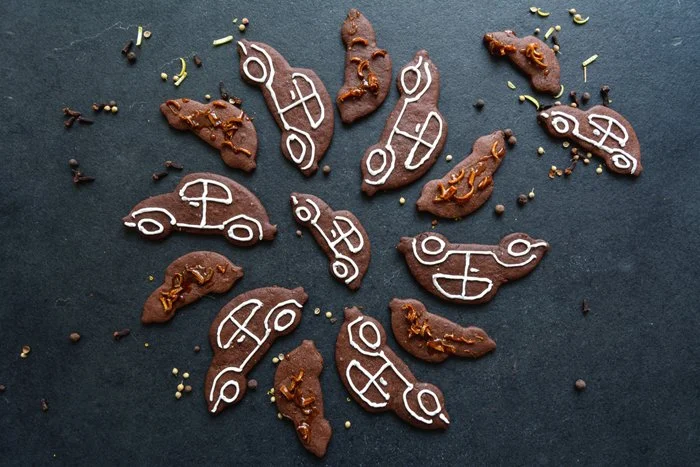
Although I generally prefer a certain order in my kitchen, there are zones and tools in this room that seem to follow their own rules. Cookie cutters, for example, tend to end up in places where I don't even know how they got there. I bought a large metal ring at one point to get my growing collection under control. Every year I buy a couple new ones to add to the classics, to stars, angels, and Santa. I tend to have annual favourites. Squirrel, sausage dog, and deer were popular for a long time, which might speak for my love of cute animals. My collection of three beetles is relatively new, maybe I need a car? Who knows. But apart from giving my cookies a cute look, a cutter should be practical. For example, I barely use the deer anymore because the cookies tend to lose their antlers in the oven, so it looks rather sad. My beetles however are very cooperative, roundish, no narrow parts, and they are even big enough to get a proper royal icing decoration.
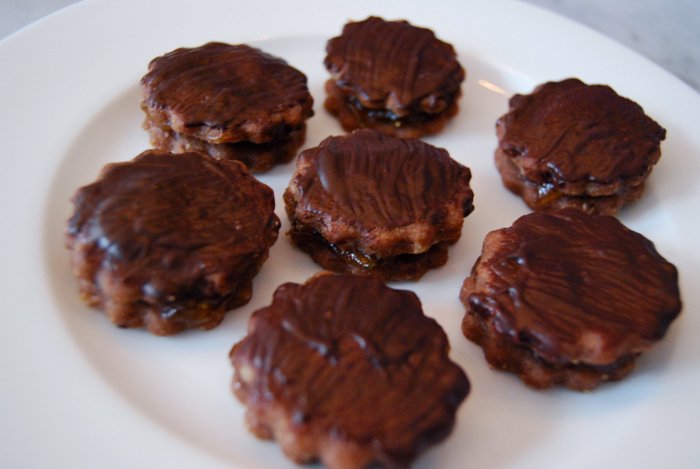
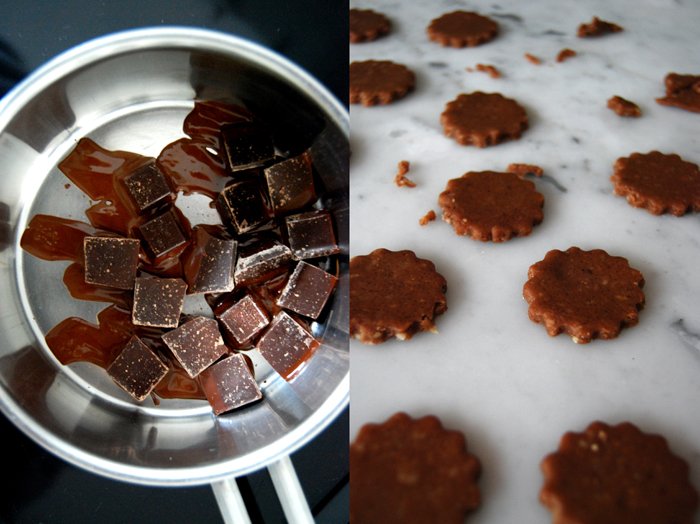
I must admit that decorating sweets is not one of my best talents. But I thought it would be nice to bake some cookies at this time of year that you can decorate - especially if there are kids around the baking table. And if you're as lazy as I am and you have a soft spot for citrus, I have a great alternative for you. Decorate half the batch of these delicious chocolate spice cookies with royal icing (I recommend you trust the pros and buy the mixture from a baking shop) and make your children happy. For the other half, caramelize lemon peel until sweet and crunchy, sprinkle this sticky golden mixture over the remaining cookies and make yourself happy. These are the adult cookies. They aren't as pretty as the cute hand decorated ones, but the combination of dark chocolate, cinnamon, cloves, coriander, aniseed, and candied lemon peel makes up for it. They taste so unbelievably good that you won't even mind the looks.
For more delicious recipes and kitchen inspiration, visit Volkswagen's Pinterest community board Food Bloggers for Volkswagen.

Chocolate Spice Christmas Cookies with Candied Lemon Peel
Makes about 50 cookies
For the cookies
plain flour 260g / 2 cups
unsweetened cocoa powder 50g / 1/2 cup
baking powder 1/4 teaspoon
freshly grated lemon zest 1 tablespoon (from 1 large lemon)
ground cinnamon, 1 teaspoon
cloves, ground in a mortar, 10 (about 1/2 teaspoon ground cloves)
coriander seeds, ground in a mortar, 2 teaspoons
aniseed, ground in a mortar, 1/2 teaspoon
allspice berries, ground in a mortar, 4
fine sea salt 1/8 teaspoon
butter, at room temperature, 130g / 1/2 cup plus 1 teaspoon
icing sugar 120g / 1 1/4 cups
organic egg 1
For the decoration
(if decorating half the cookies with royal icing and the other half with candied lemon peel)
royal icing mixture, whisked with a little water, about 60g / 2ounces
granulated sugar 50g / 1/4 cup
water 2 tablespoons
very thin strips of fresh lemon peel, 1 small handful
In a large bowl, combine flour, cocoa powder, baking powder, lemon zest, cinnamon, cloves, coriander, aniseed, allspice, and salt.
In the bowl of a stand mixer, fitted with the paddle attachment, beat the butter and icing sugar until fluffy. Add the egg and mix for about 1 minute or until well combined. Replace the paddle attachment with the dough hook, add the flour-spice mixture to the bowl with the butter, and mix until well combined. Form a thick disc, wrap in cling film and put in the freezer for about 20 minutes.
Preheat the oven to 160°C (325°F) and line 3 baking sheets with parchment paper.
In batches, roll the dough out thinly (about 3mm / 1/8" thick) between cling film and cut out cookies in whatever shape you like. Keep the remaining dough in the fridge while cutting the cookies. Arrange the cookies on the lined baking sheets and bake, one baking sheet at a time, for about 6 minutes or until golden. Let them cool for a few minutes before you transfer them to a cooling rack.
For the royal icing, whisk the royal icing mixture with a little water (following the instructions on the package) and, using a piping bag with the smallest attachment you can find, decorate half the cookies.
For the candied peel, in a small saucepan, bring the sugar and water to the boil. When it starts to caramelize add the lemon peel. Lower the heat to medium and cook for about 3 to 4 minutes or until the peel is golden and soft—mind that it doesn't burn. While the caramel is still liquid (you can leave the saucepan on lowest heat), quickly sprinkle the remaining cookies with the candied lemon peel.
Happy baking!


A Christmas treat - the famous German Chocolate Baumkuchen
A few days ago, I walked through a little park that's close to my apartment. It's a very quite place, you don't see many people there. I like to go on my own when I need a break from the world, to feel some fresh air on my skin and think clearly again. That afternoon the air was crisp, the last golden leaves fell off the trees, and a trio of squirrels was busy collecting their nuts. I felt a bit chilly and as I pulled my scarf closer to my neck, I noticed a change, I could smell winter.
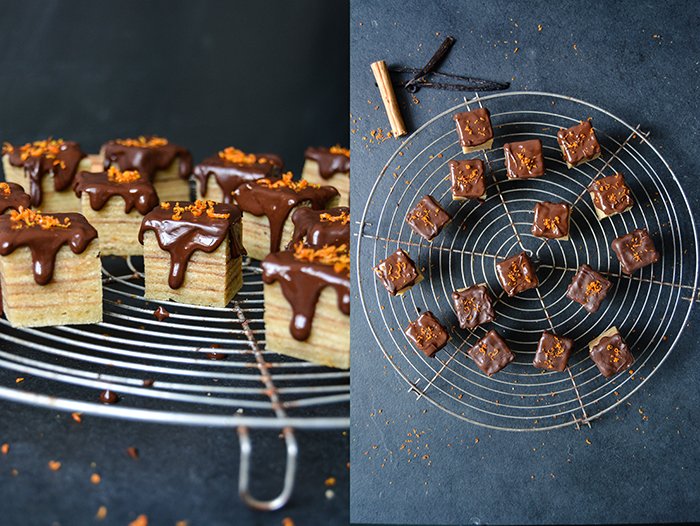
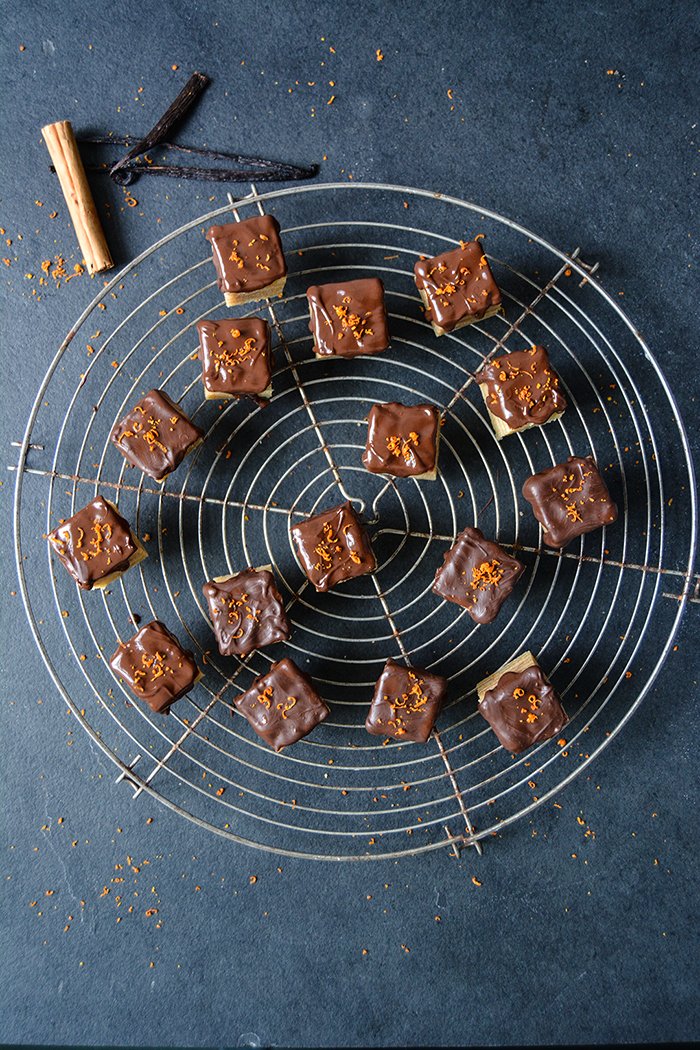
Winter brings many changes, I could sleep more, eat more, and bake more. Baking always plays an important role in my life, especially on the weekends, but during the Christmas season I become excessive. There are so many recipes on my list, my classics, but then I also want to try out new creations. The fabulous Baumkuchen has been on my mind since summer, I love this traditional German Christmas cake that's usually baked on a spit. The name means tree cake, referring to the fact that it looks like the growth rings of a tree. This cake takes time and it's a bit of work to prepare. First you bake a thin layer of batter for just a few minutes, then you brush on the next layer and continue until you end up with up to 20 layers (mine has 12, that's more than enough). It's a hit at Germany's Christmas markets where you can see it being baked on rotating spits, close to a grill (broiler) or wood fire.
Baumkuchen has always been one of my Christmas favorites, especially to sweeten my teatime in December's dark and cold afternoons. I usually buy the cake from the store, but then I had an idea. It was in summer. I don't remember why I gave it a thought in the heat of July (I guess I felt some Christmas longings), but never mind. It dawned on me that I don't need a spit and wood fire to enjoy this treat, that I could also bake it in a normal cake pan under the grill (broiler) of my oven. Cut into squares, it almost counts as Christmas cookies, but if you prefer, you can cover the whole Christmas beauty in chocolate and serve it as a cake.
My Baumkuchen is moist, refined with cinnamon and orange, with a strong taste of marzipan. If you have a free afternoon, get cozy next to your oven and bake a tree cake. I wish you a peaceful 1st advent!
For more recipes for Christmas baking, click here!


Chocolate Baumkuchen
Makes about 20 Baumkuchen squares
plain flour 60g / 1/2 cup
cornstarch 30g / 1/4 cup
organic eggs, divided, 6
fine sea salt 1/8 teaspoon
marzipan / almond paste, crumbled, 120g / 4 ounces
unsalted butter, soft, 200g / 3/4 cup plus 1 tablespoon
brandy 2 tablespoons
granulated sugar 200g / 1 cup
vanilla bean, split and scraped, 1
ground cinnamon 1/4 teaspoon
freshly grated orange zest 1 teaspoon
For the topping
bittersweet chocolate 100g / 3 1/2 ounces
butter 1 teaspoon
orange zest (optional)
Turn on the grill (broiler) of your oven or preheat to 220°C / 425°F (this only works if you can set the heat to come just from the top). Butter and line the bottom and sides of a 20cm / 8" springform pan or a tall 15 x 20cm / 6 x 8" cake pan with parchment paper.
Sieve together the flour and cornstarch.
Beat the egg whites and salt until stiff.
In a large bowl of a stand mixer, using the paddle attachment, beat the marzipan, butter, and brandy until creamy. Add the sugar, vanilla seeds, cinnamon, orange zest, and egg yolks and continue mixing for about 3 minutes or until fluffy. Add the flour mixture and, using a wooden spoon, stir until well combined. Gently fold the egg white into the flour-butter mixture until combined.
Add about 3 generous tablespoons of the batter to the lined springform pan, it should only be a thin layer to cover the bottom. Using a wide spatula, spread the batter evenly. Place the springfrom pan in the top third of the oven and bake for about 3-4 minutes or until golden/ light brown, but not dark. Watch well and mind that the batter can burn within seconds. Take the pan out of the oven, add 3 tablespoons of the batter on top of the first baked layer of cake, spread well, and bake for 3-4 minutes or until golden / light brown. Continue the same way until you have used all the batter, you should end up with about 12 layers. Let the cake cool in the pan for 10 minutes, take it out of the pan, and let it cool completely. Once cool, cut the cake into little squares.
In a small saucepan, heat the chocolate and butter over low heat or in a bain marie. Let it cool for a few minutes before you decorate the cake.
Drizzle the Baumkuchen squares with the chocolate and decorate with a little orange zest.


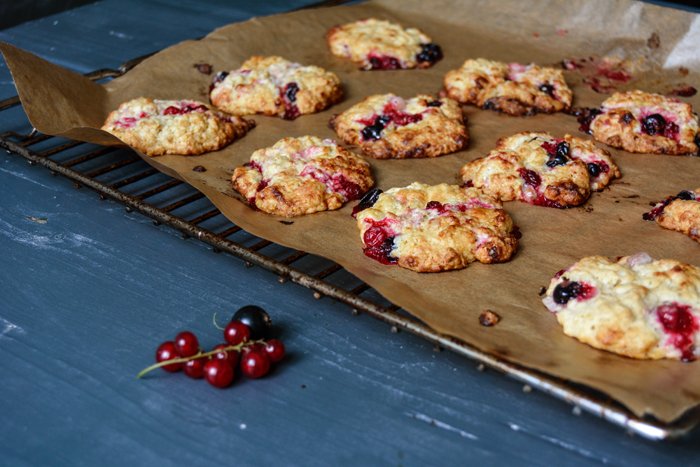
Black, White, and Red Currant Cookies with White Chocolate

This is my annual currant cookie recipe. It's quite a young tradition, I only started it last year, when I introduced a cakey cookie made with red currants, oats, mashed banana, and a strong hint of vanilla to the blog. It was a sweet hit. But 2016 is the year of colours - black, white, and red currants add vivid flavour and beauty to my new creation. It's still not crunchy, the fresh fruit is just too juicy, but it's less soft and spongy than last year's treat. I left out the banana and replaced it with chopped white chocolate, which brought in a different kind of sweetness, with a slightly milky touch.
The problem with cookies is that I always think I'll make a large batch and keep them in a glass jar to present them in all their prettiness and grab one to go along with my cup of tea or espresso whenever I feel like. However, reality is different. They barely last for two days. It's surprising how quick 24 cookies can vanish with only 2 people in the house - I'm impressed!

Black, White, and Red Currant Cookies with White Chocolate
Makes about 24 cookies
plain flour 130g / 1 cup
rolled oats 90g / 1 cup
salt 1/2 teaspoon
baking powder 1/2 teaspoon
baking soda 1/4 teaspoon
butter, at room temperature, 110g / 1/2 cup
granulated sugar 130g / 2/3 cup
vanilla bean, split and scraped, 1/4
organic egg 1white chocolate, roughly chopped, 100g / 3 1/2 ounces
mixed fresh currants (black, white, and red), preferably frozen for at least 2 hours, 140g / 5 ounces
It's easier to stir the currants into the dough when the fruits have been frozen, it looks prettier and less messy.
Preheat the oven to 180°C / 350°F (preferably convection setting). Line 2 baking sheets with parchment paper.
In a large bowl, combine the flour, oats, salt, baking powder and baking soda.
Add the butter, sugar, and vanilla seeds to the bowl of a stand mixer fitted with the paddle attachment and beat for a few minutes until light and fluffy. Add the egg and beat for about 1 minute or until well combined. Using a wooden spoon, stir in the flour mixture and mix until you have a lumpy dough (with a bit of flour left here and there). Fold in the white chocolate, then quickly, but gently the black, white, and red currants. Try not to damage the berries too much, you want their juices to stay inside their skins.
For each cookie, drop a generous tablespoon of dough onto the lined baking sheets, don't push the dough down and leave enough space between the cookies. Bake, 1 sheet at a time, for about 13 minutes or until golden brown, the cookies will be quite soft. Take them out and let them cool on the tray for a few minutes before you transfer them to a wire rack.


Essijiet - Maltese Tea Time Cookies with a shot of Vermouth
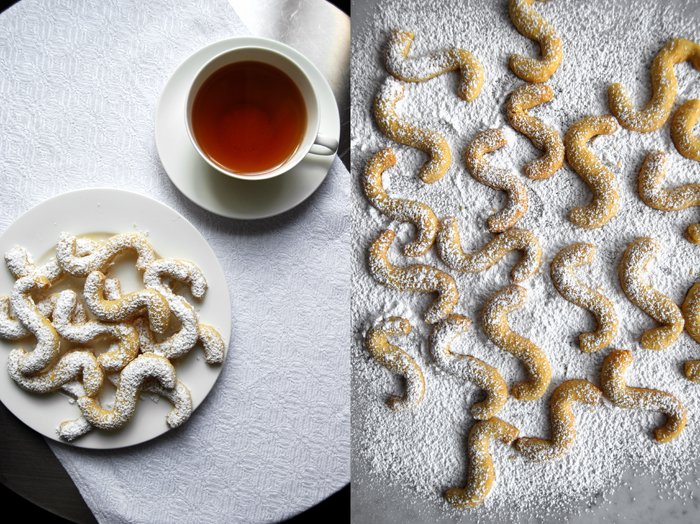
When I'm on the phone or video chat with our family in Malta, you can be sure it will go on for hours, it will involve many people, coming and going, lots of laughing and very often the exchange of recipes. Especially when I talk to Granny Edith who has been cooking and baking all her life, so you can imagine her large recipe collection, influenced by her mother, grandmother and all the close relatives and friends which are quite numerous in a Maltese family. I found so many traditional dishes in her collection, true treasures! Like everybody else in the family, I love to sit with Edith at her kitchen table in her beautiful old villa in Msida at the sea, talking about life, cooking, men, fashion, the offers at the vegetable man and the butcher, normal daily life, it feels so easy on this island! We enjoy a cup of tea, some sweets from our local confectionary (which is the best in Malta in our opinion) and appreciate every second!
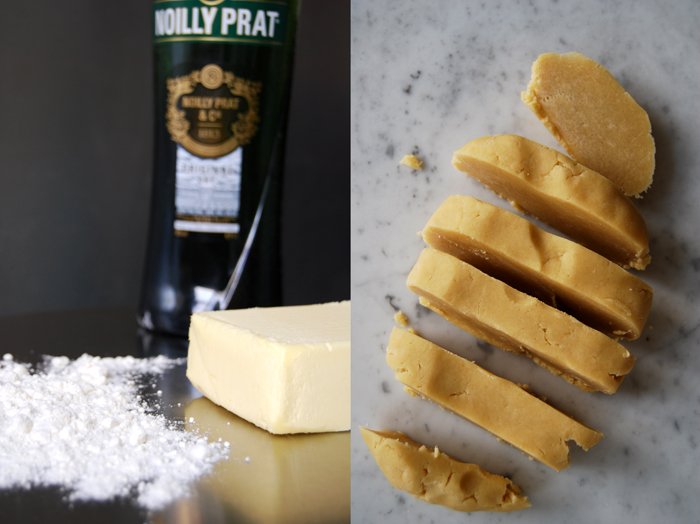
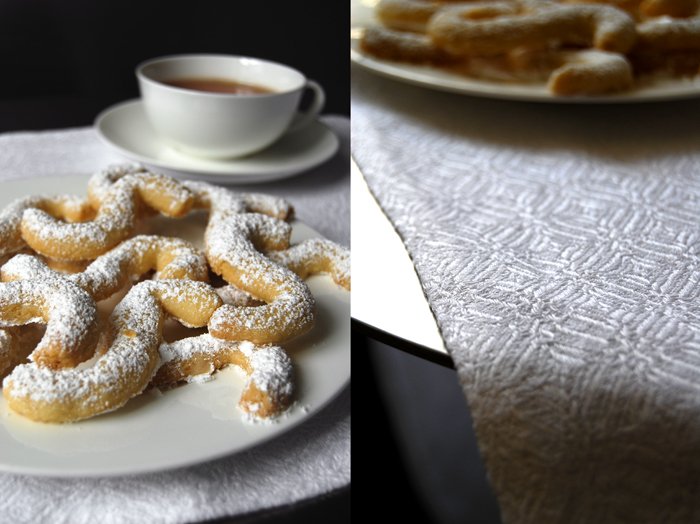
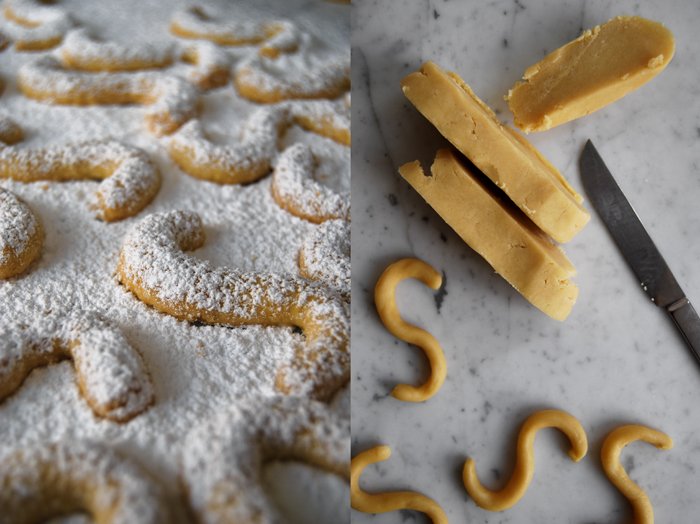
Recently I've been talking to her about baking and she handed some recipes over to me which caught my attention. One is a traditional tea time cookie recipe from her mother-in-law Maria, she used to make them for the family, Edith continued the tradition and now she passes it on to the next generations. It's a very easy cookie recipe, made with so little ingredients that I thought I had left some out when I started preparing the dough. It's just butter, flour, baking powder, salt, sugar and a shot of vermouth making a delicious cookie, fine in taste, buttery and crumbly. I couldn't have asked for more for tea time! The cookies don't really have a proper name apart from the family given one, referring to their shape they are called Essijiet, meaning many "S" in Maltese.
Essijiet - Maltese Tea Time Cookies
For around 60 cookies you need
plain flour 300g / 10.5 ounces
baking powder 1/2 teaspoon
granulated sugar 1 tablespoon
a pinch of salt
butter 200g / 7 ounces
vermouth 2 tablespoons
icing sugar for dusting
Combine the flour with the baking powder, sugar and salt. Cut the butter with a knife into the flour until there are just little pieces of butter left. Continue with your fingers and work the butter into the flour until combined (there shouldn’t be any lumps of butter left). Add the vermouth and continue mixing with the hooks of your mixer until you have a crumbly mixture. Form a ball, wrap in cling film and put in the fridge for an hour or in the freezer for 15 minutes.
Set the oven to 175°C / 350°F and prepare a baking sheet with parchment paper.
Cut thick slices off the dough, make thin rolls and cut into 12cm / 5" pieces. Form the cookies into an S-shape and bake for 9 minutes or until lightly golden (they stay light in colour). Let them cool for a couple minutes and dust with icing sugar.

The Best Peanut Butter Cookies Ever
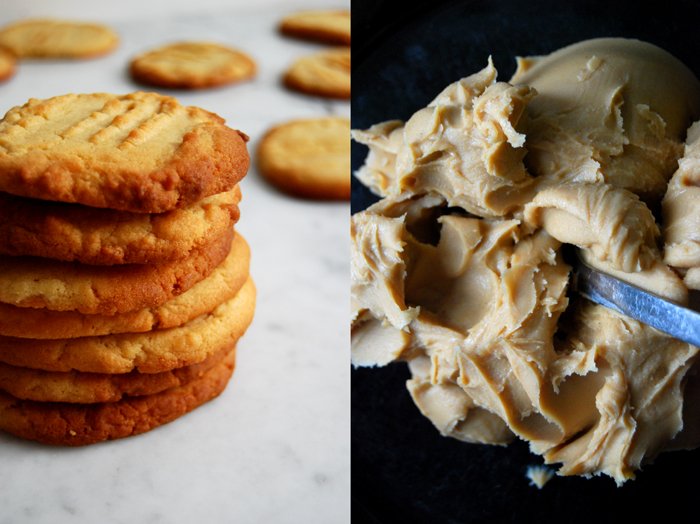
I got this recipe from a true cookie specialist - our Granny Doris from Florida. Years ago, at Christmas time, she sent us two huge parcels full of her peanut butter cookies and I fell in love with them. I ate so many I thought I would never be able to eat them again. That didn't last long. Before this experience, I never really liked peanut butter but theses cookies changed everything. They are so crunchy yet juicy and so tasty that you can't stop eating them.
These cookies are big enough as a small breakfast or mid-day snack together with a cup of coffee, they go very well with a cup of tea in the afternoon and if you don't feel like a big dessert after dinner but feel like something sweet together with your espresso just grab one. I bake them in very big batches exactly for this reason!

Peanut Butter Cookies
For 50 cookies you need
plain flour 280g / 10 ounces
baking soda 2 teaspoons
salt 1/4 teaspoon
butter 250g / 9 ounces
peanut butter (smooth not crunchy!) 350g / 12.5 ounces
Demerara sugar 280g / 10 ounces
organic eggs 2
Set the oven to 180°C / 355°F and prepare a baking sheet with parchment paper.
Combine the flour, baking soda and salt.
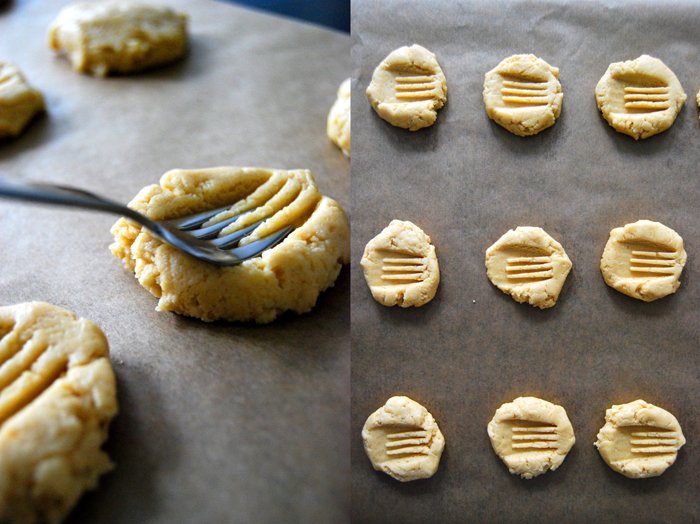
In a large bowl, beat the butter until fluffy, add the sugar and continue mixing for a minute. Mix in the eggs, one at a time, add the peanut butter and beat until combined. Add the dry ingredients gradually and mix well. Shape the dough into walnut sized balls and place on the lined baking sheet leaving plenty of space in between each dough ball. Flatten lightly with a fork and bake for 9-10 minutes or until golden. It will seem as though they are a bit under done when they first come out but that's a good thing. Leave them to cool on the baking sheet for a couple minutes before you cool them completely on a wire rack.


The Family Cookies
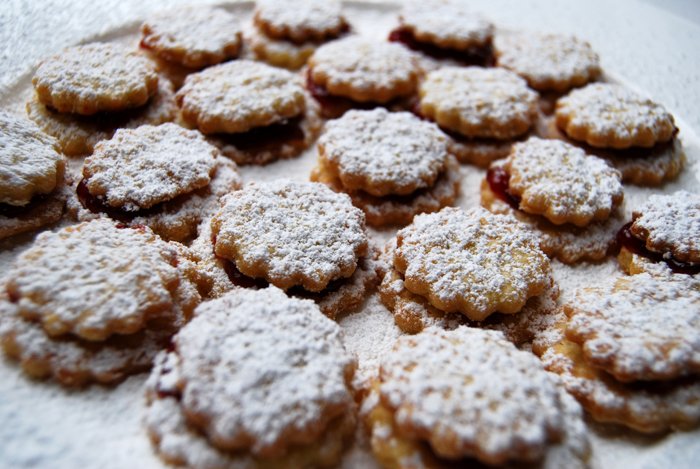
My mother started the tradition of these precious stacked Christmas cookies. They are little divas, very delicate, you have to be gentle with them as they are a bit fragile but they are worth all the effort - trust me! Apart from the fact that they look simply stunning, the buttery short crust of these cookies is one of the best I ever had. Just perfect, buttery but still light, flaky - they will melt in your mouth.
The dough isn't much work at all. It needs to sit for half an hour and then you can start cutting out your cookies, baking and assembling them, with redcurrant jam or jelly in between. Some sugar dusting on top and they are done. You should just handle them with care and appreciate that you have something very precious and delicate between your fingers.
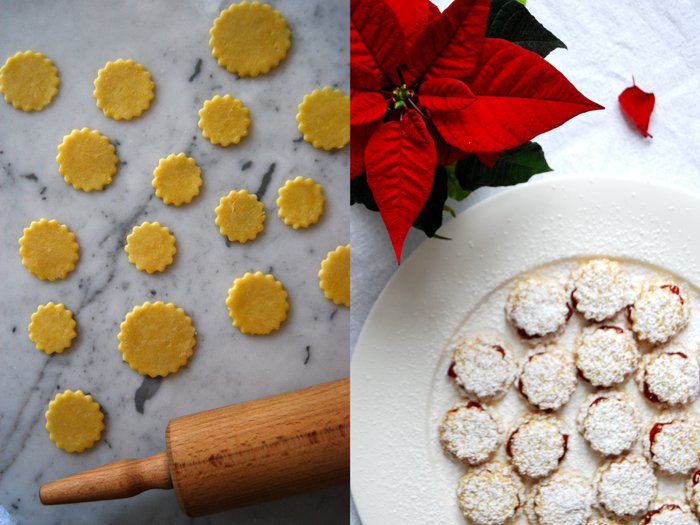
Linzer Cookies
For 60 sandwich cookies you need
plain flour 250g / 9 ounces
butter, cold 150g / 5 ounces
egg yolks 2
granulated sugar 2 tablespoons
a pinch of salt
cold water, 3 tablespoons
redcurrant jam or jelly
icing sugar, for dusting
You need round cookie cutters in 2 or 3 different sizes (mine are 3.5cm / 1 1/2" and 4.5cm / 1 3/4").
Combine the flour with the sugar and salt. Cut the butter with a knife into the flour until there are just little pieces of butter left. Continue with your fingers and quickly work the butter into the flour until combined. Add the egg yolks and the water, continue mixing with the hook of your mixer until you have a crumbly mixture. Form a disc, wrap in cling film and put in the freezer for 30 minutes.
Preheat the oven to 175°C / 350°F and prepare a baking sheet with parchment paper.
Roll the dough out thinly (about 2-3mm) between cling film and cut out your cookies with a floured cookie cutter. If you want to have 2 different sizes cut out an equal amount of cookies with each cookie cutter. Place your cookies on a baking sheet and bake them for 8 minutes or until golden but not dark. Let them cool for a minute or two. Place 1/4 teaspoon of jam on a bigger cookie and put a smaller one on top. Press a little bit but not too much as they might break. Let them cool completely and dust with icing sugar.
Enjoy their beauty and - when you're ready - pile them up carefully in a cookie box.

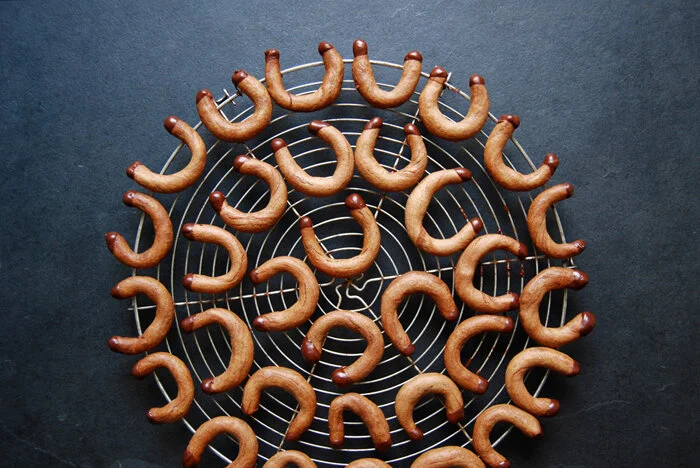
Gianduja and Chocolate Cookies
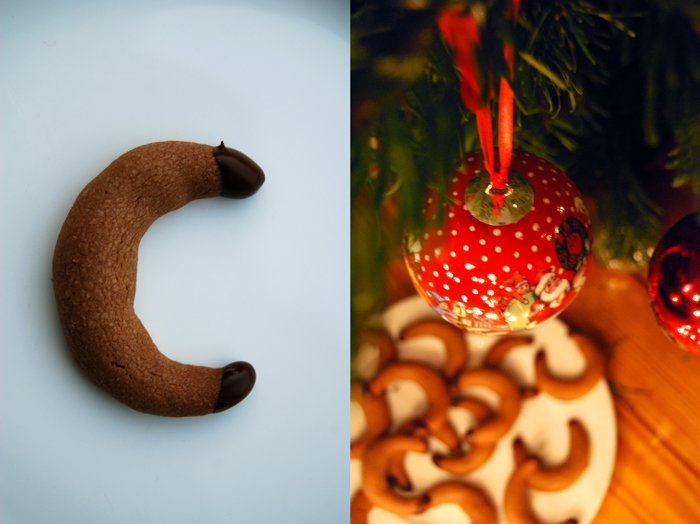
When I made these cookies the first time many Christmases ago I knew that a tradition was born. Every year, in December, I need a box of these crescent shaped cookies stuffed with Gianduja, which is also known as nougat in Germany and Austria and gives them their name: Nougat Kipferl. This nougat is made of chocolate and hazelnuts - different to the white nougat (or "Turkish honey") which is made of almonds and honey.
Another weekend, another Kipferl! These aren't as tender as the Vanilla Kipferl which I made last week, they are more dense, but still crumbly. I add lots of Gianduja to the dough because I want more than just a hint of this taste. The bittersweet chocolate on the Kipferl's feet isn't just for decoration - it takes away a bit of the sweetness. The amounts I use in my recipe aim for a bigger batch of 90 cookies as I enjoy this pleasure just once a year.
Gianduja and Chocolate Cookies - Nougat Kipferl
For 90 cookies you need
butter, soft, 100g / 3.5 ounces
Gianduja / nougat for baking, soft, 250g / 9 ounces
organic egg 1
plain flour 320g / 11 ounces
baking powder 3/4 teaspoon
vanilla sugar 1 tablespoon
a pinch of salt
bittersweet chocolate 70g / 2.5 ounces
Mix the butter together with the nougat, this works best with dough hooks. Add the egg and continue mixing. Add the flour, vanilla sugar, baking powder and the salt and mix to a dough ball. Form a thick disc, wrap in cling film and put in the freezer for 45 minutes.
Preheat the oven to 180°C / 355°F and prepare a baking sheet with parchment paper.
Melt the chocolate.
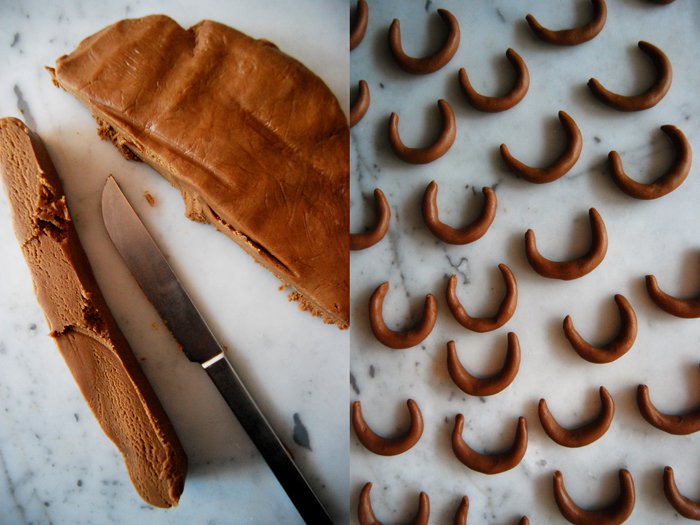
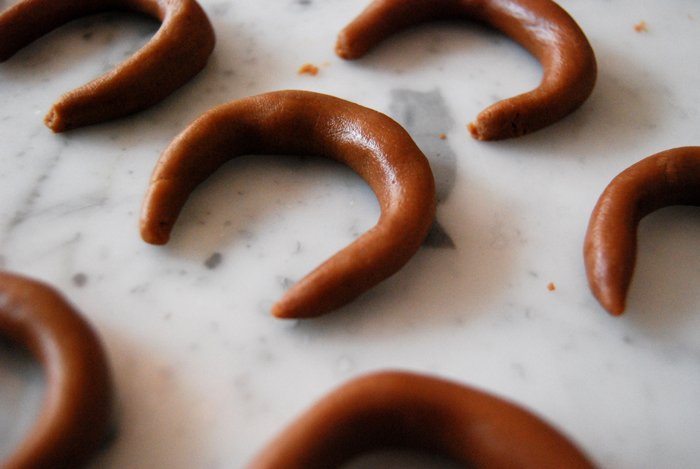
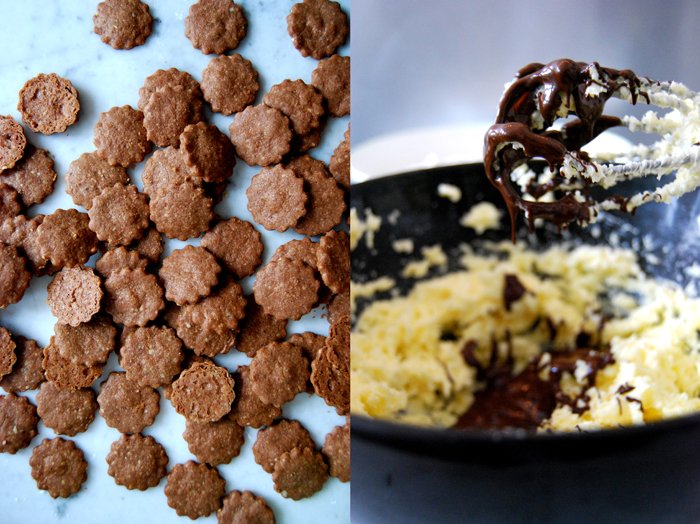
Take the dough out of the freezer. Cut thick slices off the disc and cut these slices in walnut sized pieces. Roll your cookies into the Kipferl shape between your hands. Mind that the ends don't get too thin as they would burn. Place your cookies on a baking sheet and bake for 8 minutes. Don't let them get too dark. Let them cool completely before you start dipping their two tips into the melted chocolate.

Dark Chocolate and sweet Apricot Cookies
John Fahey's Christmas songs are playing in the background, the tree is lit up and my second Christmas cooking baking session can start. Happy Advent!
Today's cookies are a lovely combination of dark chocolate and sweet apricot jam. The texture is light and crumbly enriched with the juiciness of the jam. The dough is made with ground hazelnuts which adds a nice nuttiness and - like yesterday's Kipferl - they are so easy to prepare!
These cookies put me in a real time warp. I used to love them as a child and I gobbled up boxes of them. But as I tried out so many different recipes over the years I forgot about them. But now they are back in my cookie boxes!
Update, December 2023: Today, 10 years after I posted this recipe, a friend pointed out that these cookies taste like the famous Austrian Sachertorte. It’s true!
Chocolate Cookies with Apricot Jam
For 70 double cookies you need
plain flour 350g / 12 ounces
hazelnuts, ground, 100g / 3.5 ounces
sugar 100g / 3.5 ounces
butter, soft, 250g / 9 ounces
bittersweet chocolate, melted, 200g / 7 ounces (100g / 3.5 ounces for the dough and the rest for topping)
a pinch of salt
apricot jam for the filling
You need a round cookie cutter (about 3,5 cm / 1 1/2").
Melt half of the chocolate. Combine the flour with the ground hazelnuts and the salt. Mix the butter together with the sugar till fluffy, add the melted chocolate and mix again. Mix the butter mixture together with the flour mixture. Form a ball, wrap in cling film and put in the fridge for 60 - 90 minutes.
Preheat the oven to 160°C / 320°F, prepare a baking sheet with parchment paper and melt the rest of the chocolate.
Roll the dough out thinly (about 2-3mm) between cling film and cut out your cookies with a floured cookie cutter. Bake them for 7-9 minutes, they shouldn't get too dark. Let them cool.
Brush half of your cookies with the melted chocolate.
Cover each of the remaining cookies with 1/4 teaspoon of jam and place a chocolate topped cookie on top. Let the chocolate dry completely and then: fill your cookie boxes!


Vanilla Kipferl take over my kitchen
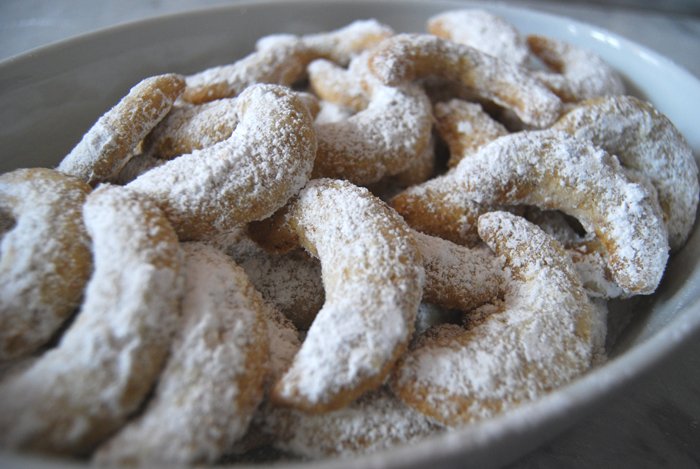
The kitchen smells amazing. As soon as the Vanilla Kipferl are out of the oven they spread their sweetest, buttery smell. These small, crescent shaped cookies are perfect for the Advent season. They taste and look absolutely wonderful and the vanilla icing sugar dusting on top fits to the weather perfectly - it just started snowing!
Kipferl traditionally come from the South of Germany and their pastry is light and crumbly. A Vanilla Kipferl is a very delicate cookie with a buttery taste and a hint of vanilla. Don't be deceived by their look, elegant as they may appear they are very easy to prepare. All you need is flour, butter, ground hazelnuts (or almonds) and sugar for the dough and icing sugar - enhanced with vanilla - for the dusting.
Update: Click here for more Christmas baking recipes!

Vanilla Kipferl
Makes about 60 kipferl
all-purpose flour 280g / 2 cups plus 2 tablespoons
ground hazelnuts or ground almonds 100g / 1 cup
granulated sugar 70g / 1/3 cup
fine sea salt 1/8 teaspoon
unsalted butter, cold, 200g / 3/4 cup plus 2 tablespoons
confectioners' sugar 100g / 1 cup
vanilla sugar 3 tablespoons (you can make your own vanilla sugar by mixing the scraped out seeds of 1/4 vanilla pod with 50g / 1/4 cup of granulated sugar)
Combine the flour, hazelnuts, granulated sugar and salt. Add the butter and use a knife to cut the butter into the flour until there are just small pieces left. Continue with your fingers and quickly rub the butter into the flour until combined then mix, using the dough hooks, with an electric mixer until crumbly. Form the dough into a 3 cm / 1 1/4" thick disc, wrap in plastic wrap and refrigerate for about 30 minutes or until relatively firm, or freeze for about 10 minutes.
Preheat the oven to 180°C / 350°F (preferably convection setting) and line 3 baking sheets with parchment paper.
Sift and mix the confectioners' sugar and vanilla sugar.
Take the dough out of the fridge and cut off a 2.5 cm / 1" thick slice, keep the remaining dough in the fridge. Cut the slice of dough into 1.25 cm / 1/2" thick pieces. Use your hands to quickly roll each piece of dough into a ball then shape it into a roughly 9 cm / 3 1/2" long kipferl (see the last picture). Continue shaping the remaining dough and arrange the kipferl generously spaced on the lined baking sheets.
Bake, 1 baking sheet at a time, for 11 to 12 minutes or until golden. Let the kipferl cool for 1-2 minutes. When they are too hot they might break but when they are completely cooled off the icing sugar won't stick so well.
Turn the warm kipferl gently in the vanilla confectioners' sugar mixture or sift the sugar over the kipferl. Once the kipferl are completely cool, store them in an airtight container.

